❓ What is Localazy CLI? 🔗
The Localazy CLI is a command-line interface for uploading files to the Localazy platform and downloading translations back into your project, allowing for various automatizations and advanced manipulation of the data you upload and download.
It is easy to integrate into any build chain or CI/CD system (e.g., GitHub Actions), and it supports complex projects with multiple modules, libraries, and products. CLI can also help you handle uploading existing translations in case of migration from other solutions.
👩💻 Installation 🔗
The first step is to download and install the Localazy CLI. Depending on the requirements of your system and the preferences of the project, the Localazy CLI offers multiple installation options to choose from.
Learn more about CLI: Installation
The Localazy CLI can be installed on multiple platforms as a native application (including Windows, Linux, and macOS), a Java JAR, an npm package, and a Docker image. In this guide, the Localazy CLI will be installed from the npm repository:
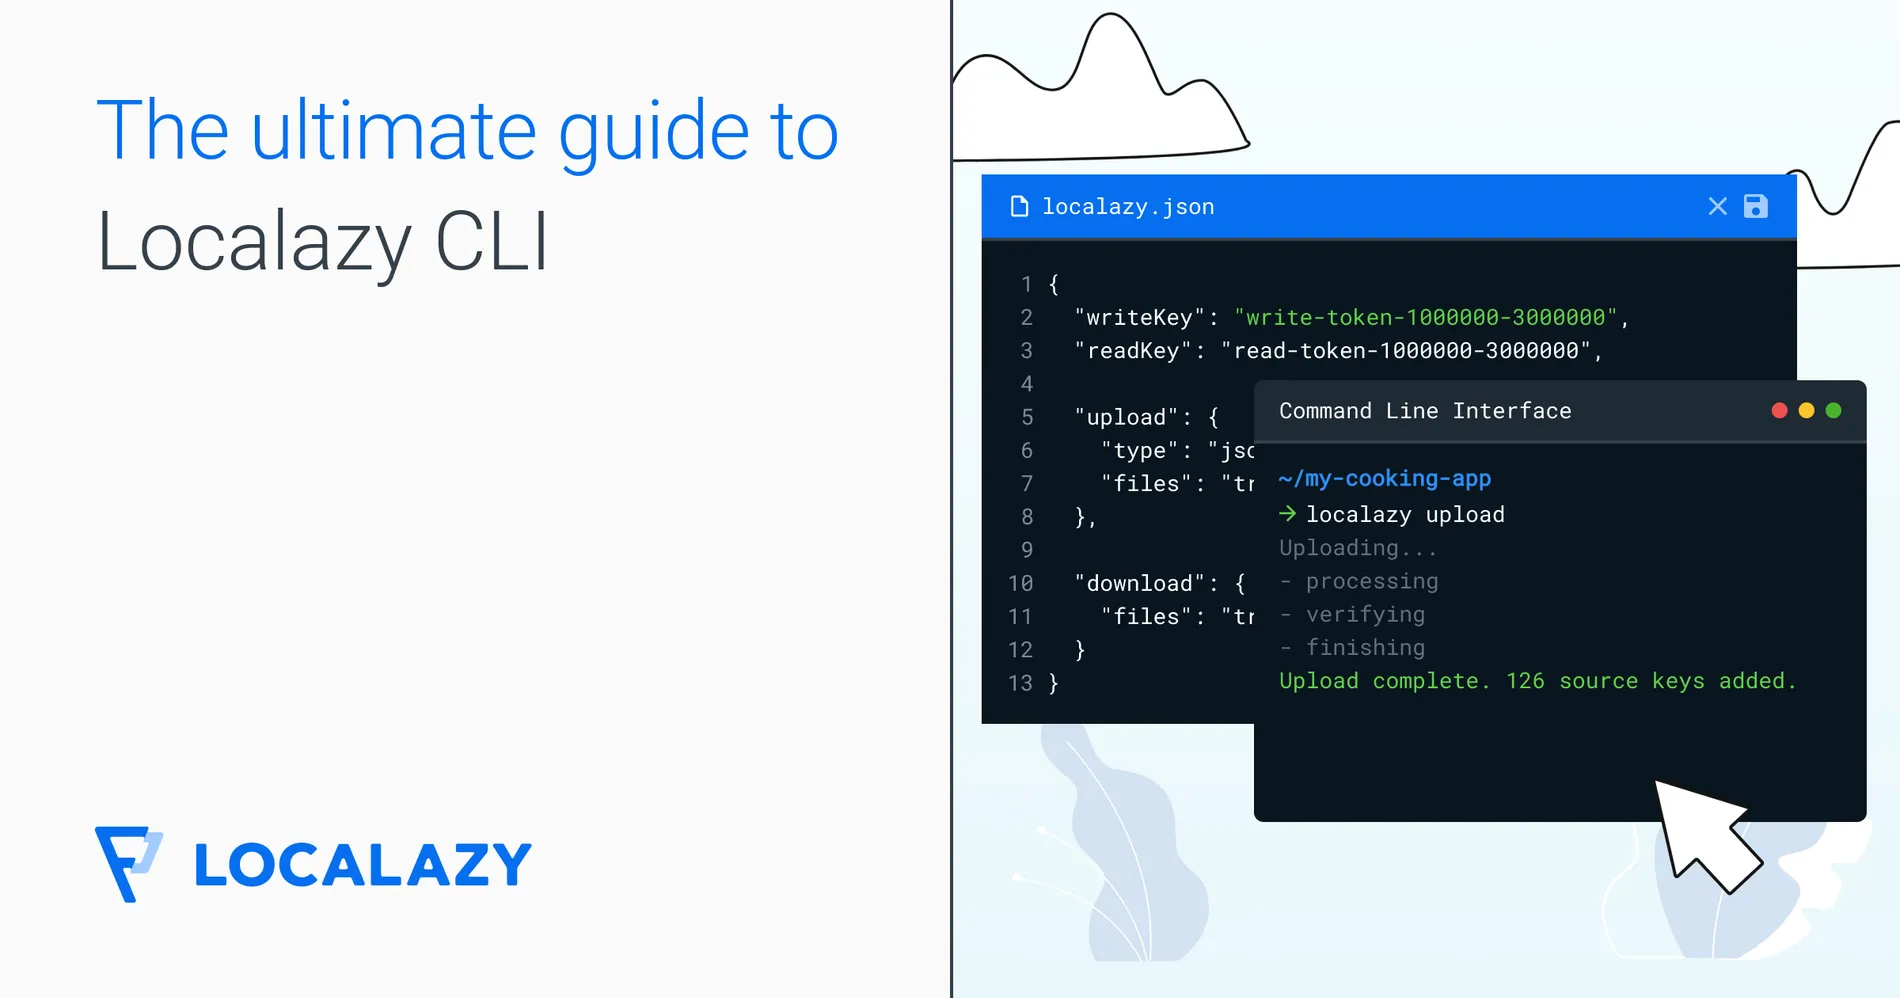
npm install -g @localazy/cliThe typical Localazy CLI usage pattern across all platforms is as follows:
localazy [command] [common options] [groups] This article will cover the most important command options available in the Localazy command line interface.
🕹️ Configuration 🔗
To demonstrate the options of the Localazy CLI, we will use the Localazy features to translate a simple React web page. The code for the front end can be found in this repository.
Simple upload configuration for JSON 🔗
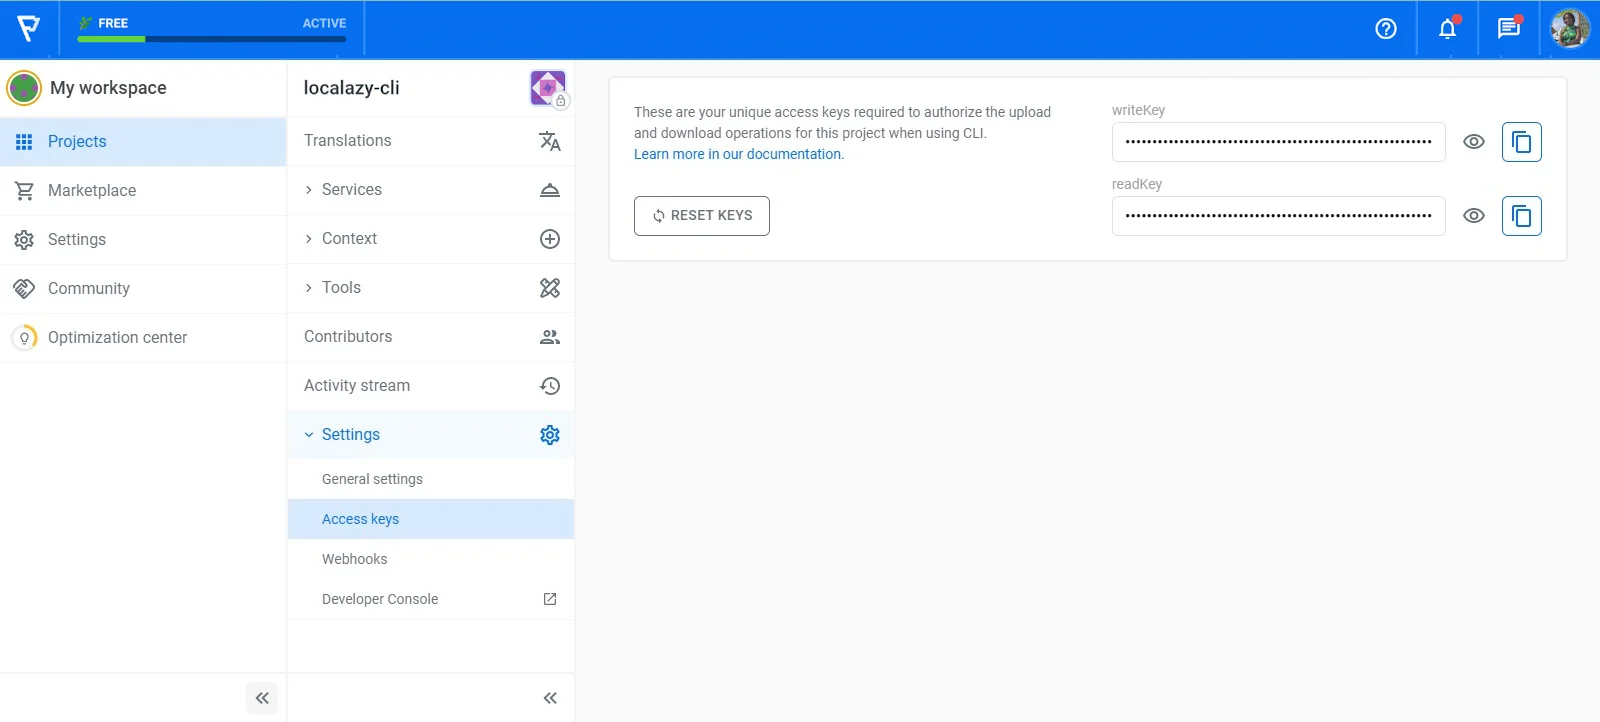
In order to use the CLI commands with our Localazy project, we must authorize our access to the project using the writeKey and readKey in our configuration.
Create a new project from your Dashboard or obtain the keys for your project by navigating to Project - Settings - Access keys in the menu.
In your application's root directory, create a configuration script named localazy.json that instructs the CLI tool on which files to upload and how to handle downloaded translations. Add the following snippets of code:
{
 "writeKey": "app-write-key",
 "readKey": "app-read-key",


 "upload": {
   "type": "json",
   "files": "public/locales/en/translation.json"
 },


 "download": {
   "files": "public/locales/cs/translation.json"
 }
}
The above JSON file contains a writeKey and a readKey you can find in the settings mentioned above. The upload command configuration then includes the type filed, which specifies that the file to be uploaded is a JSON file, and the files field, which contains the path directory of the translation file.
It can also specify how to collect files for uploading to the Localazy platform and, optionally, what metadata to include.
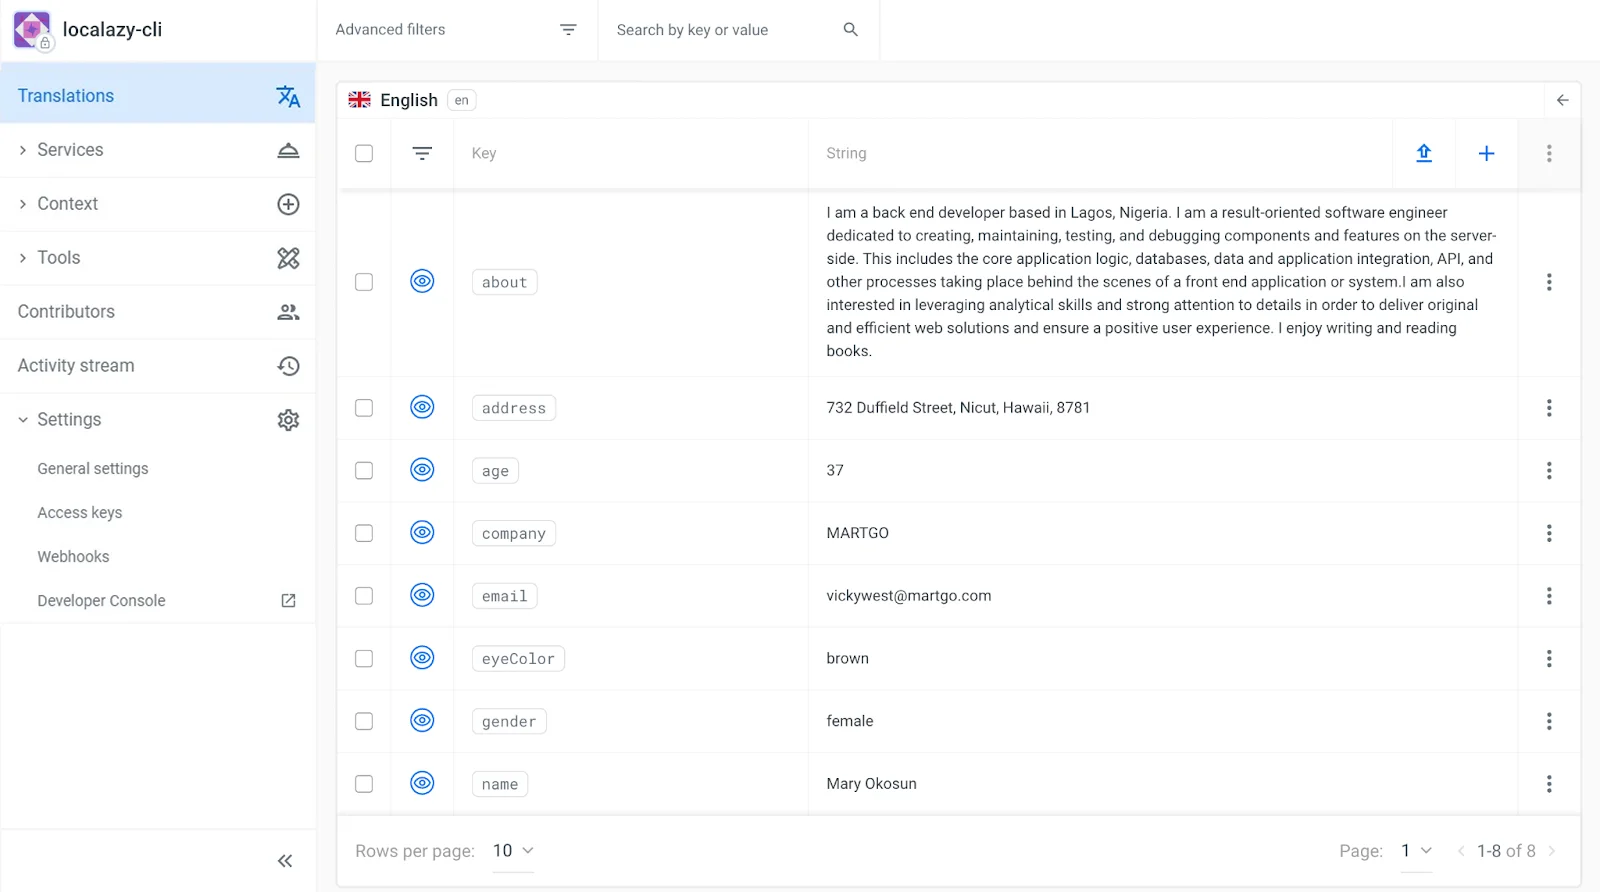
In the public/locales/en folder is a translation file containing text to be translated. Execute the following command at the terminal:
localazy uploadLearn more about CLI: Upload Reference
Translate your strings with Localazy 🔗
Navigate to the Translations tab and click on the Source language row. The content from your uploaded JSON should appear in the source language table.
Now, add a new language from the Translations page so you can translate the content using Localazy. Let's say we want to offer 🇨🇿 Czech (cs) as a language option on this web page. Once the language has been added, you can begin translating your strings.

Localazy offers three methods from which to choose and combine for your project's translation:
- 💪🏻 Translate on your own or invite contributors - You can start translating on your own and use our built-in suggestion system.
- 🦾 Translate everything in bulk via machine translation - With the Localazy Autopilot plan, you can instantly translate all strings by running a machine translation over the content. This is great for the first iteration and localization testing of any project.
- 🚩 Fully automate the translation process with the Continuous Localization services - Once your Localazy integration is set up, you can order translations from our vetted translators and get your project translated by professionals automatically. The service is also proactive, so you don't have to micromanage translators, and you can visit Localazy only once in a while to check the progress.
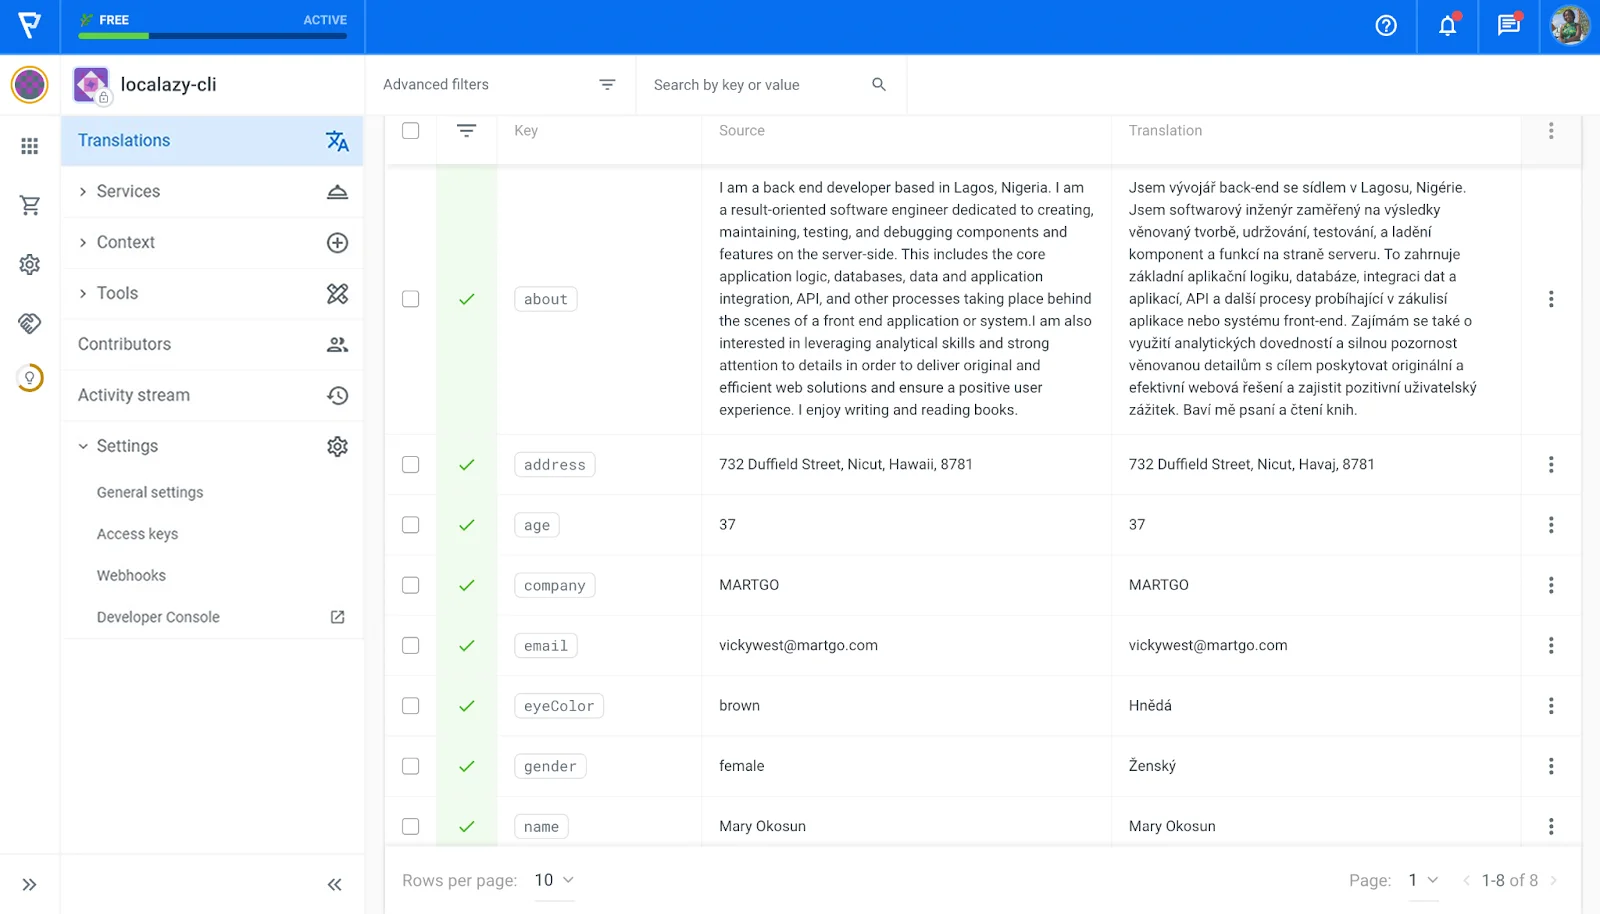
Once you translate everything, you can view the translations by clicking on the name of the language in the Translations view.
Learn more about translating strings in Localazy
Download translations using the CLI 🔗
To download the translations, you can now use the download command. Execute the following command at the terminal:
localazy downloadThe download code snippets can be found within the localazy.json file, just below the upload object.
The download object specifies where the translated files should be saved. The translated file translation.json would be saved in the public/locales/cs folder in our example.
{
 "about": "Jsem vývojář back-end se sídlem v Lagosu, Nigérie. Jsem softwarový inženýr zaměřený na výsledky věnovaný tvorbě, udržování, testování, a ladění komponent a funkcí na straně serveru. To zahrnuje základní aplikační logiku, databáze, integraci dat a aplikací, API a další procesy probíhající v zákulisí aplikace nebo systému front-end. Zajímám se také o využití analytických dovedností a silnou pozornost věnovanou detailům s cílem poskytovat originální a efektivní webová řešení a zajistit pozitivní uživatelský zážitek. Baví mě psaní a čtení knih. ",
 "address": "732 Duffield Street, Nicut, Havaj, 8781",
 "age": 37,
 "company": "MARTGO",
 "email": "vickywest@martgo.com",
 "eyeColor": "Hnědá",
 "gender": "Ženský",
 "name": "Mary Okosun"
}
The react package react-i18next will be used to handle changes to translated languages. You can now switch between languages in the web page's user interface and see the page's content adapt based on the language you choose.


Learn more about CLI: Download Reference
Upload existing translations 🔗
When making changes to your translations, it's recommended to only modify and upload the source language and use the Localazy platform to manage the rest. But, in some instances, like migration from other tools, we might want to upload files that have already been translated elsewhere.
The first step is to specify the file's language. The source language file should then be separated from the translated files. The best practice is to upload the source language and other translations separately using groups.
{

  "upload": {
    "files": [
      {
        "pattern": "src/resources/localization/strings_en.json",
        "lang": "inherited"
      },
      {
        "group": "existing",
        "pattern": "src/resources/localization/strings_*.json",
        "excludes": ["src/resources/localization/strings_en.json"],
        "lang": "${autodetectLang}"
      }
    ]

  }
}
The above code snippets define two groups. The first group uploads the strings_en.json source file, while the second group, named existing, uploads everything besides the source language.
Invoke localazy upload existing to upload all existing translations and then simply use localazy upload to upload changes to the source language.
Learn more about Uploading Existing Translations with Localazy CLI
🚀 Advanced configurations 🔗
The Localazy CLI offers many advanced options to further customize your workflow and adapt the features to your project.
Variables 🔗
Variables can be used to construct output paths for translated files and to send data along with files for conditions or transformations to the server. Variables are always referenced with $variable_name. Only letters and the underscore character are permitted in variable names. It is important to note that a variable's value is always a string.
There are a few variables that primarily serve major functions, such as the upload variables and the download variables.
Upload variables are accessible when the Localazy CLI is collecting files for server upload.
Examples of upload variables include the following:
$file - This is the filename without the path of the translated file, such as translation.json.
$path - This is the path to the translated file without the file name, for example, public/locales/en.
$fullPath - This is the full path to the translated file, including the file name, for example, public/locales/en/translation.json.
Download variables become available when the Localazy CLI is processing downloaded translated files.
It is important to upload accurate metadata, as the majority of download variables are those that were previously sent during file uploading.
Examples of the download variables include:
${fileExt} - This is the file extension, e.g., json
$languageCode - This is the language code for the translated file, such as cs.
$fullPath - This is the full path to the translated file, including the file name, for example, public/locales/en/translation.json.
Learn more about using variables in your CLI configurations
Transformations 🔗
Transformations enable the processing of input variables and the inference of new variables. This is very beneficial for automating the workflow. For example, a language code can be obtained from a file's name or path.
In the following code snippets, a new variable called path_lang is created from the source string $path using a couple of operations. These operations are performed in a specific order, with the subsequent operation being performed on the result of the previous one.
//localazy.json
{
  "transformations": [

    {
        "name": "path_lang",
        "source": "${path}",
        "operations": [
          "substringAfter: ./",
          "substringBefore: /",
          "remove: translation-"
        ]
    }

  ]
}
Using the code snippets above, for example, if the path is ./translation-cs/test and the language is required for an upload command, the language can be retrieved from the path.
- The operation
substringAfter:./returns the substring after the first occurrence of the string specified as a parameter, resulting in translation-cs/test. - The operation
substringBefore: /returns the substring that comes before the first occurrence of the string given as a parameter, which gives translation-cs. - The operation
remove: translation-deletes all occurrences of the string given as a parameter, returningcs, which is then assigned to the variablepath_lang.
This variable can be used in the upload/download section in the future.
There are several other operations available, which are detailed in the docs.
Excluding Keys 🔗
During upload and format conversion, keys can be included or excluded. For file uploads, it is possible to filter out sensitive or unwanted strings, and it is defined directly in the upload section.
For format conversion, it is possible to filter out strings that do not need to be included in the converted file (e.g., platform-specific texts), and it is defined separately for each action. Strings are always filtered according to their keys' rules.
These filtering rules can be specified using keySeparator, includeKeys, and excludeKeys.
The keySeparator is used to create structured keys for includeKeys and excludeKeys.
A period (.) is the default value for a keySeparator.
Each rule for includeKeys and excludeKeys has the format OPERATION:parameter.
{
  "keySeparator": ".",
  "includeKeys": ["MATCH:my_key"],
  "excludeKeys": ["PREFIX:my_key"]
}
In the above code snippets, the includeKeys rule is only valid if the key exactly matches my_key. During upload or format conversion, all keys with a prefix of my_key are excluded.
If includeKeys is empty or missing, all texts are processed except those excluded by excludeKeys.
Only explicitly included texts are processed if includeKeys is not empty.
The rules in excludeKeys are more important than those in includeKeys. That is, if the same text matches a rule in both includeKeys and excludeKeys, it is ignored.
Find more detailed examples and learn more about Excluding String Keys with Localazy CLI
Format Conversions 🔗
By including a conversion section in your localazy.json file, translated files can be converted between different formats.
Please note that the Format Conversions feature is available only with the Professional Plan and above.
Additionally, you can filter content, modify how plurals and string arrays are stored, convert files to multilingual formats, etc. The conversion section functions similarly to the download section, and the same variables can be used. Conversions are processed alongside downloading when localazy download is invoked. If only conversions are required, you may omit the download section from your configuration file. Additionally, groups can be used to separately process downloads and conversions.
{
	"conversion": {
        "actions": {
          "group": "convert-files",
          "output": "converted/${file}",
          "conditions": "startWith: ios_, ${file}",
          "changeExtension": "json",
          "type": "json-multilingual",
          "pluralType": "plural_icu",
          "forcePluralType": true,
          "filterArray": true
        }
  }
}
From the snippets above,
- group: This code is only executed when the
localazy download convert-filescommand is invoked. - conditions: It only applies to files whose names begin with ios_.
- type && output: The files are converted to multilingual JSON and saved in
converted/$file. - changeExtension: The extension of such files is changed to json; for example, ios_menu.xml is saved as ios_menu.json.
- pluralType && forcePluralType: All plurals are forced to be in plural_icu format.
- filterArray: String arrays are all filtered out.
Learn more about CLI: Format Conversions in the documentation.
🗂️ File Formats 🔗
Files scheduled for upload to Localazy can be in a variety of formats. Localazy supports over 25 file formats and their variants. Some of the most commonly used formats are detailed further below.
PO/POT 🔗
PO and POT are text-based formats used for localization in a variety of applications, including localization.
PO is an abbreviation for Portable Object File. POT is an abbreviation for Portable Object Template. The gettext library and WordPress CMS, for instance, use PO and POT files to manage multilingual software and websites.
Localazy allows for the seamless management of PO and POT file translations. An example of a PO file is the following:
msgid "This is the original text"
msgstr "The translated content comes here"The upload object in the localazy.json file has a features configuration that can have a use_key_for_content enabled. This indicates that the msgid should be used as as content when msgstr is empty.
msgid "Sorry, comments are closed for this item."
msgstr ""
{
"upload": {
...
"features": ["use_key_for_content"],
}
}When working with empty translations, there are two options you can use in features in the upload section.
- ignore_blank_content
Empty translations in the input file are considered valid translations by default. Using an empty translation is a valid case for a variety of reasons. When this option is enabled, translations that are empty are filtered out, and the string is considered untranslated.
{

  "upload": {
    ...
    "features": ["ignore_blank_content"],
  }

}- empty_untranslated
Using empty_untranslated instructs Localazy to render untranslated strings as empty translations. Empty translations in the input file are considered valid translations by default. Using an empty translation is a valid case for a variety of reasons. When this option is enabled, translations that are empty are filtered out, and the string is considered untranslated.
{

  "upload": {
    ...
    "features": ["empty_untranslated"],
  }
}
Localazy can be instructed to generate binary MO files instead of PO files. To enable it, add output_mo to the features section of the upload section.
{

  "upload": {
    ...
    "features": ["output_mo"],
  }

}
If you require both PO and MO files, you can use Format Conversions in your localazy.json file. For example:
{
  "readKey": "---",
  "writeKey": "---",

  "upload": {
  "files": "locales/en.po"
  },

  "download": {
    "files": "my_po_files/${lang}.po"
  },

  "conversion": {
    "actions": {
      "type": "mo",
      "output": "my_mo_files/${lang}.mo"
    }
  }

}
XML 🔗
The Android XML format, including array-lists and plurals, is fully supported. It is simple to upload the source language, and with a number of variables for the download phase, including the pre-formatted Android language $langAndroidRes, it is also simple to store translated files in their proper location.
{

  "writeKey": "app-write-key",
  "readKey": "app-read-key",

  "upload": {
    "type": "android",
    "files": "src/main/res/values/strings.xml"
  },

  "download": {
    "files": "src/main/res/values-${langAndroidRes}/${file}"
  }

}
Localazy supports all product flavors and build types. For detecting those from the standard project structure, there are transformations androidBuildType and androidProductFlavors.
We recommend using the Localazy Gradle plugin for Android app localization because it handles uploads, downloads, and OTA (over-the-air) updates automatically. However, the CLI tool can be executed directly from the Gradle build script. Simply place the CLI binary along with the configuration file localazy.json in the app's module folder and create a task:
// Create task for running Localazy CLI.
task downloadTranslations(type: Exec) {
    executable "./localazy"
    args "download", "-q"
}

// Run the Localazy CLI task only for release versions.
android.applicationVariants.all { variant ->
    if (!variant.buildType.debuggable) {
        variant.preBuildProvider.get().dependsOn(downloadTranslations)
    }
}
XLIFF 🔗
Localazy supports XLIFF file formats for translation. This is an example of an XLIFF file:
<?xml version="1.0" encoding="UTF-8"?>
<xliff xmlns="urn:oasis:names:tc:xliff:document:1.2"
       version="1.2">

  <file original="Interface.storyboard" source-language="en" target-language="en" datatype="plaintext">
    <body>
      <trans-unit id="text1" xml:space="preserve">
        <source>Source Text 1</source>
        <target>Translated Text 1</target>
        <note>Comment for the translator.</note>
      </trans-unit>
      <trans-unit id="text2" xml:space="preserve">
        <source>Source Text 2</source>
        <target>Translated Text 2</target>
      </trans-unit>
    </body>
  </file>

</xliff>file: The attributes original, source-language, target-language, and datatype are used to obtain and store locale information.
trans-unit: The phrase is skipped if the attribute translate is set to false or no.
group: If the group element contains id, it is kept, and the stored data is structured accordingly. Without id, the group is just removed.
The entire group is skipped if the attribute translate is set to false.
Both source and target strings are processed by default, and the locale is derived from the XLIFF file. You can modify this behavior by adding the features listed in the documentation.
🎛️ Dynamic Configurations 🔗
Dynamic configuration of the upload and download commands can be handled by specifying additional parameters using the -p option in the CLI.
The default value for passing a dynamic configuration in the CLI is
localazy upload -p ${parameterName|Default value}
localazy download -p ${parameterName|Default value}For example, in the snippets below, we have a download parameter includeSourceLang that determines if the source language should be included during the download of translated files. It accepts an option of includeSourceLang if provided else, it defaults to false.
{
  "download": {
    "includeSourceLang": "${includeSourceLang|false}"
  }
}
Now, invoking the CLI to include the source language is as simple as passing true as a value for the includeSourceLang key.
localazy download -p includeSourceLang:trueA similar approach can be used in the download section to determine where the resulting files should be saved or how to filter them based on specific parameters.
Using additional parameters like this is similar to using groups in some ways, but you don't need to define the corresponding section ahead of time.
Learn more about Dynamic Configurations for Localazy CLI
🎉 Share your configuration with the community! 🔗
If you want to help other Localazy users by sharing your configuration, you can add the community section to your localazy.json file as follows:
{
  "community": {
    "author": "Your Name",
    "email": "your@email.com",
    "company": "Localazy",
    "website": "https://localazy.com",
    "tags": ["javascript", "typescript"],
    "description": "Uploading files for javascript."
  },
}
When the configuration file containing this section is uploaded to Localazy servers, it is submitted for approval to be a part of the upcoming community-sharing portal. In addition, we use these configurations to enhance our documentation and quick-start guides, as well as to implement more efficient automated solutions.
Note: Your writeKey and readKey are of no concern. Before the configuration file is shared with the community, they are automatically removed.
✔️ Conclusion 🔗
In this article, we learned how to streamline and automate localization workflow using the localazy CLI. We also learned how to perform format conversions, how Localazy supports various file formats, and how to dynamically configure Localazy CLI parameters.
Are you ready to start playing with the Localazy CLI?
Sign up and explore the possibilities of automated localization with Localazy.