It's a common story: once an app ships in more than one language, the translation files start fighting back. Keys go missing, contributors overwrite each other, and every new locale means another round of manual JSON shuffling. Localazy turns that into a sync step: upload your source strings, translate them in one place, pull the results back into your project.
In this guide, we'll build a fully localized Vue 3 app with vue-i18n and Localazy, covering dynamic values, plural rules, runtime language switching, and persistent locale selection. From there, we'll wire it up to the Localazy CLI and GitHub Actions, so adding a new language just takes one simple action.
🧱 What you’ll build
We will build a small product single page app with localization support.
The app will include:
- Product title and description translations
- Price interpolation using
{amount} - Cart messages using plural rules
- Runtime language switching
- Persistent language selection
- Automatic synchronization with Localazy
You can see the finished project here:
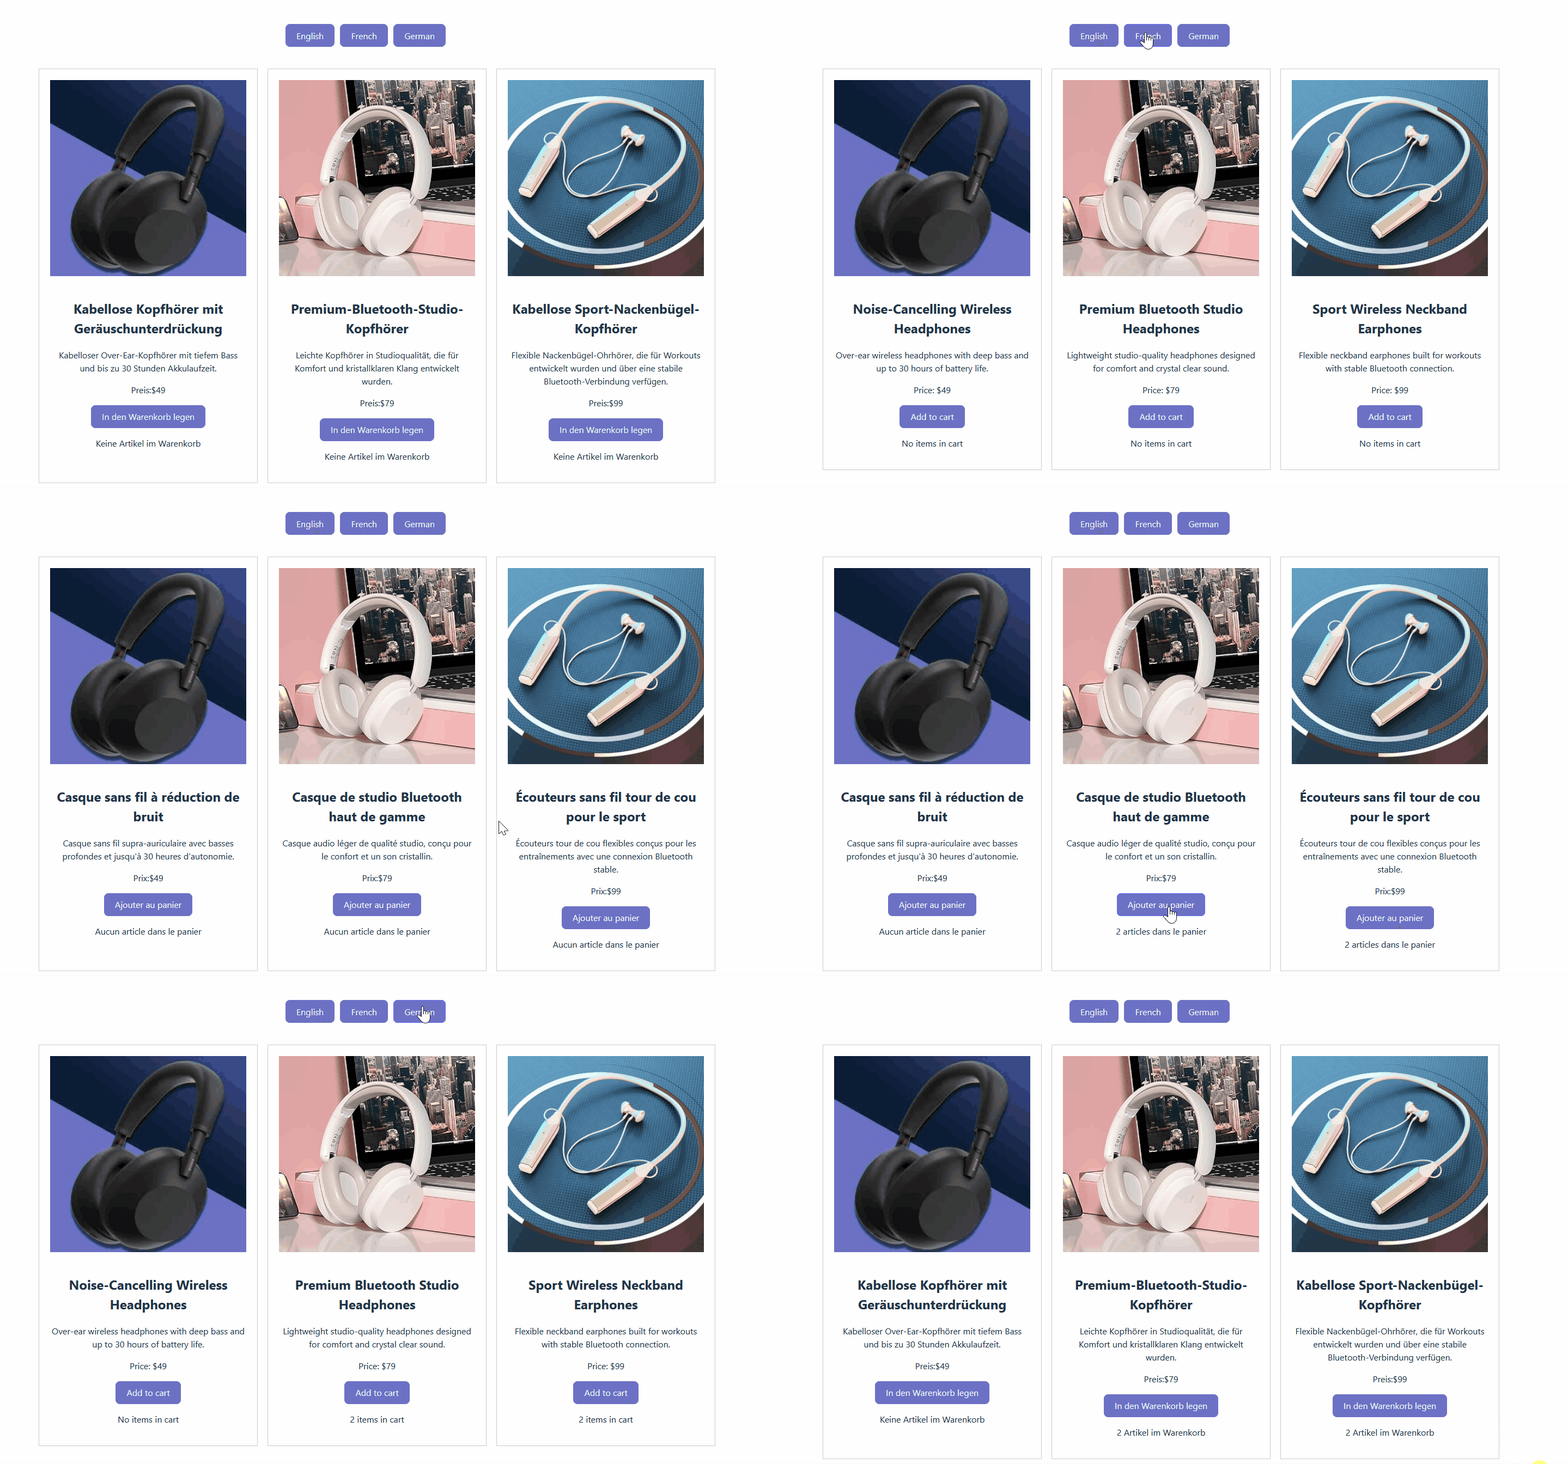
The goal is to keep the application minimal and focus mainly on the localization workflow.
🏗️ Project structure
This is the layout we'll work with:
src/
 ├── assets/
 │    └── locales/
 │         └── en.json
 ├── components/
 │    ├── ProductCard.vue
 │    └── LanguageSwitcher.vue
 ├── i18n.ts
 ├── App.vue
 └── main.ts

localazy.json
The locales folder contains translation files. The English file will be the source language that gets uploaded to Localazy. The localazy.json file will define how translations are uploaded and downloaded.
📋 Prerequisites
Before starting, make sure you have:
- Node.js installed
- npm or yarn
- Basic knowledge of Vue
- A Localazy account
1️⃣ Step 1: Create a Vue 3 app
Spin up a new Vue project with Vite:
npm create vite@latest vue-localazy-demo
This command creates a new Vue application that you will use for the localization example. If prompted, select Vue and TypeScript options.
Then start the dev server:
cd vue-localazy-demo
npm run dev
You should see a default Vue app running locally.
2️⃣ Step 2: Install vue-i18n
Install vue-i18n, which handles translation lookups inside Vue components:
npm install vue-i18n
It stores translations in JSON files and exposes them through translation keys, with built-in support for parameters and plural messages, both of which we'll use on the product page.
With that installed, we can create the first translation file.
3️⃣ Step 3: Create the source translation file
Create the folder that will contain all our translation files:
src/assets/locales
Then add the file:
src/assets/locales/en.jsonWith the following content:
{
  "product": {
    "priceLabel": "Price: {amount}"
  },
  "product1": {
    "title": "Noise-Cancelling Wireless Headphones",
    "description": "Over-ear wireless headphones with deep bass and up to 30 hours of battery life."
  },
  "product2": {
    "title": "Premium Bluetooth Studio Headphones",
    "description": "Lightweight studio-quality headphones designed for comfort and crystal clear sound."
  },
  "product3": {
    "title": "Sport Wireless Neckband Earphones",
    "description": "Flexible neckband earphones built for workouts with stable Bluetooth connection."
  },
  "cart": {
    "add": "Add to cart",
    "items": "No items in cart | One item in cart | {count} items in cart"
  },
  "language": {
    "english": "English",
    "french": "French"
  }
}
This is the source language file. Localazy treats it as the reference for every other locale, so keep it complete and up to date. Translations for other languages will be generated from these keys.
4️⃣ Step 4: Build the demo UI
The UI we'll build is intentionally minimal. Just enough surface to exercise translation keys, parameters, plural rules, and language switching.
Build the product card
Create the component:
src/components/ProductCard.vue
This component will display the product information and a small cart counter.
<script setup lang="ts">
import { ref } from "vue";
import { useI18n } from "vue-i18n";
const { t } = useI18n();

defineProps<{
  image: string;
  title: string;
  description: string;
  price: string;
}>();

const count = ref(0);

function addToCart() {
  count.value++;
}
</script>

<template>
  <div class="product">
    <img :src="image" class="product-image" />
    <h2>{{ t(title) }}</h2>
    <p>{{ t(description) }}</p>
    <p>
      {{ t("product.priceLabel", { amount: price }) }}
    </p>
    <button @click="addToCart">
      {{ t("cart.add") }}
    </button>
    <p>
      {{ t("cart.items", count) }}
    </p>
  </div>
</template>
src/style.css:
.product {
  border: 1px solid #ccc;
  padding: 20px;
  position: relative;
  width: 100%;
}

.product-image {
  width: 100%;
  margin-bottom: 15px;
}

button {
  margin-left: 5px;
  margin-right: 5px;
  background-color: #6c71c5;
  color: #f9f9f9;
}
The component uses translation keys instead of hardcoded text. The price label uses a parameter:
{amount}
vue-i18n replaces this value at runtime. The cart message uses plural rules:
{count}
This allows the message to change depending on how many items are in the cart. When you pass a numeric count to t(), vue-i18n selects the correct plural form based on the active language.
Create the language switcher
Next, we'll create a component that allows switching between languages.
Add the following code in src/components/LanguageSwitcher.vue:
<script setup lang="ts">
import { useI18n } from "vue-i18n"

const { locale } = useI18n()

function changeLanguage(lang: string) {
    locale.value = lang
    localStorage.setItem("locale", lang)
}
</script>

<template>
    <div>
        <button @click="changeLanguage('en')">
            English
        </button>
        <button @click="changeLanguage('fr')">
            French
        </button>
    </div>
</template>
This component changes the active locale at runtime and stores the selected language in localStorage, so the same language is used when the user reloads the page.
5️⃣ Step 5: Configure vue-i18n
Now that the translation file and components are ready, we can configure vue-i18n and register it in the app.
Create i18n.ts
Create src/i18n.ts with the following code:
import { createI18n } from "vue-i18n"
import en from "./assets/locales/en.json"

const savedLocale = localStorage.getItem("locale") || "en"

export const i18n = createI18n({
  legacy: false,
  locale: savedLocale,
  fallbackLocale: "en",
  messages: {
    en
  }
})
legacy: false switches vue-i18n into Composition API mode, which is required for useI18n() to work inside <script setup>, the pattern our components use. The rest of the config loads the English translations and sets English as the fallback, so if a key is missing in another language, vue-i18n renders the English value instead of empty text.
Register i18n in main.ts
Open src/main.ts and register the plugin:
import { createApp } from 'vue'
import './style.css'
import App from './App.vue'
import { i18n } from "./i18n"

createApp(App).use(i18n).mount('#app')
This makes translation functions available in all components. At this point, the application should run normally using English translations.
Next, replace the default Vite template in src/App.vue with the localized layout:
<script setup lang="ts">
import ProductCard from "./components/ProductCard.vue";
import product1 from "./assets/img/headphone1.jpg";
import product2 from "./assets/img/headphone2.jpg";
import product3 from "./assets/img/headphone3.jpeg";
import LanguageSwitcher from "./components/LanguageSwitcher.vue";
</script>

<template>
  <div class="page">
    <div class="language-bar">
      <LanguageSwitcher />
    </div>
    <div class="products">
      <ProductCard :image="product1" title="product1.title" description="product1.description" price="$49" />
      <ProductCard :image="product2" title="product2.title" description="product2.description" price="$79" />
      <ProductCard :image="product3" title="product3.title" description="product3.description" price="$99" />
    </div>
  </div>
</template>
The default Vite page contains a demo layout that we no longer need, so this will ensure that the app shows our localized components.
style.css:
.products {
  display: grid;
  grid-template-columns: repeat(3, minmax(0, 1fr));
  gap: 60px;
}

@media (max-width: 900px) {
  .products {
    grid-template-columns: repeat(2, minmax(0, 1fr));
  }
}

@media (max-width: 600px) {
  .products {
    grid-template-columns: 1fr;
  }
}
You can test this by running:
npm run dev
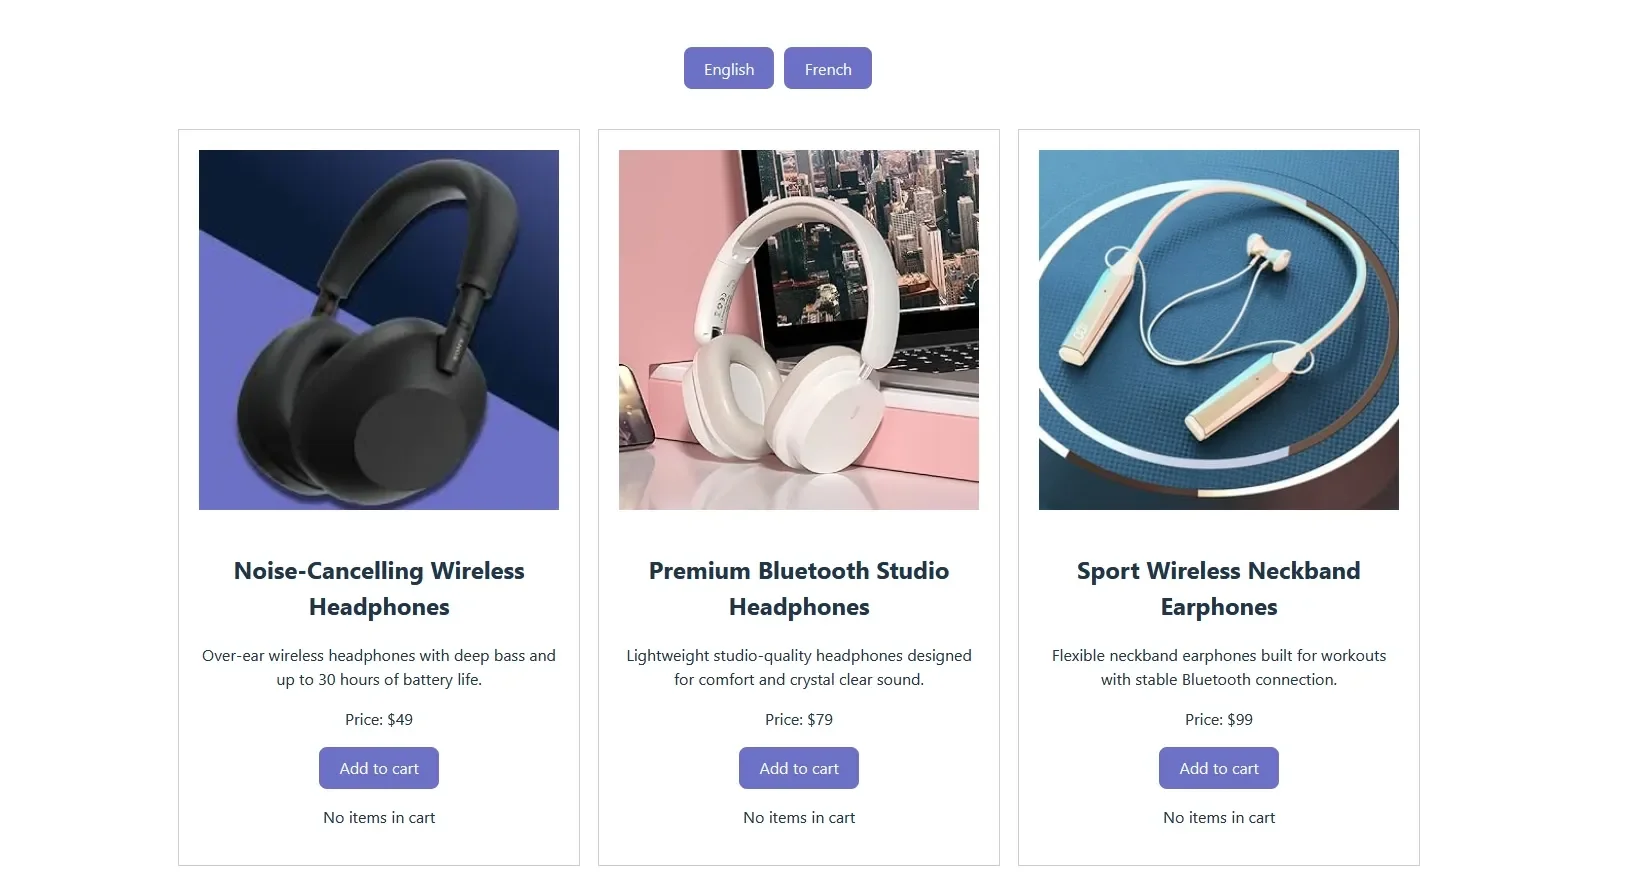
And the interface should display the product text from en.json:
From here, you are all set up to start managing your translations.
6️⃣ Step 6: Connect the project to Localazy
Next, we'll connect the project to Localazy so translations can be synchronized automatically.
Localazy uses a configuration file and CLI commands to upload and download translation files.
Create a Localazy project
Create a project at Localazy, then open the Integrations > Integrations overview > Vue.js Integration section.
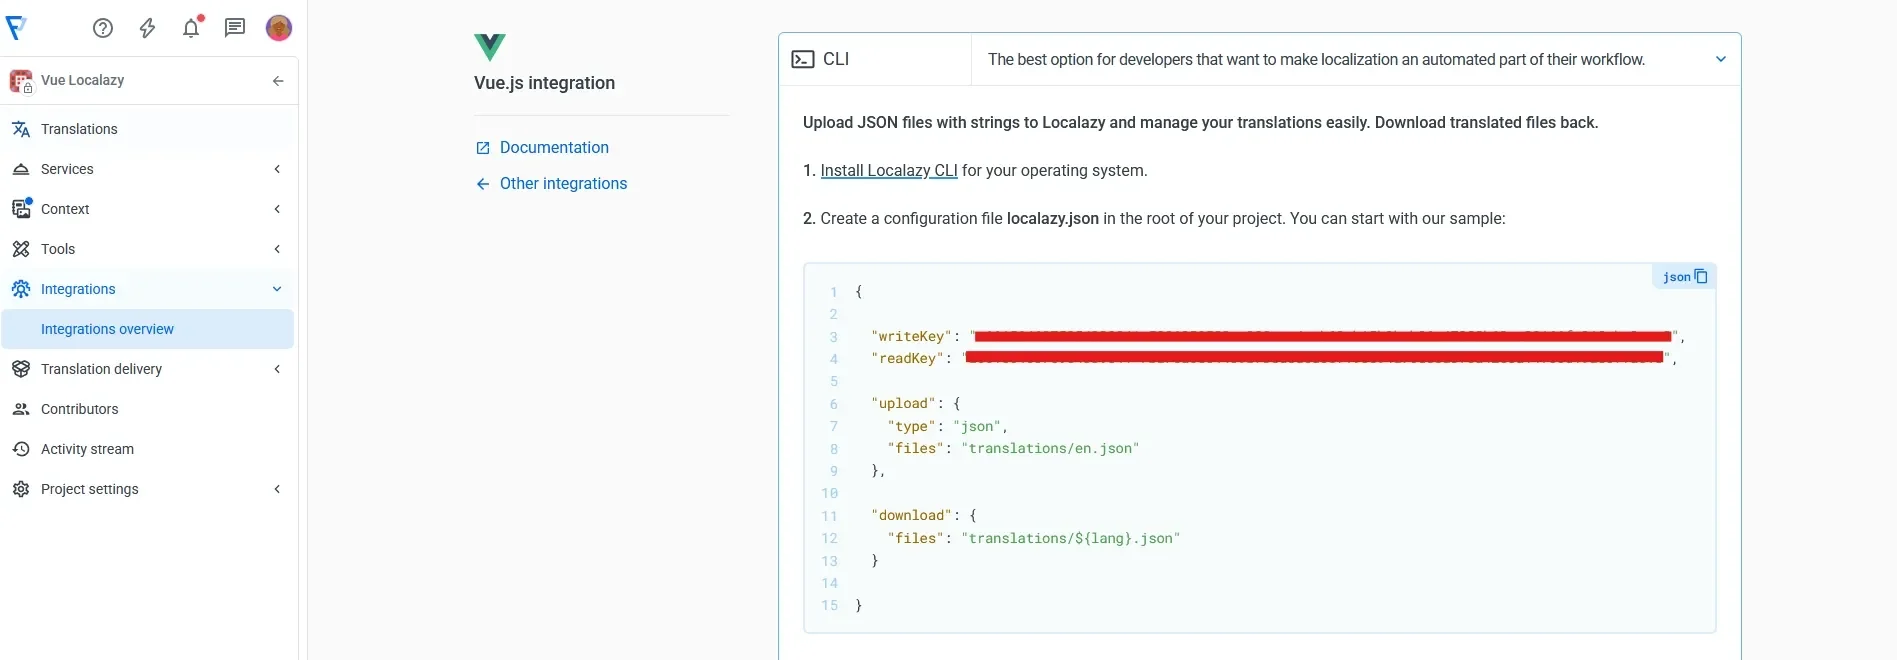
You will see two keys:
- writeKey: used to upload translations.
- readKey: used to download translations.
We will use these keys in the next step.
Install Localazy CLI
Install the Localazy CLI:
npm install -D @localazy/cliThe CLI allows us to synchronize translation files directly from the project.
Create localazy.json
Now create the configuration file, localazy.json, and add the following to it:
{
  "upload": {
    "type": "json",
    "files": "src/assets/locales/en.json"
  },

  "download": {
    "files": "src/assets/locales/${lang}.json"
  }
}
The upload section points to the source language file, the download section defines where translated files land, and ${lang} is replaced with the language code at download time (e.g. fr.json, de.json, es.json). Keys are in a separate file, so they stay out of version control.
Create localazy.keys.json in the project root:
{
  "readKey": "YOUR_READ_KEY",
  "writeKey": "YOUR_WRITE_KEY"
}
Replace the placeholders with the keys from your Localazy project, then add localazy.keys.json to .gitignore. The project is now ready to sync translations.
7️⃣ Step 7: Sync translations with Localazy
Now that the project is connected to Localazy, we can synchronize translation files.
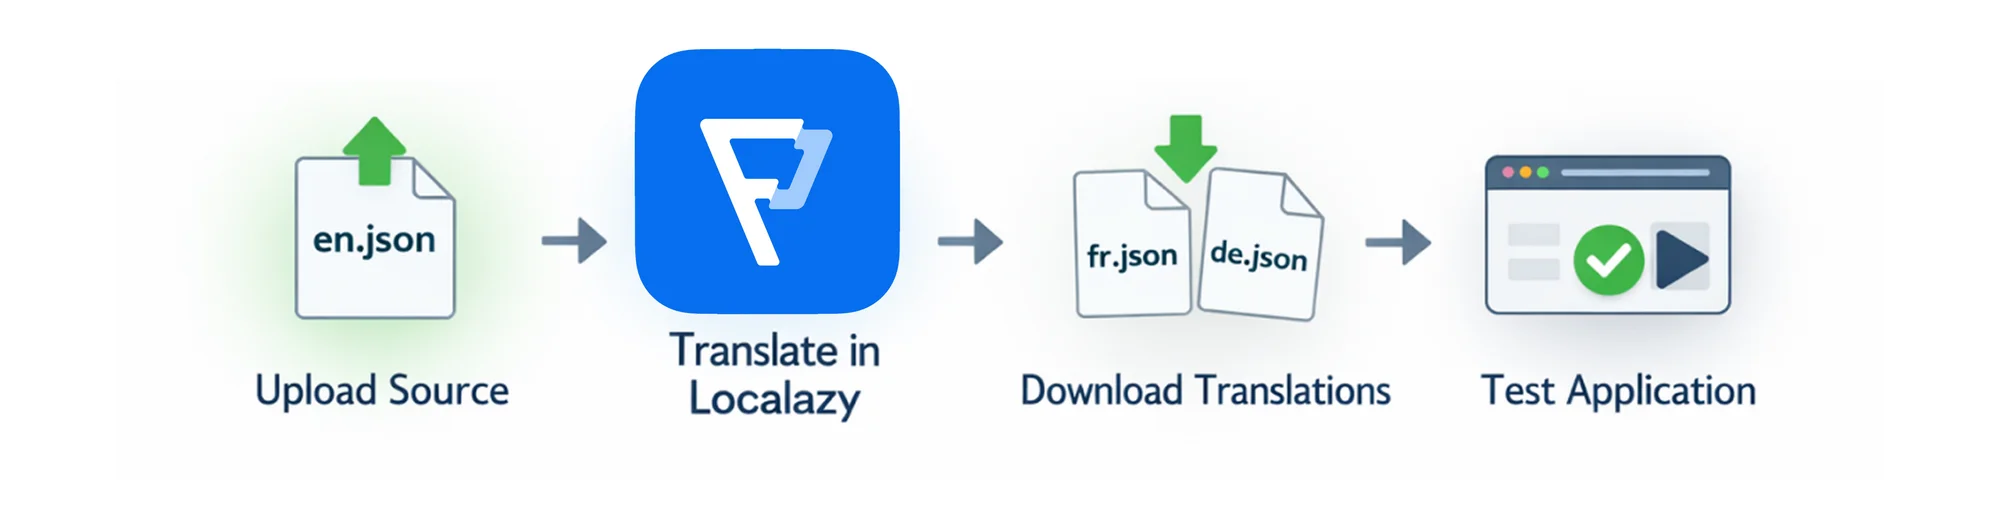
The typical workflow is:
- Upload source language
- Translate in Localazy
- Download translations
- Test the application
Upload source strings
Upload the English source file:
npx @localazy/cli uploadThis command reads the configuration in localazy.json and uploads:
src/assets/locales/en.json
After uploading, the translation keys will appear in the Localazy dashboard.
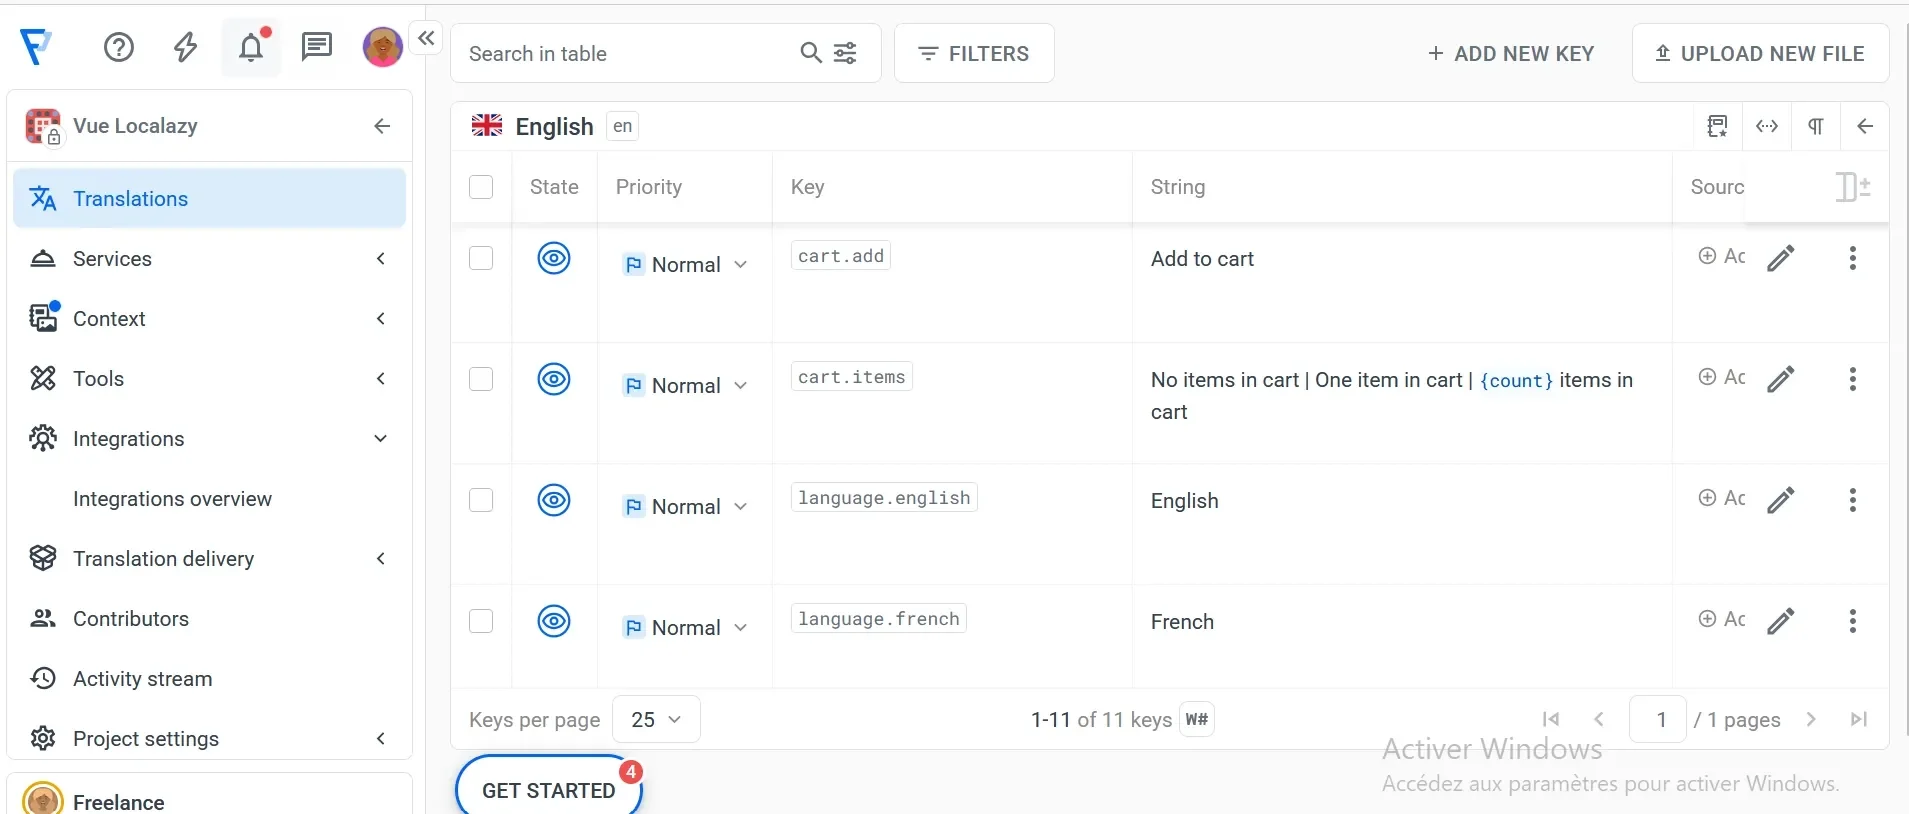
You should see keys like:
product1.title,product2.title,product3.titleproduct1.description,product2.description,product3.descriptionproduct.priceLabelcart.add,cart.itemslanguage.english,language.french
These keys can now be translated into other languages.
Add a new language in Localazy
Open your project in the Localazy dashboard. Add a new language such as French:
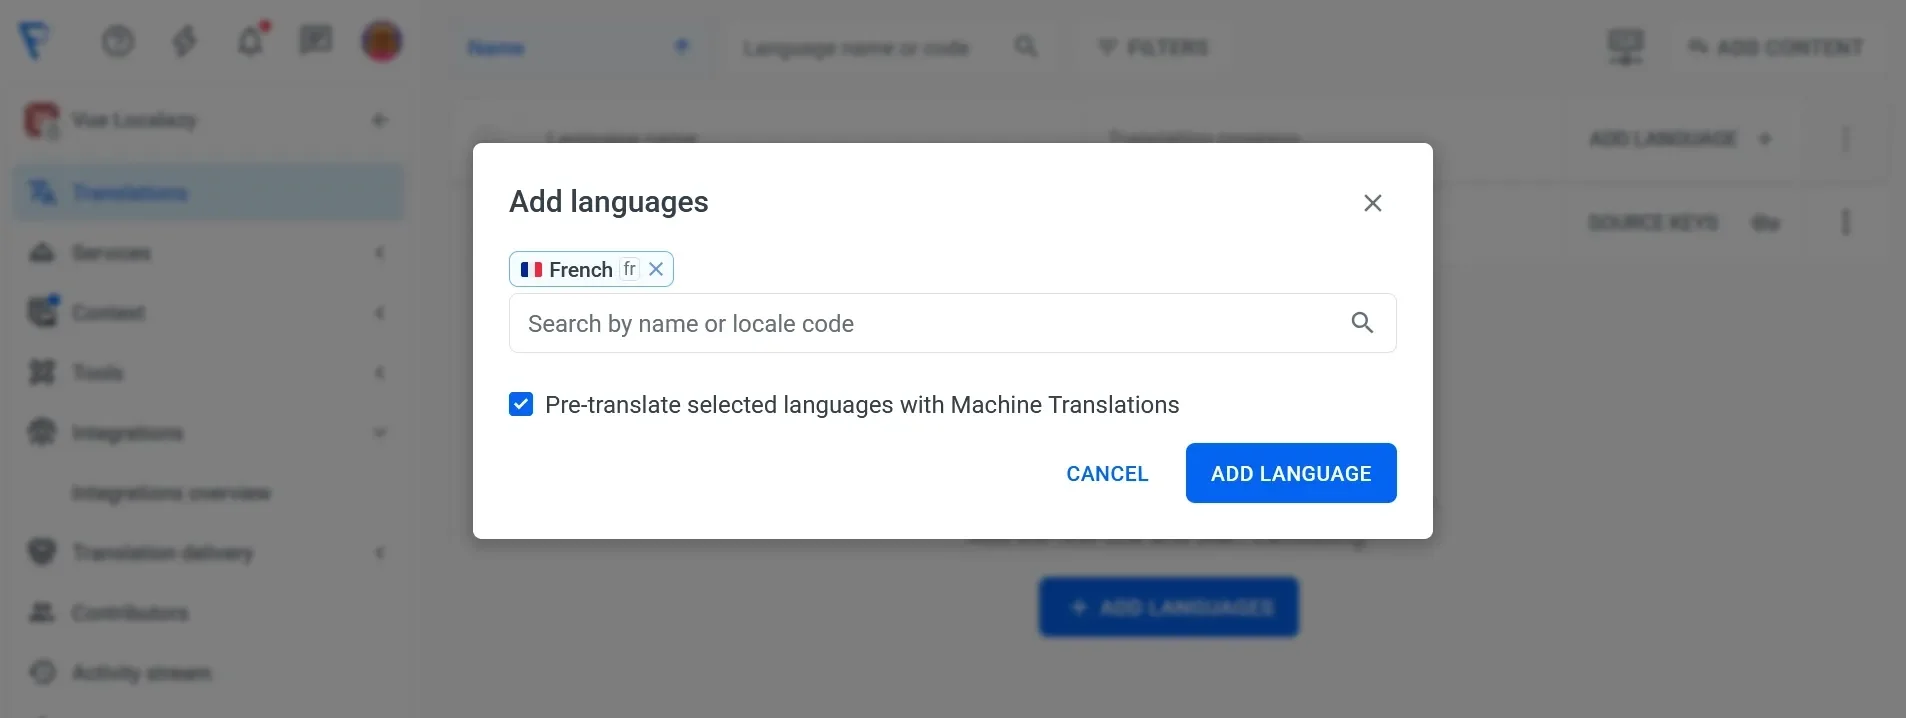
Localazy will automatically create translation entries for each key.
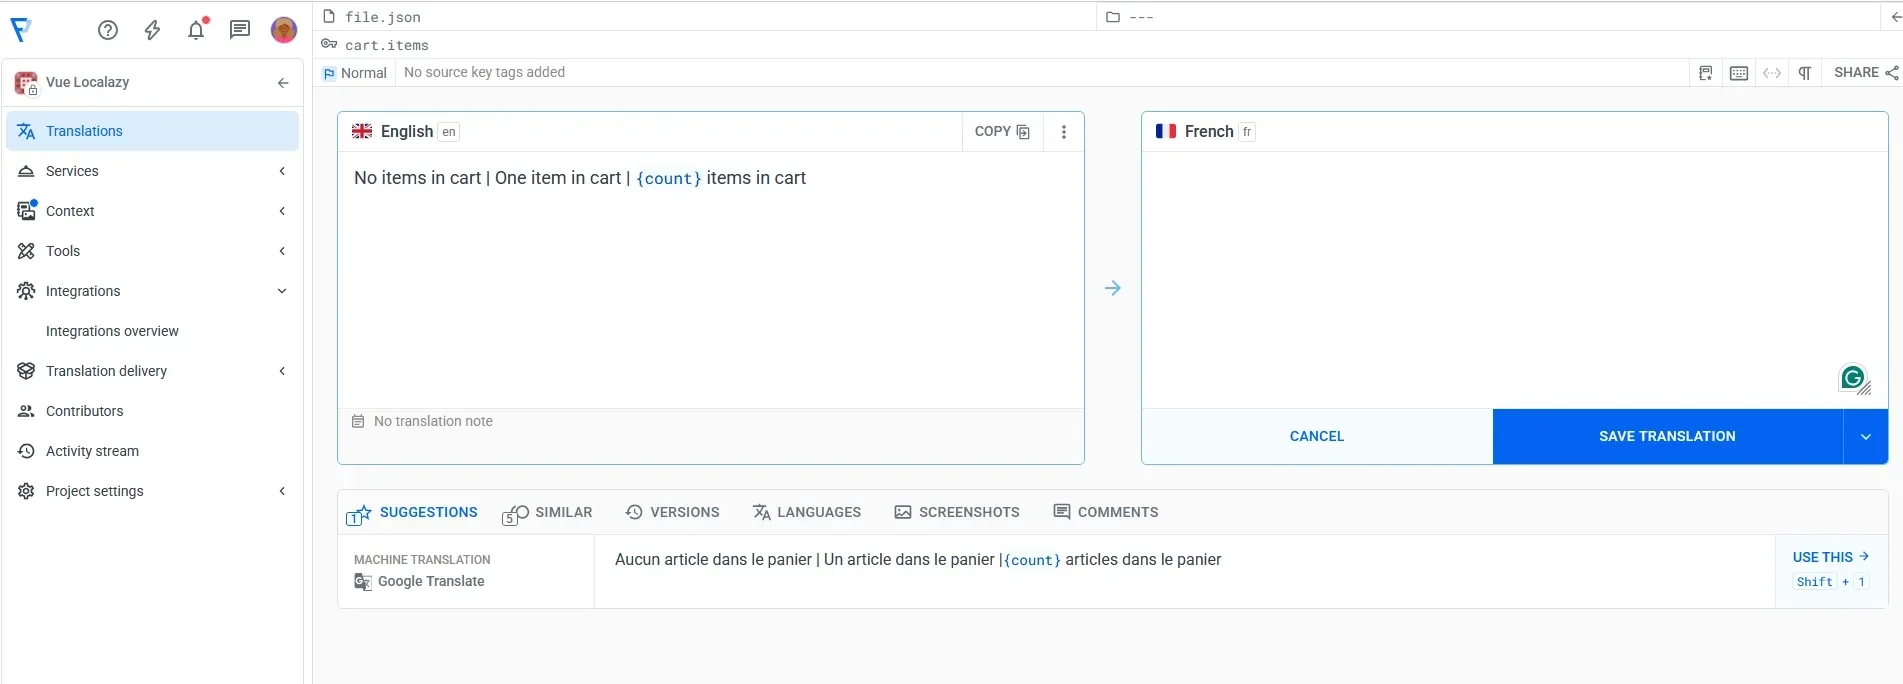 French translation key in the Localazy dashboard." loading="lazy" width="1903" height="684" srcset="https://ghost.localazy.com/content/images/size/w600/2026/06/s_907FF7A53662520364D5EADE356E02832128E39A6631489BA7CF61FE72E936FB_1772132534614_image.webp 600w, https://ghost.localazy.com/content/images/size/w1000/2026/06/s_907FF7A53662520364D5EADE356E02832128E39A6631489BA7CF61FE72E936FB_1772132534614_image.webp 1000w, https://ghost.localazy.com/content/images/size/w1600/2026/06/s_907FF7A53662520364D5EADE356E02832128E39A6631489BA7CF61FE72E936FB_1772132534614_image.webp 1600w, https://ghost.localazy.com/content/images/2026/06/s_907FF7A53662520364D5EADE356E02832128E39A6631489BA7CF61FE72E936FB_1772132534614_image.webp 1903w" sizes="(min-width: 720px) 720px">
Translate the strings so we have something to test language switching against.
Localazy AI is the recommended engine since it's tuned to consider your project's context, so results tend to need less post-editing.
Generate translations with Localazy AI
In the Localazy dashboard, open your project and add a new language (Italian, for example).
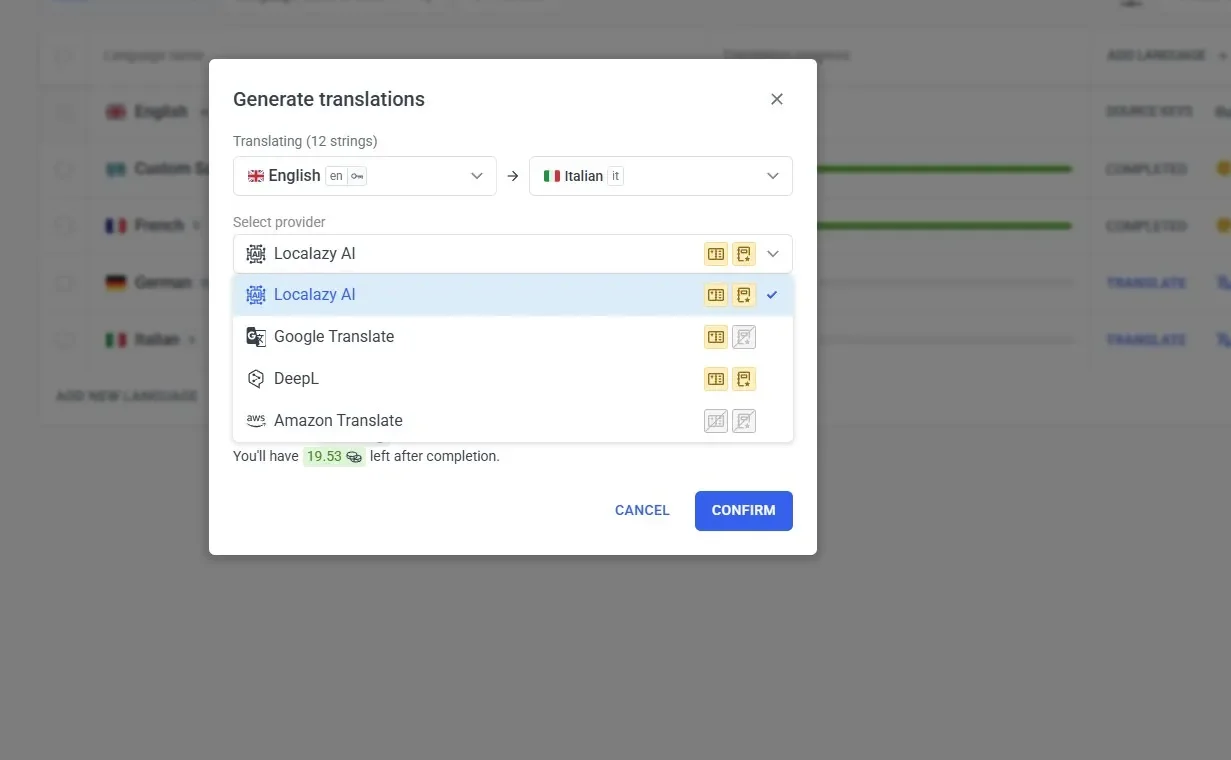
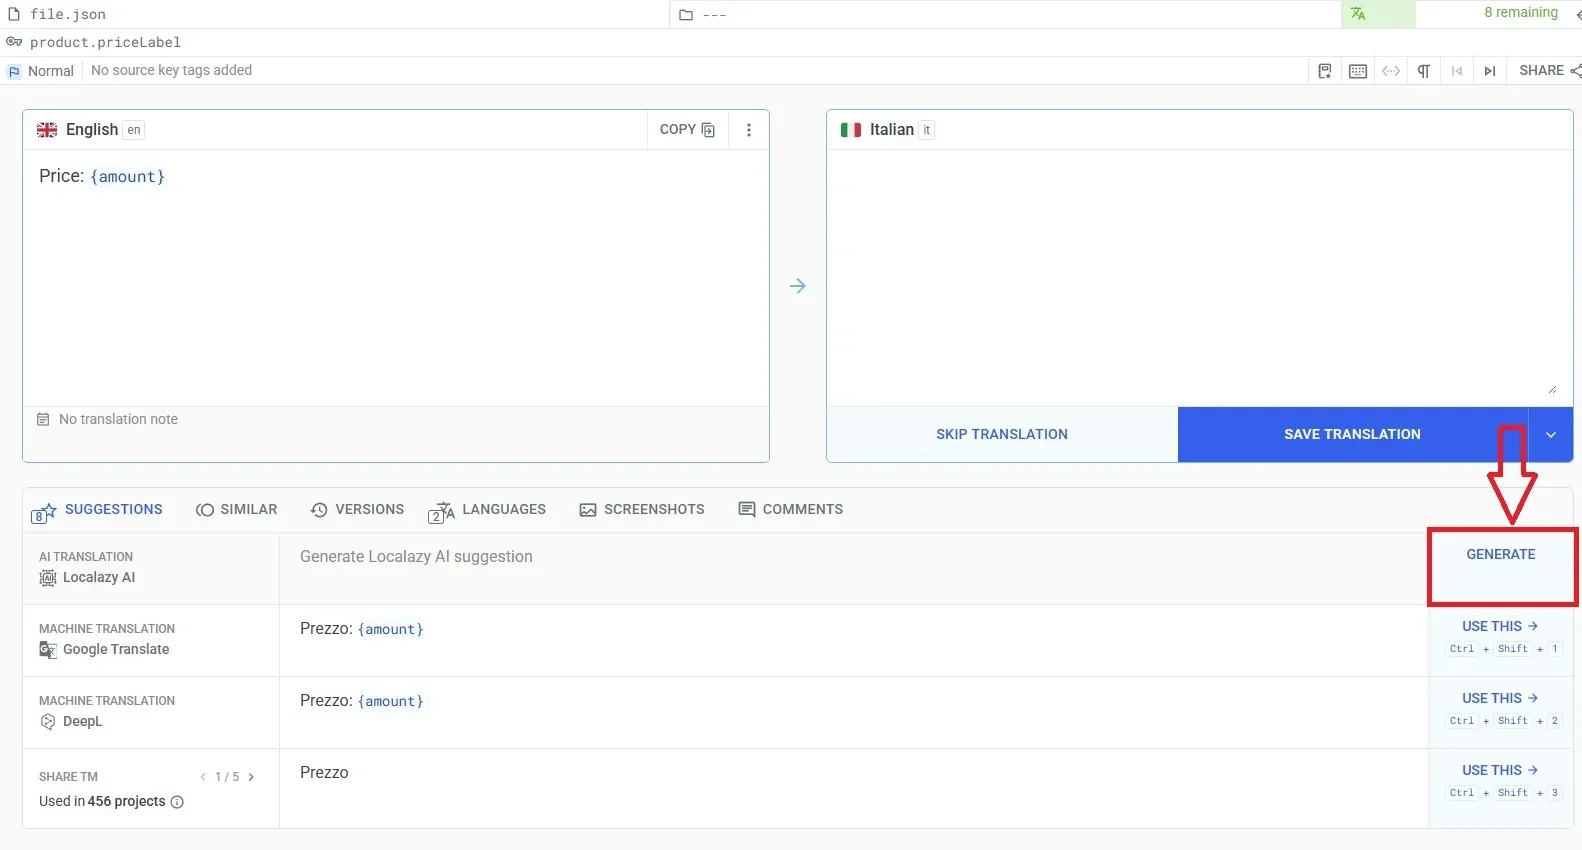
After adding the language, click the Translate button next to that language. Then, in the Suggestion panel, under AI Translation, click Generate to create a Localazy AI suggestion for the string.
Review the suggestion and, if it fits your context, click Use this to add it to the translation field.
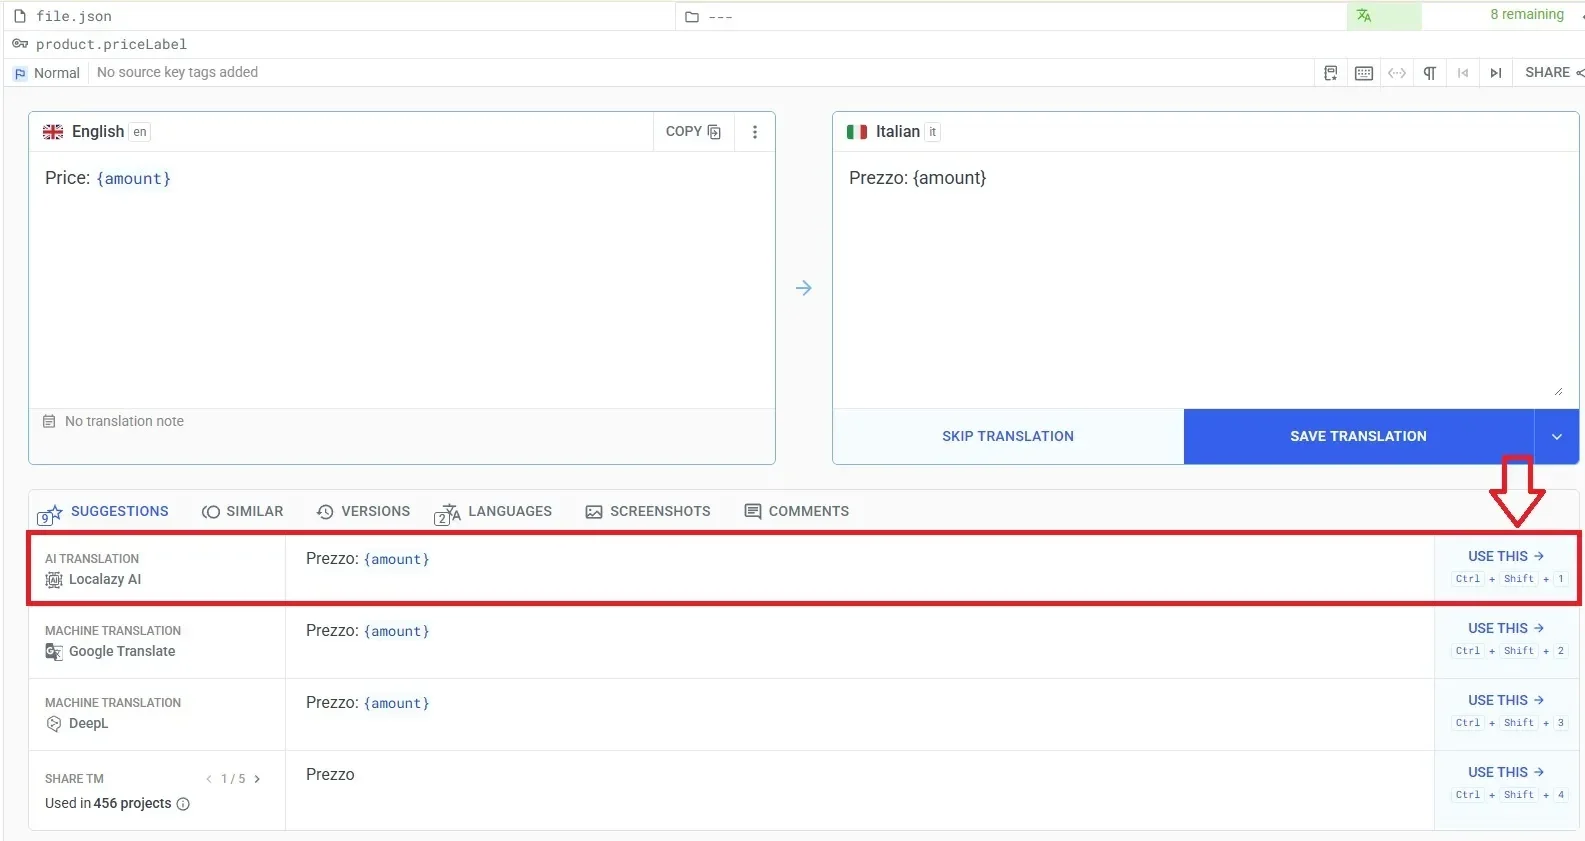
For each string, review the translation in context and choose the necessary action: save it, send it for review, or mark it as needing improvements. Besides Localazy AI, you can also use the other machine translation engines available in the same translation workflow. Google Translate, Amazon Translate, and DeepL are also available if you want to compare outputs.
Localazy also pulls from ShareTM, its shared translation memory. When the same phrase has already been translated in another project, ShareTM surfaces it as a suggestion, which helps keep wording consistent across your interface.
Download translations
Run the following command to download:
npx @localazy/cli downloadThe command writes translation files into src/assets/locales/. For example, src/assets/locales/fr.json. Each file contains the translated strings from Localazy.
Then register the new locale in i18n.ts:
import fr from "./assets/locales/fr.json"
...
messages: {
    en,
    fr
  }
Verify language switching in the app
Start the development server:
npm run dev
Open the application and switch languages using the language switcher. The product text should change immediately when switching between languages:
If the language does not change, restart the development server.
Adding another language for testing MT
Instead of using pseudo-localization, you can validate the interface by adding another real language. Testing with real translations gives a clearer picture of how the UI behaves when different sentence structures and word lengths appear.
For example, let’s add German in the Localazy dashboard.
Open your project and select Add language, then choose:
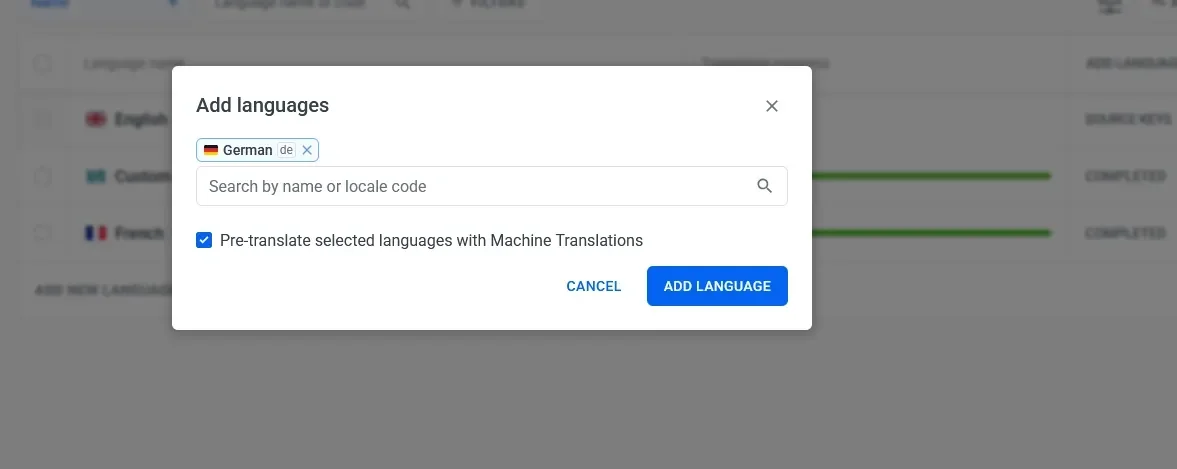
Make sure to check the Pre-translate selected languages with Machine Translations option so that Localazy generates translations for all existing strings automatically. When you open a field, you'll see that it is already pre-filled with machine-translated content:
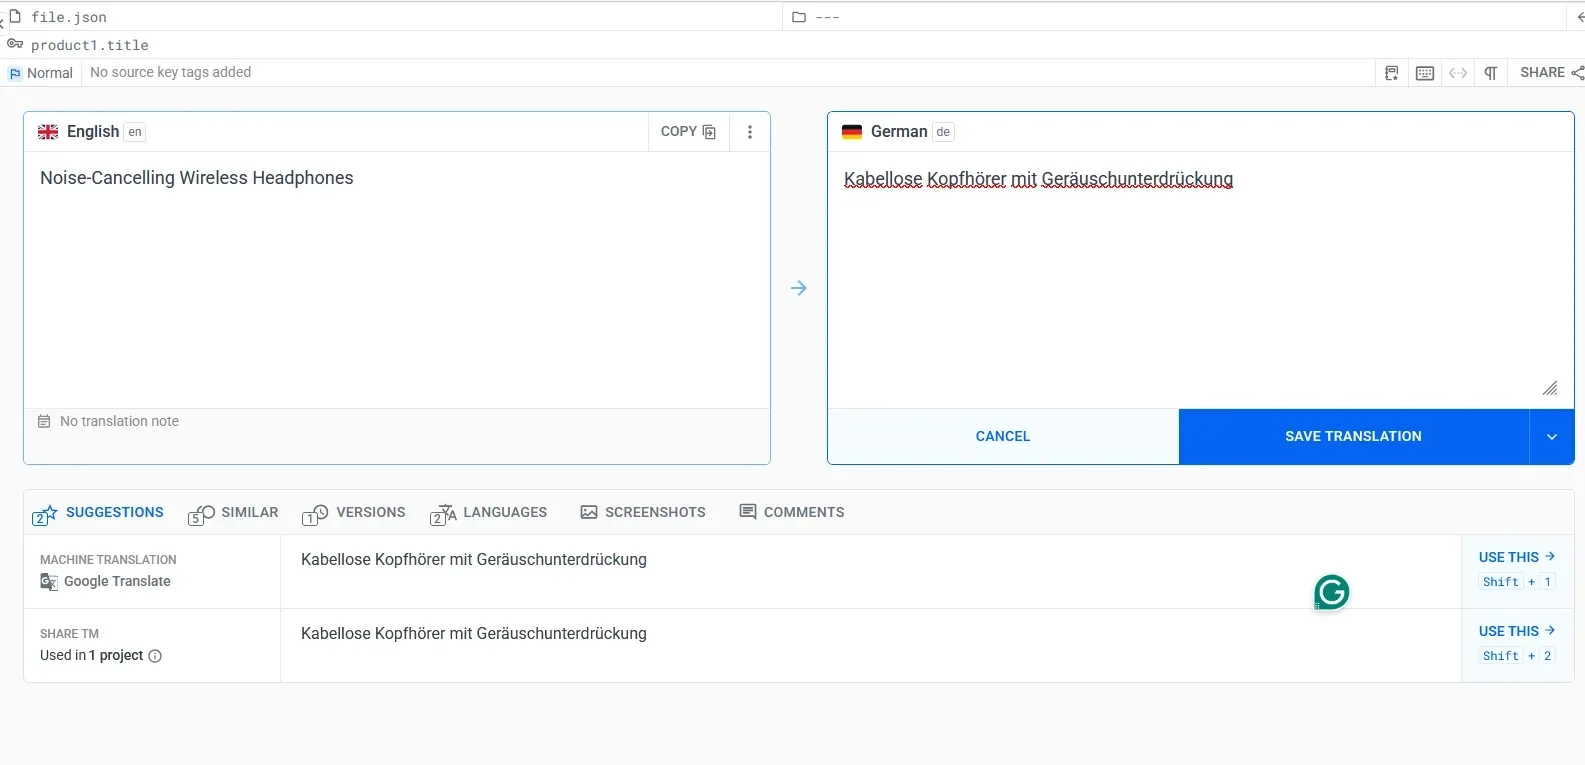 German translation key in the Localazy dashboard." loading="lazy" width="1585" height="765" srcset="https://ghost.localazy.com/content/images/size/w600/2026/06/image-3.webp 600w, https://ghost.localazy.com/content/images/size/w1000/2026/06/image-3.webp 1000w, https://ghost.localazy.com/content/images/2026/06/image-3.webp 1585w" sizes="(min-width: 720px) 720px">
Localazy also suggests translations from its shared translation memory. These suggestions can help you speed up translation when common phrases appear, but you can review and adjust them before saving or choosing the one suitable in your context.
When you have finished verifying the translations, download them again with:
npx @localazy/cli downloadYou should see a new locale file in your locales folder:
de.json
Also, add the German language switcher so that you can test later:
<template>
    <div>
        <button @click="changeLanguage('en')">
            English
        </button>
        <button @click="changeLanguage('fr')">
            French
        </button>
        <!-- add this -->
        <button @click="changeLanguage('de')">
            German
        </button>
    </div>
</template>
Then include it in i18n.ts:
 import de from "./assets/locales/de.json"
 ...
 messages: {
    en,
    fr,
    de
  }
And finally test the app:
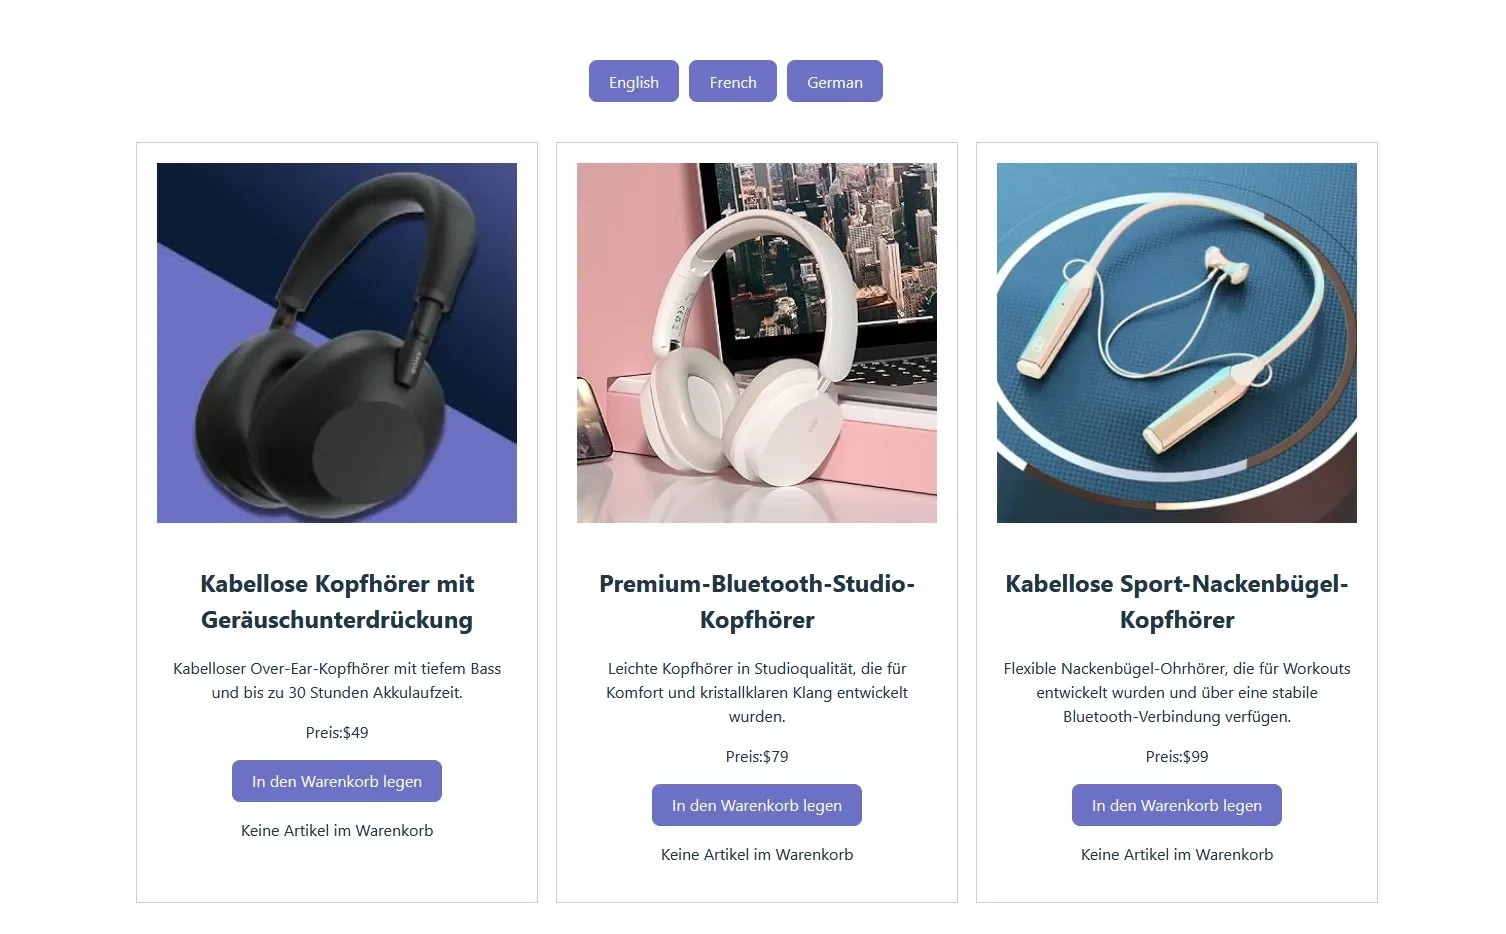
🔄 Recommended development workflow
Once the project is connected to Localazy, translations can be synced regularly during development. Instead of running long CLI commands each time, it is easier to define npm scripts.
Open package.json and add:
"scripts": {
  "dev": "vite",
  "build": "vite build",
  "localazy:upload": "localazy upload",
  "localazy:download": "localazy download"
}
Now translations can be synchronized with simple commands:
- Upload source strings:
npm run localazy:upload- Download translations:
npm run localazy:downloadA typical development loop looks like this, like described in the section above about syncing translations:
- Edit
en.json - Upload translations
- Translate in Localazy
- Download translations
- Test the application
This workflow keeps the source language and translated files synced.
⏭️ Automate with GitHub Actions
Translations can also be synchronized automatically using CI. This allows translation files to stay updated without manual uploads. To begin, you need to create secrets, then configure the GitHub workflows.
Store Localazy keys as GitHub Secrets
Open the GitHub repository settings and create the following secrets: Settings > Secrets and Variables > Actions > New repository secret.
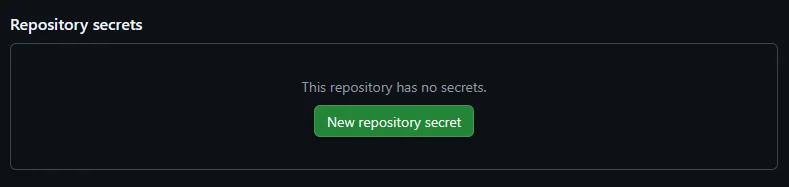
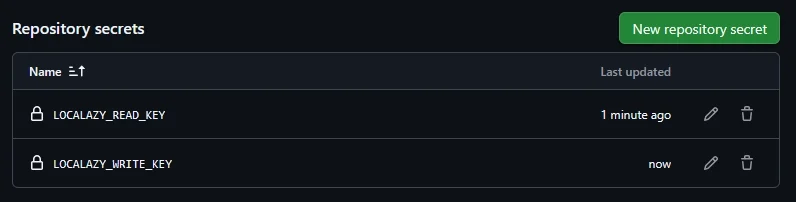
These values should match the keys from your Localazy project. Storing them as secrets keeps them out of the repo. The workflows in the next two sections read them directly through the GitHub Action's read_key and write_key inputs, so localazy.json itself doesn't need to change, and localazy.keys.json stays local-dev only.
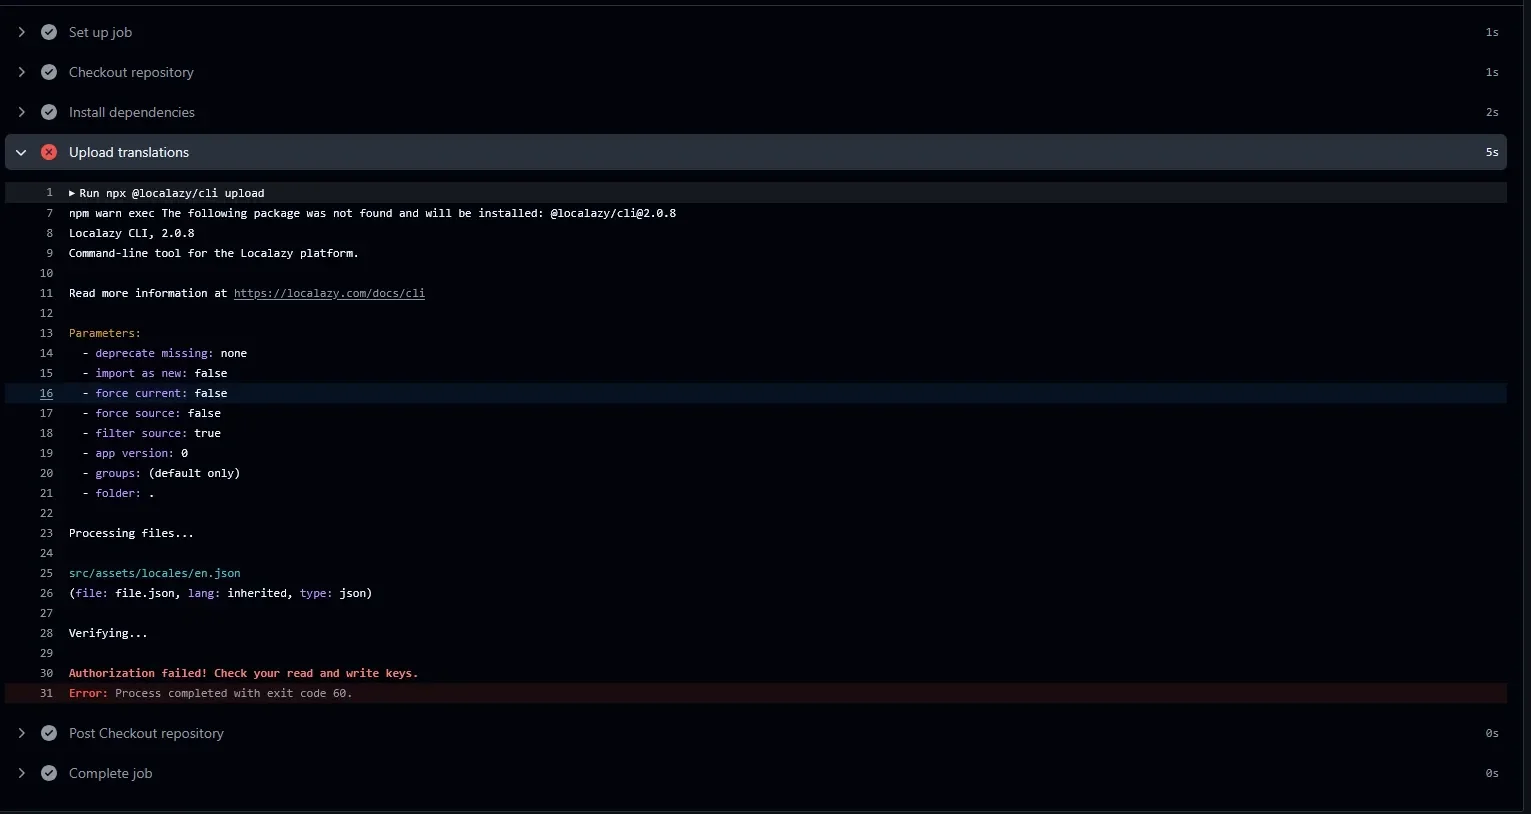
If the workflow can't reach your keys because the secrets aren't set, or their names don't match what the workflow expects, Localazy returns an authorization failure. Double-check that LOCALAZY_READ_KEY and LOCALAZY_WRITE_KEY are set in the repository's Actions secrets before pushing.
Upload on push
In your project root, create:
.github/workflows/localazy-upload.yml
Add:
name: Localazy Upload
on:
  push:
    branches:
      - main
  workflow_dispatch:
jobs:
  localazy-upload:
    name: Upload source keys to Localazy
    runs-on: ubuntu-latest
    steps:
      - uses: actions/checkout@v4
      - name: Upload to Localazy
        uses: localazy/upload@v1
        with:
          read_key: ${{ secrets.LOCALAZY_READ_KEY }}
          write_key: ${{ secrets.LOCALAZY_WRITE_KEY }}
This workflow uploads the source language automatically whenever changes are pushed. To test this workflow and make sure everything is working, add for example a string in src/assets/locales/en.json:
"debug": {
  "ciTest": "Uploaded from GitHub Actions"
}
In a real project, you can extend it to run on additional branches, trigger uploads when any locale file changes, and adjust the conditions to match how your team manages translations.
Once you commit and push you should see:
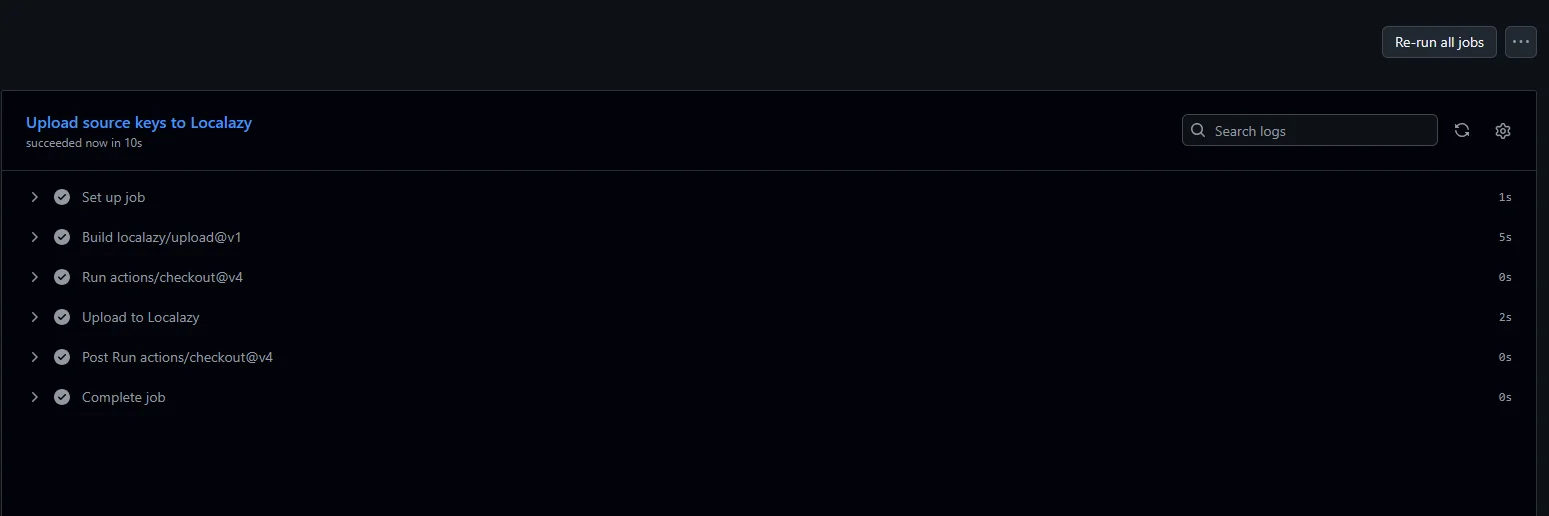
Then check your Localazy dashboard, where you should also see your uploaded string:

Finally, translate and download.
Download translations before building
The latest translations should be downloaded before the application is built. This ensures every build uses the most recent translations available in Localazy.
Create:
.github/workflows/build.yml
Add:
name: Build

on:
  push:
    branches:
      - main
  workflow_dispatch:

jobs:
  build:
    runs-on: ubuntu-latest

    steps:
      - name: Checkout repository
        uses: actions/checkout@v4

      - name: Set up Node.js
        uses: actions/setup-node@v4
        with:
          node-version: 20
          cache: npm

      - name: Install dependencies
        run: npm ci

      - name: Download translations
        uses: localazy/download@v1
        with:
          read_key: ${{ secrets.LOCALAZY_READ_KEY }}

      - name: Build application
        run: npm run build
This workflow automatically runs whenever changes are pushed to the main branch. It installs the project dependencies, downloads the latest translations from Localazy, and then builds the app using those translations.
Unlike the previous approach, the downloaded translation files are used only during the GitHub Actions build. They are not committed back to the repository, so this workflow does not require repository write permissions or a Localazy write key.
Before relying on the automatic trigger, test the workflow manually.
Open your GitHub repository and go to Actions > Build > Run workflow. Select the corresponding branch, then click Run workflow.
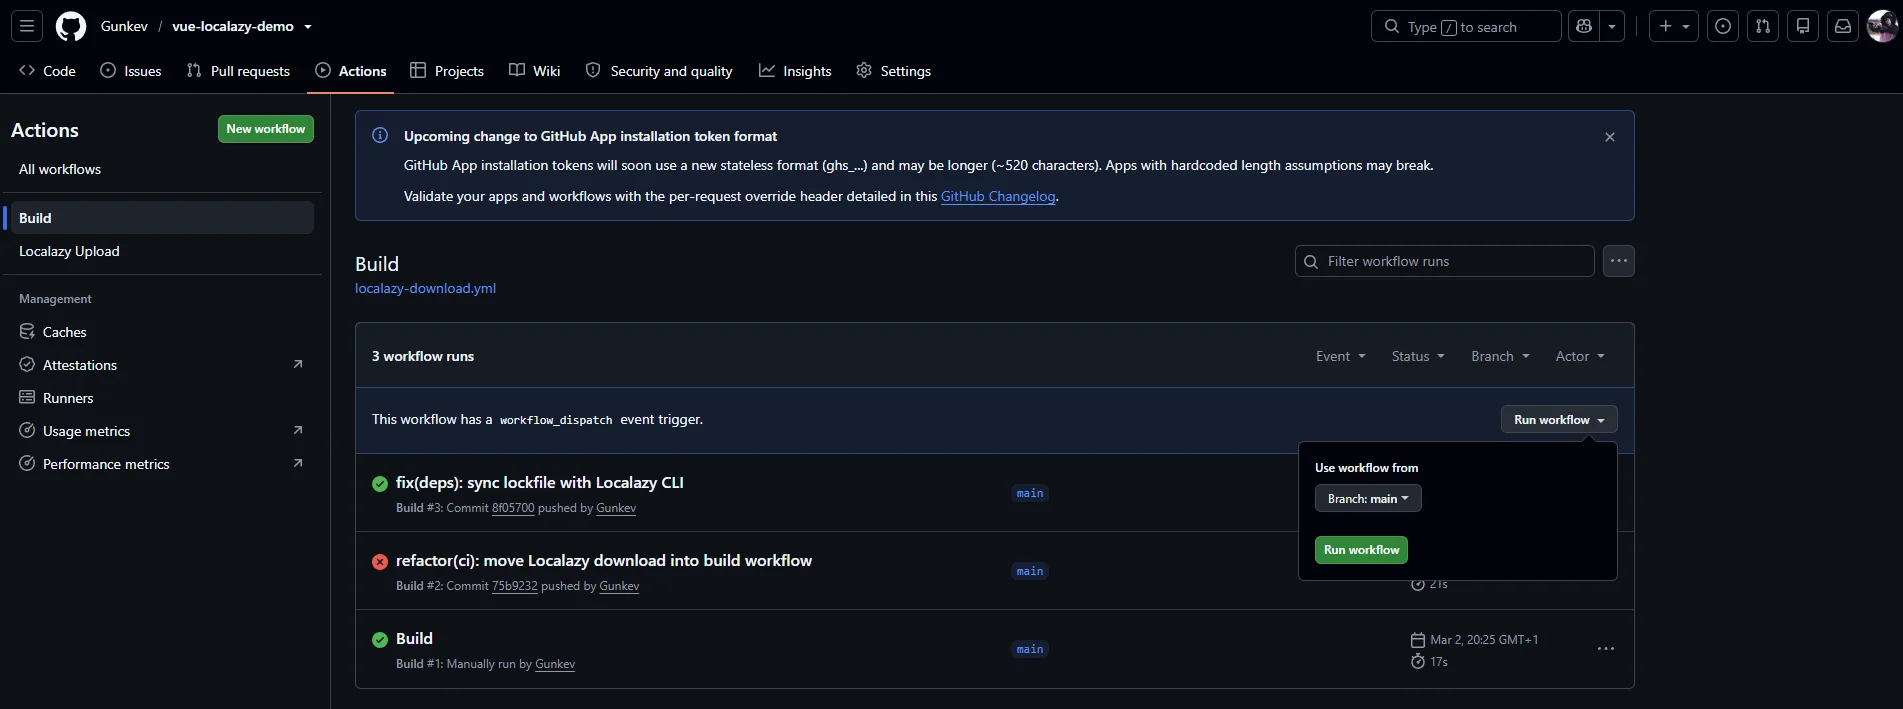
If the workflow finishes successfully, you should see the following completed steps:
- ✅ Checkout repository
- ✅ Set up Node.js
- ✅ Install dependencies
- ✅ Download translations
- ✅ Build application
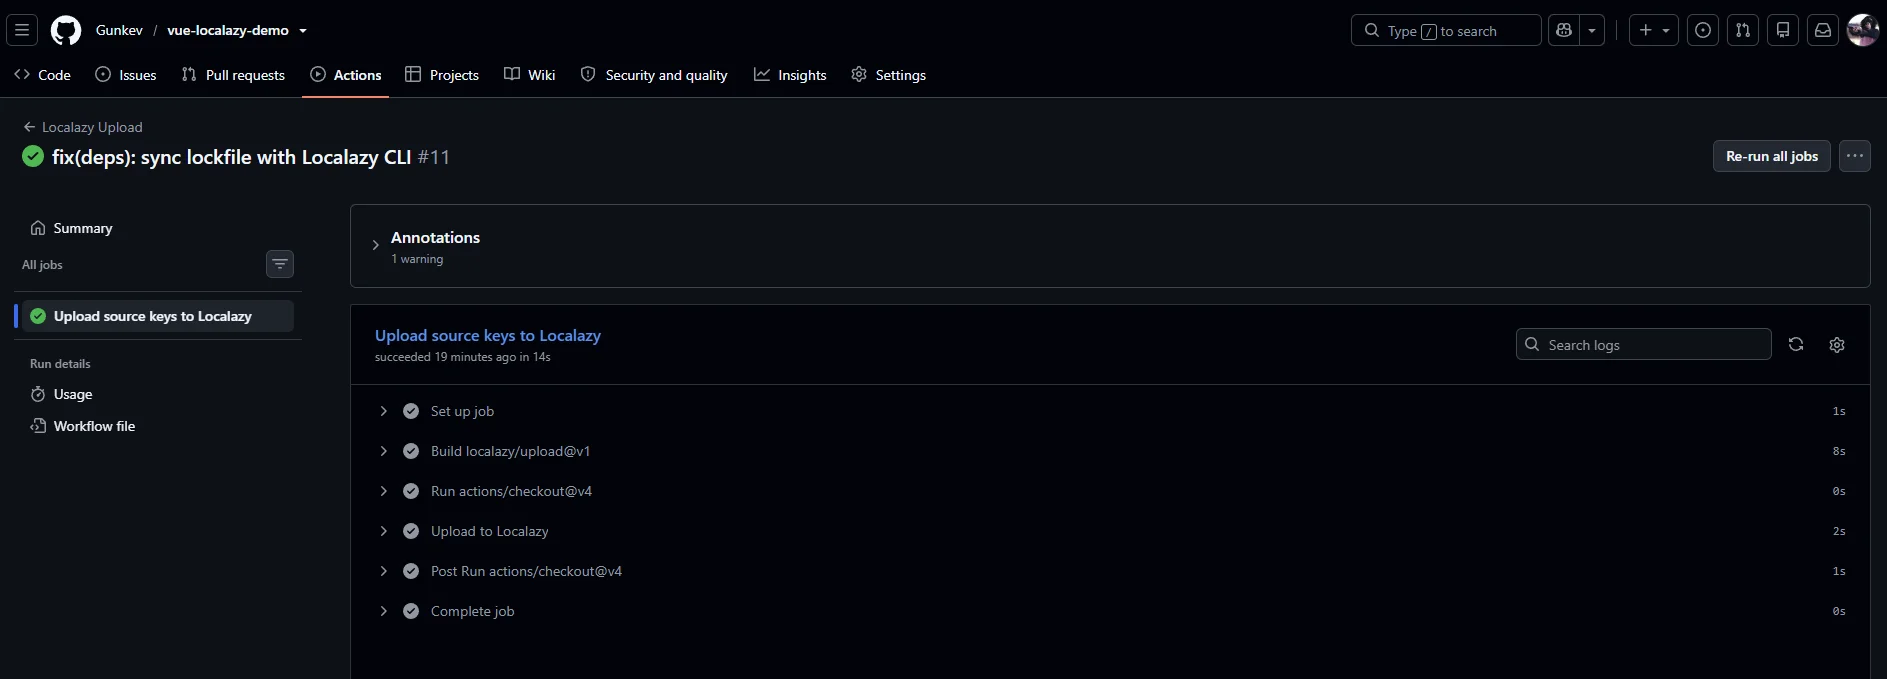
Because workflow_dispatch: is included, you can run the workflow manually at any time. On every push to main, GitHub Actions also downloads the latest translations before building the application.
At this point, your localization workflow is fully configured. Before wrapping up, let's look at a few common issues you might encounter and how to resolve them.
🛠️ Troubleshooting
Upload/Download paths don’t match
If translations do not appear in Localazy, verify the upload path in localazy.json:
src/assets/locales/en.jsonThe path must match the actual file location.
Wrong read or write key
If upload or download fails, verify the keys in the Localazy dashboard.
- The writeKey is required for uploads.
- The readKey is required for downloads.
Locale code mismatch
Check that language codes match.
For example:
fr.json
Must match:
locale.value = "fr"If the codes differ, translations will not load.
CI Secrets missing
If GitHub Actions fail, verify that the secrets exist:
LOCALAZY_READ_KEY
LOCALAZY_WRITE_KEY
Also, confirm that the workflow has permission to access secrets.
✔️ Conclusion
The setup covered here includes vue-i18n for the runtime, Localazy for the sync layer and GitHub Actions for the automation, turning localization from a manual chore into a background process. You don't have to copy JSON between environments, or deal with contributor conflicts. No more "one more locale" turning into a merge conflict! The pipeline handles it.
Your app won't be English-first anymore but language-ready by design, which means the next language you add will just be a config change and nothing more.
The complete working demo is on GitHub if you want to fork it as a starting point.
Where to go from here
- 🤖 If you're translating with Localazy AI, our guide on getting the most from it covers context configuration and post-editing workflows in more depth.
- 🧹 If your source strings need work before translation, pre-translation source prep is worth a read.
- 🌎 For teams shipping to markets with high localization stakes (like Korea or Japan), UX-level localization matters as much as string translation.