🤔 What is Strapi? 🔗
Strapi is a leading open-source headless content management system (CMS). It is entirely customizable, built for developers, and 100% JavaScript. Strapi allows you to build your application faster as its API is self-hosted, customizable, and performant.
💜 Strapi Plugins 🔗
Strapi builds and maintains plugins to increase the functionality of its base applications. Strapi plugins were created to effortlessly add unique features and power up your Strapi app with market-leading software. They are available for download as npm packages or through the Strapi Market.
These plugins are known for assisting developers in easily modifying the looks and usability of their applications.
This article serves as a reference for a few of the extra plugins created by Strapi that are offered in the Marketplace and already installed. You will learn about a quick plugin explanation, how the installed plugin functions, and how admin panel configurations are handled in this post.
It is crucial to note that having a Strapi project on your local computer is a must for these plugins to function. If you don't already have a Strapi project, you can read this comprehensive quick-start guide on how to set one up on your computer.
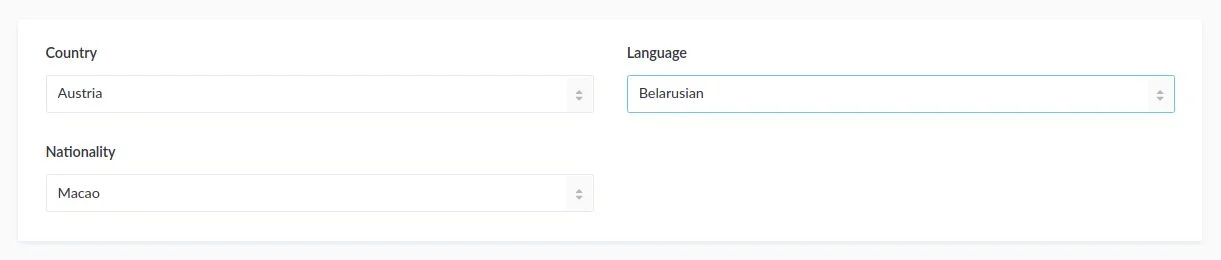
International Fields 🔗
The Strapi plugin international fields is a Strapi plugin that adds custom fields to your Strapi application. These custom fields are:
- Country
- Language
- Nationality
Installation
To use this plugin in your application, open your terminal and run the following command:
# using yarn
yarn add strapi-plugin-international-fields

# using npm
npm install strapi-plugin-international-fields --save
Configuration
Every country listed in the ISO 3166 standard is available in the dropdown menu for the country field. Every language listed in the ISO 639 standard is available in the language field's dropdown menu. Every nationality listed in the ISO 3166 standard is available in the nationality field's dropdown menu.
Nearly all Strapi Admin panel languages are supported for the country and language fields. Therefore depending on the interface language chosen, the dropdown will display localized option labels.
Only English, German, and French are available for the nationality field, however, so the dropdown will be displayed with i18n alternatives with English as a fallback depending on the interface language that has been chosen.
To add one of the custom fields to a content type, you need to add it to the attributes field in the model's settings file api/*/models/*.settings.json like the example below.
{
  // ...
  "attributes": {
    "country": {
     "type": "country",
     "columnType": "CHAR(2)"
    },
    "language": {
      "type": "language",
      "columnType": "CHAR(2)"
    },
    "nationality": {
      "type": "nationality",
      "columnType": "CHAR(2)"
    },
  }
}
You can check out the official GitHub repository to learn more about this awesome plugin.
Strapi GraphQL 🔗
This plugin will add GraphQL functionality to your application. Every one of your content types has a REST endpoint created by default, thanks to Strapi. You can add a GraphQL endpoint to fetch and modify your content using the GraphQL plugin. Most of the CRUD methods in the Strapi REST API will be made available to you.

Installation
To get started with GraphQL, we need to install the plugin via the command line.
npm install @strapi/plugin-graphql

yarn add @strapi/plugin-graphql
Configuration
After installing the plugin, we would handle a bit of configuration. The config/plugins.js file contains a definition of a plugin's configuration. An graphql.config object can be included in this configuration file to define particular configurations for the GraphQL plugin.
You can read the official Strapi GraphQL documentation to learn more about this awesome plugin.
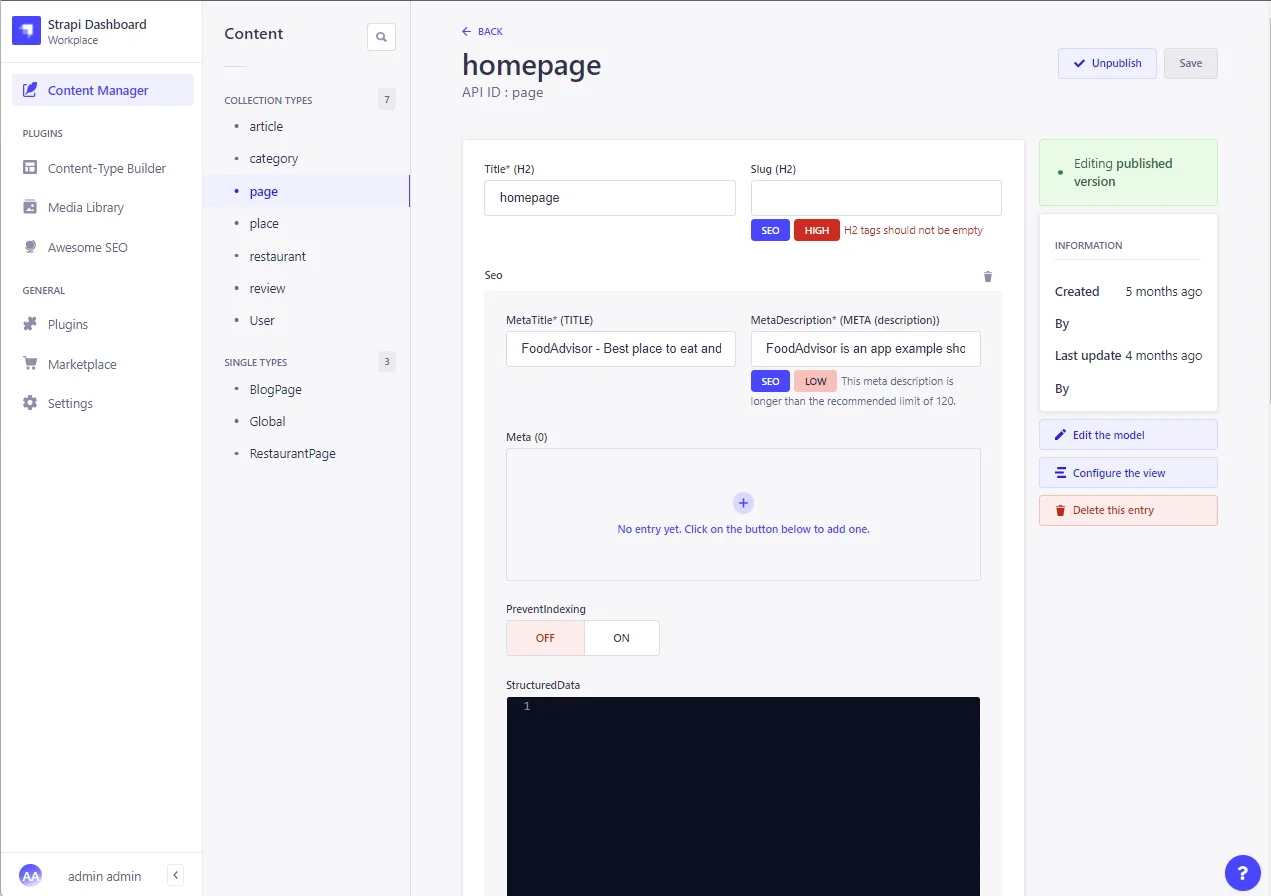
Awesome SEO 🔗
With just one click, Awesome SEO gives your content manager access to the Strapi results of your website's SEO study. Before publishing your content, this plugin lets you view your application's SEO analysis in real time. A few of this plugin's salient attributes are:
- An audit of your website's SEO
- A list of all the SEO mistakes on your website, ordered by page ranking (the most important page for your SEO at the top)
- Easy access to the Strapi content to correct mistakes.
- Errors in your content types are indicated.
- Real-time notification when adding new content or modifying existing content if the change lowers the SEO Notation
- The ability for the content manager to view SEO difficulties brought on by website development in expert mode.
Installation
To get started with using this plugin, it is essential to have chrome installed on your server.
#npm
npm install @exfabrica/strapi-plugin-awesome-seo

#yarn
yarn add @exfabrica/strapi-plugin-awesome-seo
Configuration
Enter the website for which you wish to boost SEO under Awesome SEO's general settings, then save the changes. Launch a website scan after opening the "Awesome SEO" plugin. You can examine your results with a global summary of SEO problems for your website and a summary by website page, which is often organized by rank.
After fixing any problems, you can continue reading the Strapi content page by selecting the modification button. You may see and correct any SEO mistakes in your Strapi content type by selecting the modification option on the preceding screen.
Visit the Strapi Market for more information about this useful plugin.
Cloudflare pages 🔗
With the help of this plugin, you can quickly start Cloudflare Pages builds from Strapi. The site rebuild is initiated concurrently with the updating of content. Site admins may take their time and make numerous changes with the Cloudflare page plugin, and once the content update is finished, they can start a single build. Multiple instances can be set up to manage preview builds in addition to production builds.

This plugin adopts the methodology used to initiate builds at GitHub CI/CD, which is available here.
Installation
To use this plugin in your application, open your terminal and run the following command:
npm install strapi-plugin-cloudflare-pages
yarn add strapi-plugin-cloudflare-pages
Configuration
Create a new file, config/plugins.js in the config folder. at
module.exports = ({ env }) => ({
  'cloudflare-pages': {
    enabled: true,
    config: {
      instances: [
        {
          name: "production website",
          hook_url: 'https://...'
        },
        {
          name: "preview website",
          hook_url: 'https://...'
        },
      ]
    }
  }
});
After the plugin is set up, select Cloudflare Pages Publishing from the sidebar's list of plugins.
You can go to the Strapi market for more information about this plugin.
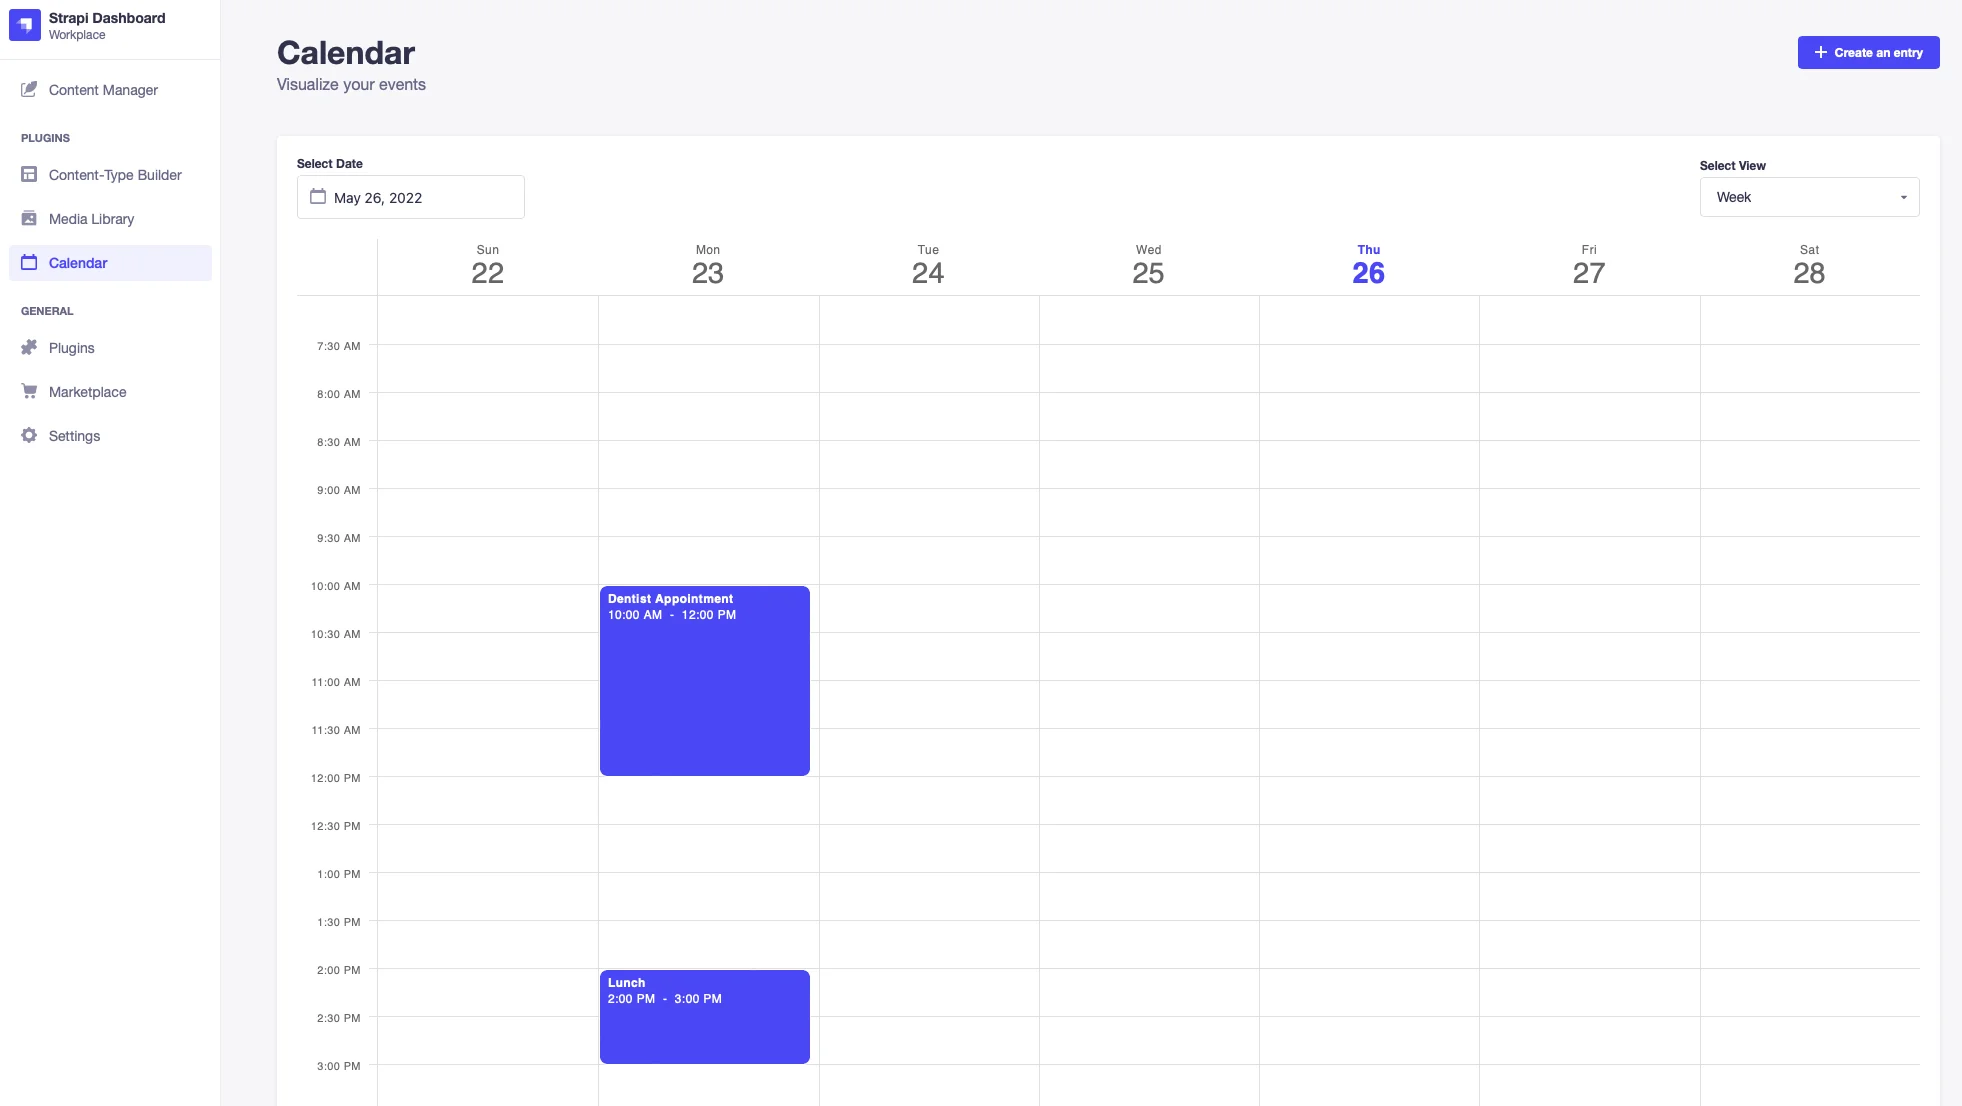
Calendar 🔗
With the help of the Calendar plugin, you may view your content on a map with weekly, daily, and monthly views.
Installation
npm install @offset-dev/strapi-calendar
yarn add @offset-dev/strapi-calendar
Configuration
Select the calendar settings by opening the settings page in the admin panel. You can choose the collections and fields to utilize here. The calendar's choices and style can also be changed.
Check this plugin's official listing to learn more about its excellent features.
Google Auth 🔗
GoogleAuth makes it simple for users to offer Google authentication to visitors to their websites. It performs the operations by utilizing the official Google-auth library.
A user can quickly implement authentication in their Strapi application with this plugin. The JWT authentication method is used by this secure plugin. It utilizes the standard user-permission collection on Strapi and is the official Google API integration.
Installation
To get started with this plugin, run the following command in your terminal.
npm install strapi-google-auth
yarn add strapi-google-auth
Configuration
After installing, create a new file plugins.js in the config folder. Add the code snippets to your config/plugins.js file.
'google-auth': {
enabled: true,
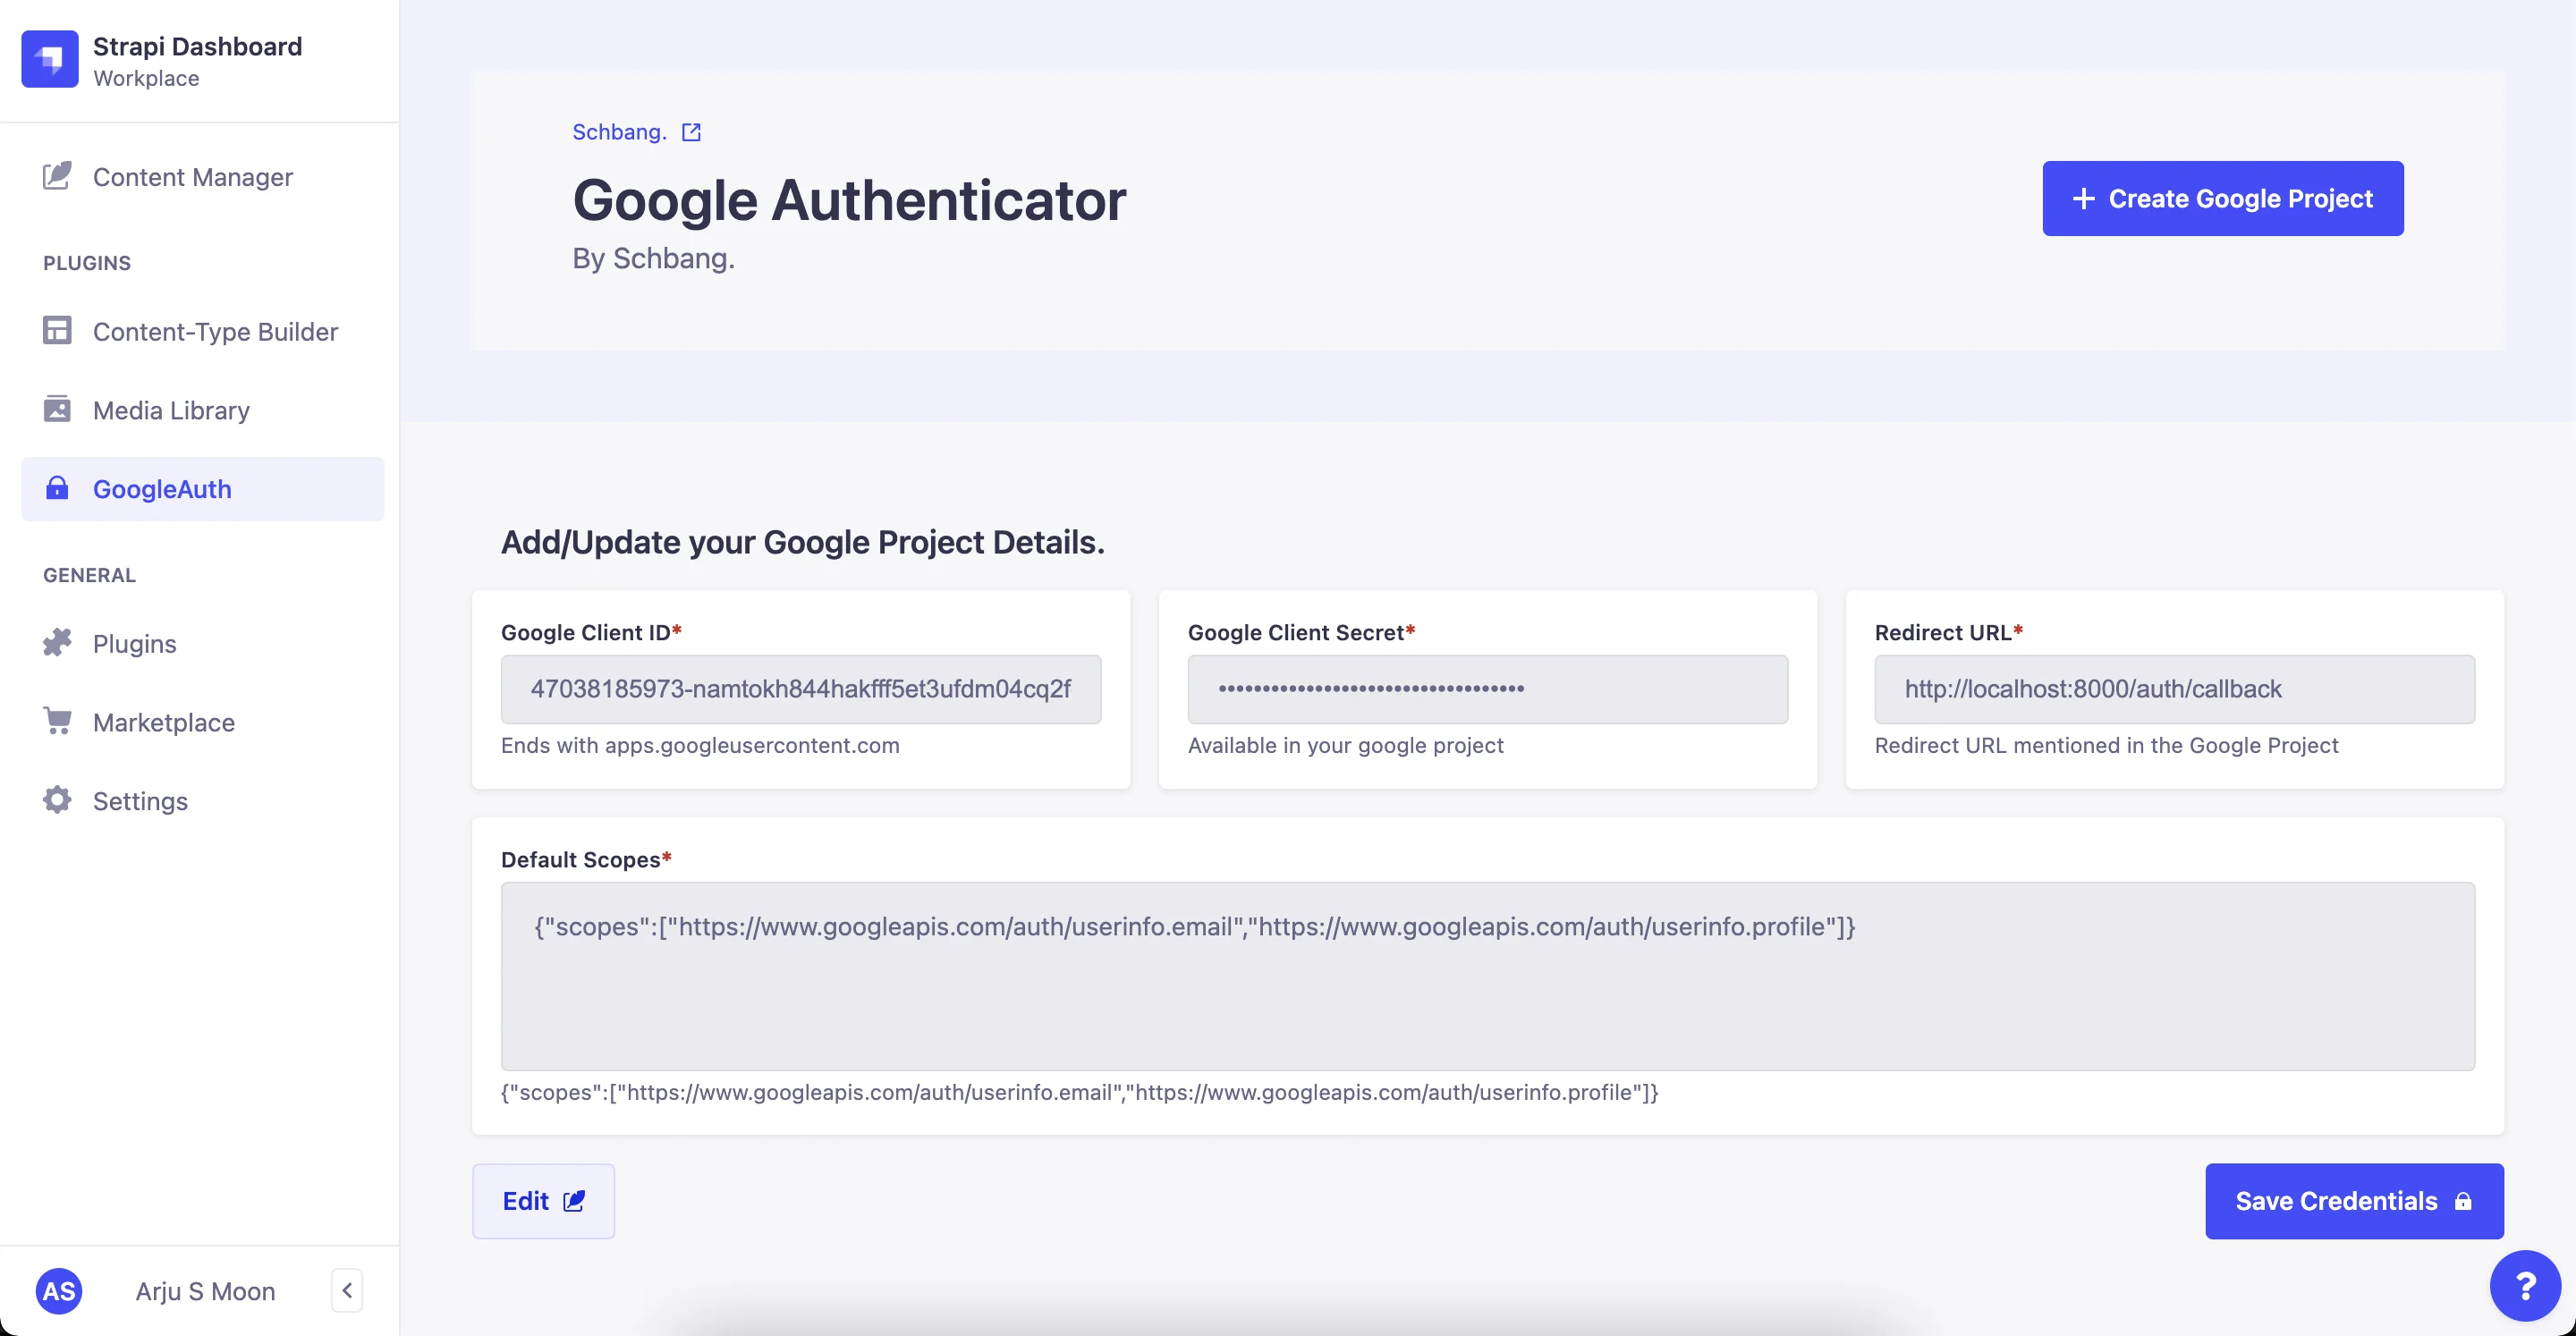
},The following steps include the following:
- From the Google Cloud Console, create a Google project.
- Create the OAuth consent screen (Nav Menu -> APIs & Services -> OAuth consent screen).
- Select Create Credentials > OAuth Client ID under Credentials.
- Fill up the plugin page of Strapi with the CLIENT ID, CLIENT SECRET, REDIRECT URL, and Scopes, and then save it.
Visit the Strapi market to learn more about how to set up the GoogleAuth plugin in your Strapi app.
Mux Video Uploader 🔗
The Mux Video Uploader plugin uses Strapi to manage video and audio files uploaded to Mux. It offers the option of direct file upload or URL-based content upload.

Installation
Before beginning the installation, you must have the following prerequisites.
- A Mux account is required.
- You can create both the Access Token and Secret Key with "Full Access" permissions via the Mux Dashboard.
- The Webhook Signing Secret that is creatable on the Mux Dashboard
To get started with this plugin, run the following command in your terminal
npm i strapi-plugin-mux-video-uploader@latest

yarn add strapi-plugin-mux-video-uploader@latest
Configuration
With the Webhook Signing Secret, Secret Key, and Access Token, Click the "General" section under MUX VIDEO UPLOADER in the Settings view of the Strapi Admin panel.
Set the proper values in the Access Token, Secret Key, and Webhook Signing Secret fields on this view, then press the Save button.
The official Strapi Market page has further details regarding this plugin as well as some frequently asked questions.
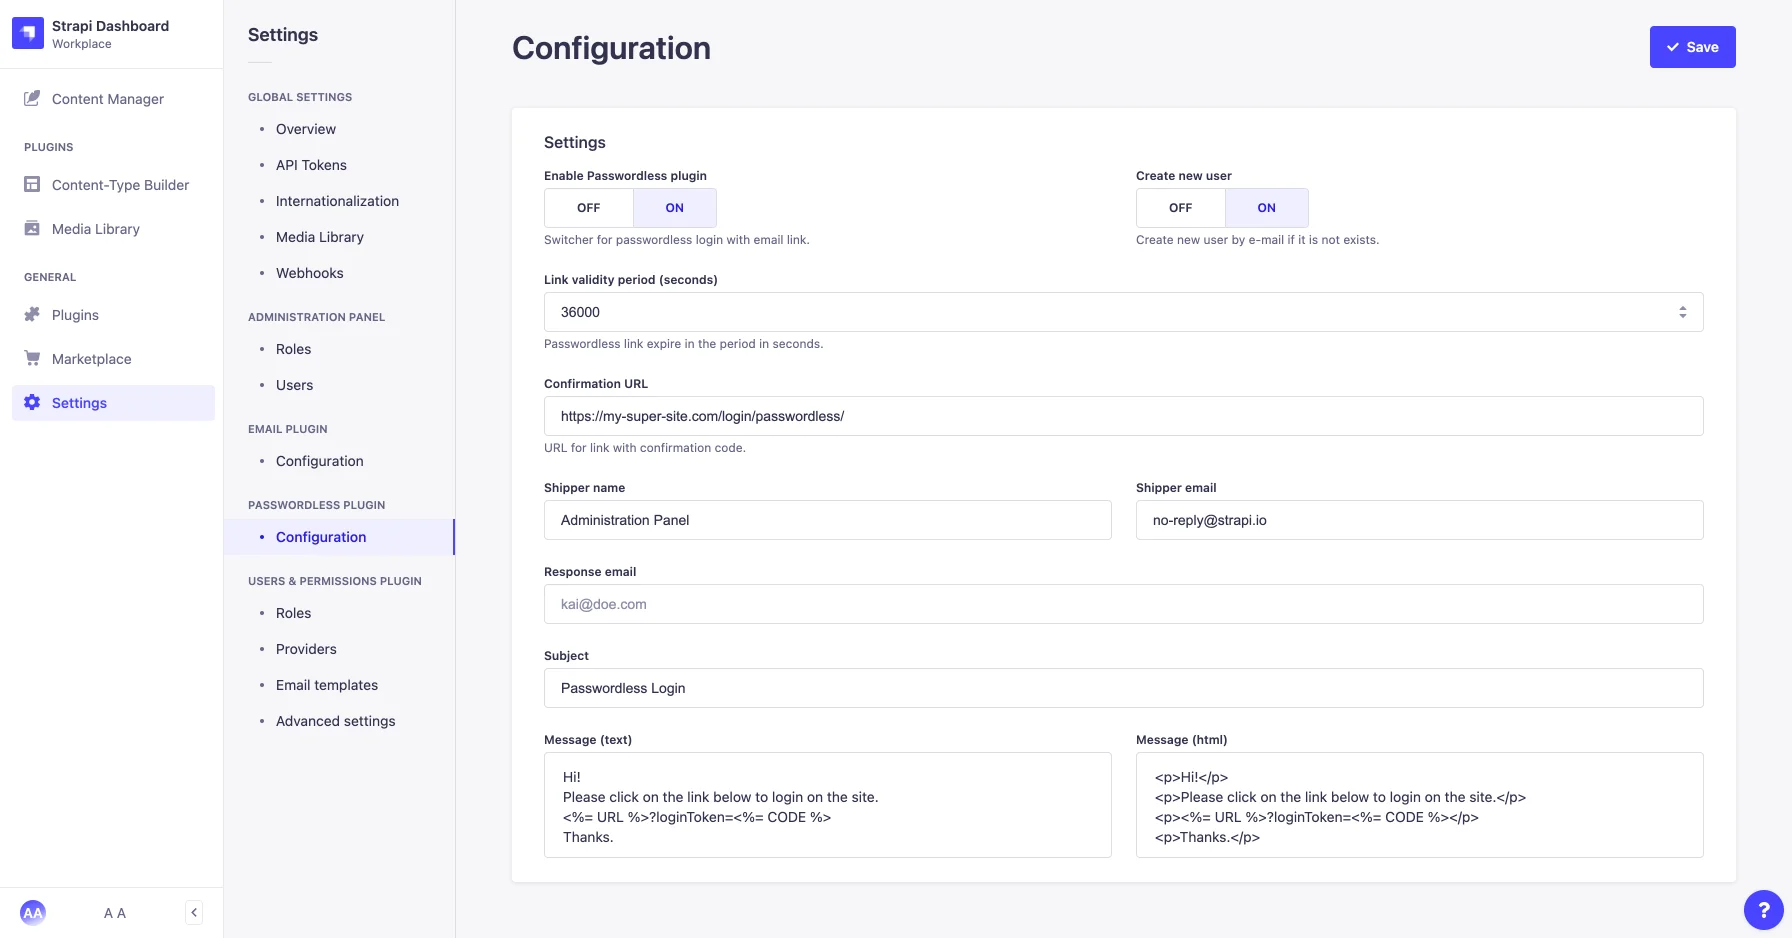
Passwordless 🔗
Passwordless is a plugin for Strapi Headless CMS that allows one to sign in or sign up to an application using a link previously delivered to an email. This plugin enhances the capabilities of the Strapi User Permissions Plugin.
Installation
To get started with this plugin, run the code snippet in your terminal.
yarn add strapi-plugin-passwordless@latest

npm i -S strapi-plugin-passwordless@latest
When you relaunch Strapi after installation, the Passwordless plugin should be visible in the Plugins area.
More fantastic features of this plugin are listed on the Passwordless Strapi Market page.
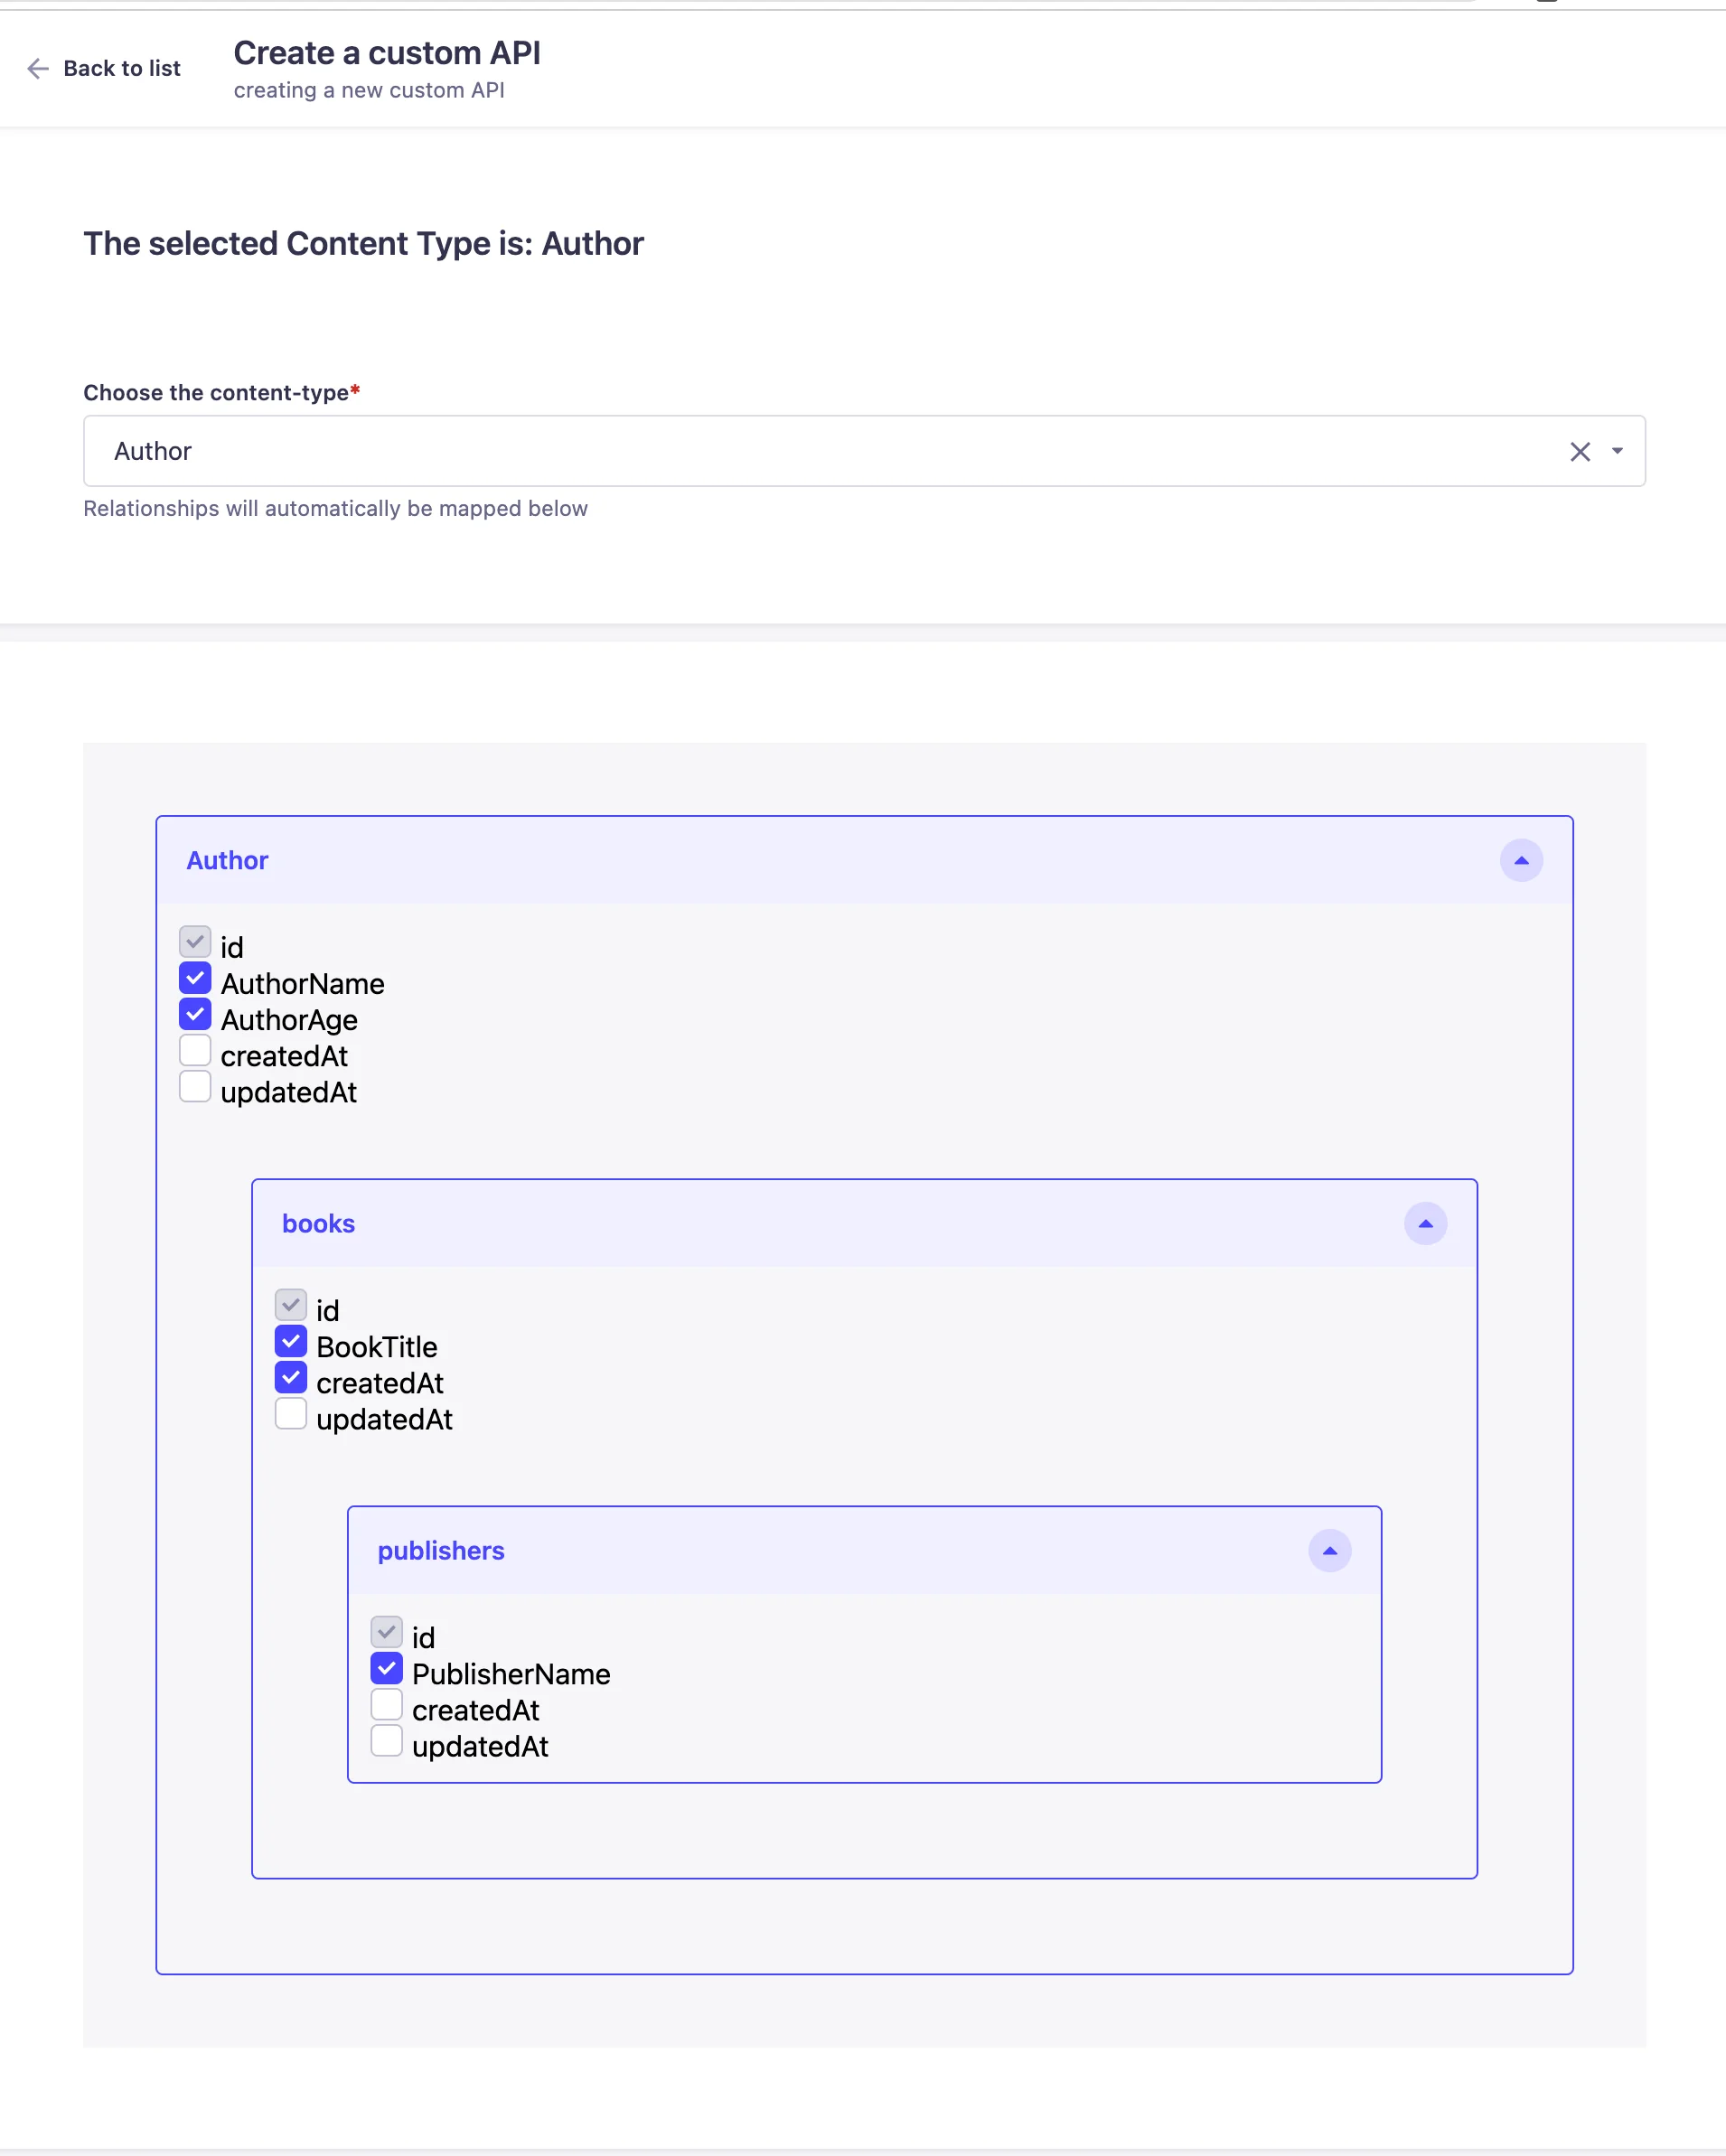
Custom-API-Builder 🔗
The Custom-API-Builder plugin enables you to create custom APIs right from the Strapi CMS admin panel. Simply choose the fields you want to display, type a legitimate slug, and then sit back and watch the plugin generate the routes, controllers, and services on its own. It is a fairly simple process to build your own API.
Installation
To get started with this plugin, run the following command.
yarn add strapi-plugin-custom-api@latest

npm i -S strapi-plugin-custom-api@latest
Configuration
After installing, create a new file plugins.js in the config folder. Add the code snippets to your config/plugins.js file.
module.exports = {
  "custom-api": {
    enabled: true,
  },
};
Find all of the fantastic features of this plugin listed in the Strapi Market.
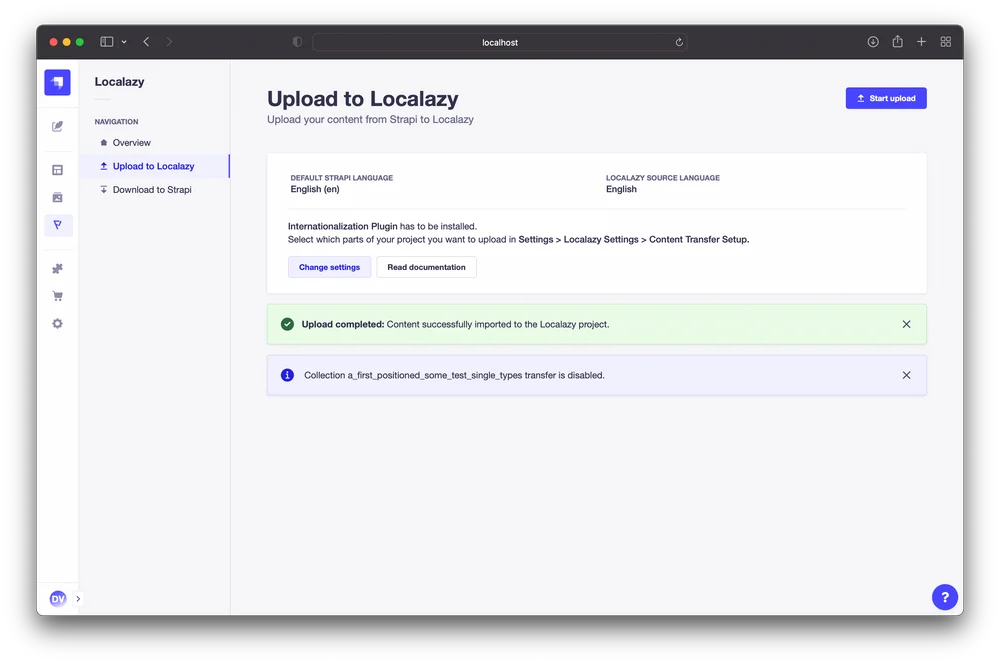
Localazy 🔗
Using the Localazy plugin for Strapi localization, you can easily translate your content into several languages. With the help of this plugin, you may translate your material manually or have the Localazy Continuous Localization Team do it for you. Additionally, you may rapidly bulk-translate everything or invite your translators.

Experience seamless multilingual content management. Simply sync your Strapi content with Localazy and download the translated material back to Strapi with one click.
To see the plugin in action and learn more about its features, watch this video, where Paul Bratslavsky (@codingthirty) interviewed Dan (@dan_charvat) and David (@dave_vaclavek) from Localazy.
Installation
To get started with this plugin, run the code snippet in your terminal.
npm install @localazy/strapi-plugin

yarn add @localazy/strapi-plugin
Configuration
Following installation, run the code snippet below. With this command, the Strapi Admin panel UI is rebuilt. You are then prepared to start translating your Strapi content.
npm run build
The official documentation contains more information about using the Localazy plugin with your Strapi project. Or you can check out the plugin's Strapi Market listing and try it yourself.
📚 Further reading 🔗
You can learn more about using Strapi with the Localazy plugin on the blog:
- Managing multilingual content with Strapi CMS & Localazy
- Introducing the Strapi localization plugin by Localazy
Or on the Strapi blog:
✔️ Conclusion 🔗
Although there are many more fantastic plugins in the Strapi Market or on GitHub, we've highlighted the top 10 plugins so you may use them in your next Strapi project.
Did you find your favorite? Would you add some other plugins to the list? Let us know in the comments!