Building invoices is easy; making them feel native in every language is where the real craft lives. In this guide, we’ll turn a simple Angular invoice app into a polished, multilingual experience using Angular localization library ngx-translate for runtime i18n and Localazy for a smooth upload-translate-download loop. Along the way, we’ll add ICU plurals, a pseudo-locale for visual QA, and a few PWA touches so your localized app feels fast, offline-friendly, and ready for real users.
🧱 What you'll build in this tutorial 🔗
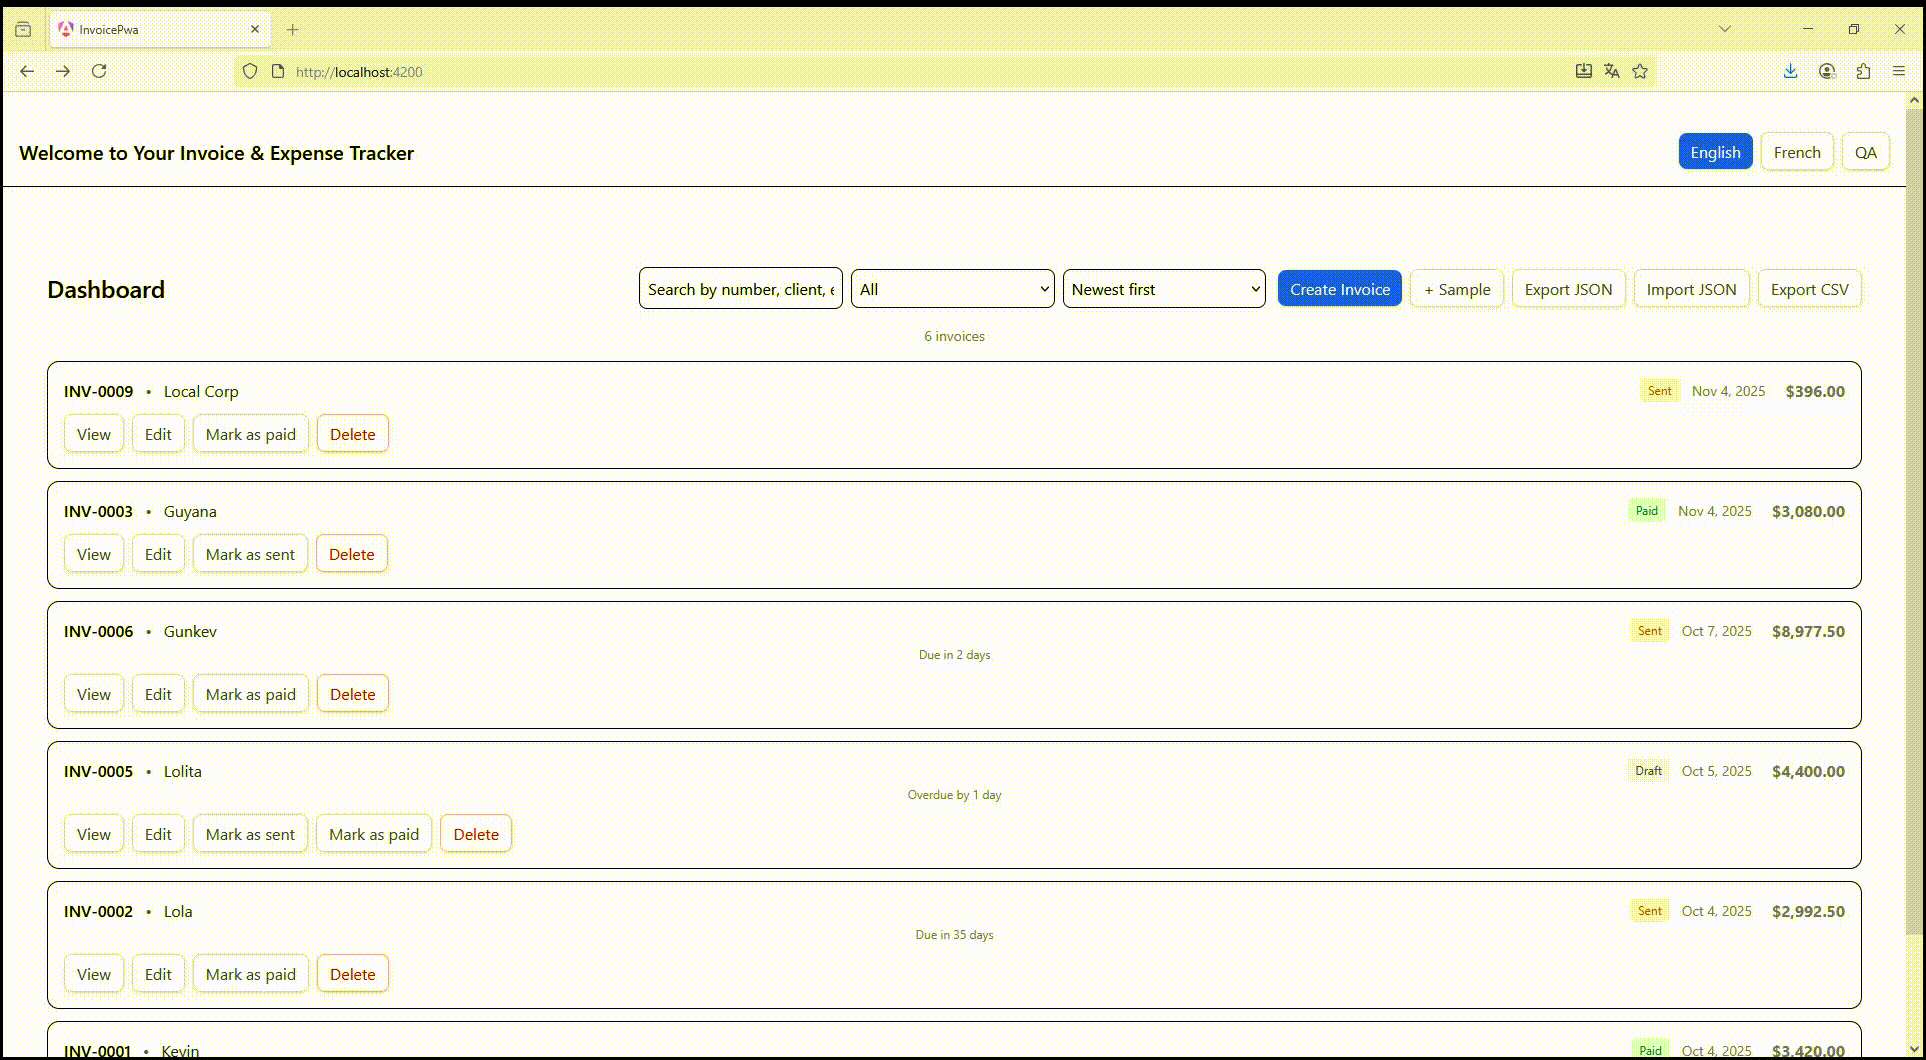
Here’s a quick look at the Angular localization app you’ll create in this tutorial. The video below shows the final result, including the integration with Localazy for managing translations effortlessly.
- 🏗️ Part 1: Foundations. Set up your Angular project, configure runtime i18n with ngx-translate, handle missing translations, and style everything with Tailwind.
- 📲 Part 2: App logic. Build the full invoice dashboard and create, edit, delete, print, and export invoices while preparing every element for translation.
- 🌎 Part 3: i18n. Integrate Localazy, manage the translation workflow, add pseudo-locales for testing, and use ICU pluralization for dynamic content.
🧑🏿💻 Project overview 🔗
In this project, you’ll build a Progressive Web App (PWA) using Angular designed to showcase a complete localization workflow. The app manages invoice data, supports multiple languages, and integrates with Localazy for automated translation management.
invoice-pwa/
├── public/
│   ├── assets/
│   │   └── i18n/
│   │       ├── en.json
│   │       ├── fr.json
│   │       └── qps.json
│   ├── icons/
│   ├── favicon.ico
│   └── manifest.webmanifest
│
├── src/
│   ├── app/
│   │   ├── core/
│   │   │   ├── models/
│   │   │   │   └── invoice.model.ts
│   │   │   ├── network/
│   │   │   │   └── network.service.ts
│   │   │   ├── persistence/
│   │   │   │   ├── invoice.repository.ts
│   │   │   │   └── invoice.serialization.ts
│   │   │   ├── pwa/
│   │   │   │   ├── pwa.service.ts
│   │   │   │   └── update.service.ts
│   │   │   ├── stores/
│   │   │   │   └── invoice.store.ts
│   │   │   ├── utils/
│   │   │   │   ├── csv.ts
│   │   │   │   ├── date.ts
│   │   │   │   ├── files.ts
│   │   │   │   ├── id.ts
│   │   │   │   ├── money.ts
│   │   │   │   ├── time.ts
│   │   │   │   └── dev-missing.handler.ts
│   │   │   ├── language.service.ts
│   │   │   └── locale-format.service.ts
│   │   │
│   │   ├── features/
│   │   │   ├── dashboard/
│   │   │   │   ├── dashboard.component.html
│   │   │   │   ├── dashboard.component.scss
│   │   │   │   └── dashboard.component.ts
│   │   │   ├── invoice-edit/
│   │   │   │   ├── invoice-edit.component.html
│   │   │   │   ├── invoice-edit.component.scss
│   │   │   │   └── invoice-edit.component.ts
│   │   │   └── invoice-view/
│   │   │       ├── invoice-view.component.html
│   │   │       ├── invoice-view.component.scss
│   │   │       └── invoice-view.component.ts
│   │   │
│   │   ├── shared/
│   │   │   └── translate-loader.factory.ts
│   │   ├── app.config.ts
│   │   ├── app.routes.ts
│   │   ├── app.html
│   │   ├── app.scss
│   │   ├── app.spec.ts
│   │   ├── app.ts
│   │   ├── index.html
│   │   ├── main.ts
│   │   └── styles.scss
│
├── .editorconfig
├── .gitignore
├── .postcssrc.json
├── angular.json
├── localazy.json
├── localazy.keys.json
├── ngsw-config.json
├── package-lock.json
├── package.json
├── [README.md](http://readme.md/)
├── tailwind.config.js
├── tsconfig.app.json
├── tsconfig.json
└── tsconfig.spec.json

The folder structure is organized for clarity and
For clarity and stability, the folder structure is organized like this:
public/assets/i18nholds all translation files (en.json,fr.json, andqps.json) used by the Angular i18n system.src/app/corecontains essential app logic such as models, data persistence, network handling, and localization services.src/app/featuresincludes feature modules like the dashboard, invoice editor, and invoice viewer that demonstrate component-based structures in Angular.src/app/sharedprovides shared utilities like the custom translation loader used to connect ngx-translate with Localazy.- Root files such as
angular.json,localazy.json, andtailwind.config.jsdefine build configuration, localization settings, and global styling via Tailwind CSS.
This modular setup will make our app maintainable while providing a solid foundation for scaling to more languages, features, and environments.
1️⃣ Step 1: Create a new Angular application 🔗
To begin integrating Angular i18n with Localazy, first scaffold a clean Angular workspace.
This ensures your localization setup is consistent and ready for translation file extraction later.
Run the following command in your terminal:
npx @angular/cli@latest new invoice-pwa --routing --style=scss
When prompted, select the following options:
- Server-Side Rendering (SSR) and Static Site Generation: No
- 'Zoneless' application without zone.js: No
- AI tools configuration: None
With this, you'll get a clean environment without extra dependencies or configurations that might distract from the core topic of integrating Angular with Localazy.
Once the CLI finishes, navigate to your new project directory.
cd invoice-pwa
You now have a baseline Angular project with routing and SCSS styling, ideal for adding Angular i18n, @angular/localize, or ngx-translate later on in this tutorial.
Project setup 🔗
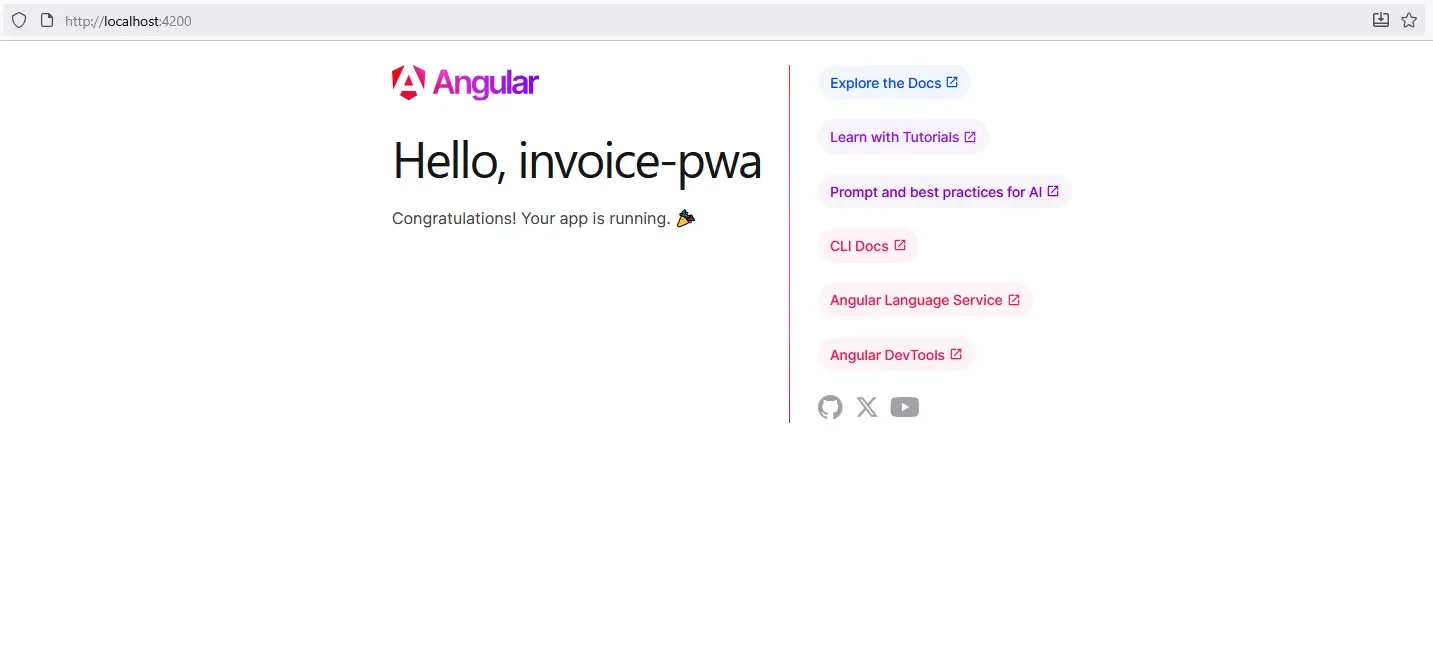
Before you integrate Angular with Localazy, confirm that your base project runs correctly. This step ensures your environment, dependencies, and Angular CLI configuration are all working as expected.
Run the following commands:
npm install
npm start
Once the development server starts, open your browser and navigate to:
<http://localhost:4200/>
You should see the default Angular welcome page:
2️⃣ Step 2: Set up runtime i18n with ngx-translate 🔗
Runtime internationalization allows your Angular app to load and switch languages instantly without needing to rebuild. While the built-in Angular i18n is ideal for compile-time translations, this tutorial focuses on ngx-translate, a more flexible runtime alternative. We’ll use it and its companion libraries to handle dynamic language changes, and later connect it seamlessly with Localazy for automated translation management.
Run the following commands to add the core translation and message formatting packages:
npm install @ngx-translate/core @ngx-translate/http-loader
npm install ngx-translate-messageformat-compiler messageformat
These packages provide:
- @ngx-translate/core, the main translation service and pipe.
- @ngx-translate/http-loader loads translation files from assets.
- ngx-translate-messageformat-compiler and messageformat enable pluralization and complex message syntax following the ICU Message Format standard (e.g., “{count, plural, one {1 item} other {# items}}”). With ngx-translate installed, the next step is to give it something to load.
3️⃣ Step 3: Create translation files 🔗
Inside your project, create a dedicated folder for localization files and add two JSON files for your target languages:
public/assets/i18n/en.json
public/assets/i18n/fr.json
Each file will hold key-value pairs for translated strings. For example:
src/assets/i18n/en.json
{
  "app": {
    "title": "Welcome to Your Invoice & Expense Tracker",
  },
  "lang": {
    "switch": "Change Language",
    "en": "English",
    "fr": "French"
  }
}
src/assets/i18n/fr.json
{
  "app": {
    "title": "Bienvenue dans votre outil de suivi des factures et des dépenses",
    "welcome": "Bienvenue dans notre application !"
  },
  "lang": {
    "switch": "Changer de langue",
    "en": "Anglais",
    "fr": "Français"
  }
}
We’ll later add a qps.json pseudo-locale file, as you saw in the project structure, to show how pseudo-localization helps identify untranslated or hard-coded text during development. This will also be important when syncing with Localazy.
4️⃣ Step 4: Configure the translation loader 🔗
The app needs to know where to fetch translations and how to initialize a default locale. We’ll configure TranslateModule to use an HTTP loader that pulls JSON files at runtime. This follows the standard ngx-translate pattern.
Before Angular can fetch your translation files, it needs a loader that knows where to look. The HttpLoaderFactory handles this by defining the base path used by @ngx-translate/http-loader and plays nicely with sub-path deployments.
Create the file:
src/app/shared/translate-loader.factory.ts
Add the following code:
import { TranslateLoader } from '@ngx-translate/core';
import { TranslateHttpLoader } from '@ngx-translate/http-loader';

/**
 * Uses document.baseURI so it also works when the app is deployed under a sub-path.
 * Example URL: <base href="/invoice-pwa/">
 */
export function HttpLoaderFactory(): TranslateLoader {
  return new TranslateHttpLoader();
}
This factory simply tells Angular where to load translation files from at runtime. It ensures your app fetches language JSONs correctly, even when deployed in subdirectories, and prepares the setup for smooth TMS integration later.
5️⃣ Step 5: Add a custom missing translation handler 🔗
To make localization easier to debug during development, you can add a custom missing-translation handler. This feature helps identify untranslated keys directly in your templates, with no need to check console logs. It’s one of the most useful Angular localization best practices when working with ngx-translate instead of the default Angular i18n compiler approach.
Create the file:
src/app/core/dev-missing.handler.ts
Add the following code:
import { MissingTranslationHandler, MissingTranslationHandlerParams } from '@ngx-translate/core';

export class DevMissingHandler implements MissingTranslationHandler {
  handle(params: MissingTranslationHandlerParams) {
    // Loud in dev so you see gaps immediately. Do not enable in production.
    return `⛔ ${params.key}`;
  }
}
To simplify runtime language management, it’s best to wrap all i18n logic inside a small, dedicated service. Language switching, storage, and fallback logic will then stay consistent across components.
Create the file src/app/core/language.service.ts
Add the following code:
import { Injectable } from '@angular/core';
import { TranslateService } from '@ngx-translate/core';

type Lang = 'en' | 'fr';

@Injectable({ providedIn: 'root' })
export class LanguageService {
  private readonly storageKey = 'lang';
  private readonly supported: Lang[] = ['en', 'fr'];

  constructor(private translate: TranslateService) {}

  init(): void {
    const saved = (localStorage.getItem(this.storageKey) as Lang | null) ?? this.matchNavigator();
    this.use(saved);
  }

  use(lang: string): void {
    const chosen: Lang = this.supported.includes(lang as Lang) ? (lang as Lang) : 'en';
    this.translate.setDefaultLang('en'); // fallback
    this.translate.use(chosen).subscribe({
      next: () => localStorage.setItem(this.storageKey, chosen),
      error: () => this.translate.use('en'),
    });
  }

  private matchNavigator(): Lang {
    const nav = (navigator.language || navigator.languages?.[0] || 'en').slice(0, 2);
    return (this.supported as string[]).includes(nav) ? (nav as Lang) : 'en';
  }
}
This service handles all runtime language management for your app. It detects the user’s browser language, applies the right locale, and remembers their choice for future sessions. You’ll initialize this service during app startup (in app.ts ) to set the default language as soon as the app loads.
Let’s verify everything end-to-end by initializing it in the root component and exposing a setLang method to set the default language as soon as the app loads.
Update your src/app/app.ts (or your root component) to include the service:
import { Component, OnInit } from '@angular/core';
import { LanguageService } from './core/language.service';

@Component({
  selector: 'app-root',
  templateUrl: './app.component.html',
})
export class AppComponent implements OnInit {
  constructor(private lang: LanguageService) {}

  ngOnInit(): void {
    this.lang.init(); // picks saved/browser language and sets default fallback
  }

  setLang(code: 'en' | 'fr'): void {
    this.lang.use(code);
  }
}
Replace your existing code in app.html with the following snippet:
<header class="app-header">
  <h1>{{ 'app.title' | translate }}</h1>
  <div class="spacer"></div>
  <button type="button" (click)="setLang('en')" aria-label="Switch to English">{{ 'lang.en' | translate }}</button>
  <button type="button" (click)="setLang('fr')" aria-label="Basculer en français">{{ 'lang.fr' | translate }}</button>
</header>
<main class="app-main">
  <router-outlet />
</main>
Then run a test:
npm start
You should see the title text translated, and the language switches instantly when you click the buttons.
6️⃣ Step 6: Add Tailwind CSS for a consistent UI 🔗
With translations working, it’s time to style your Angular app using Tailwind CSS. Tailwind provides a fast, utility-first approach that keeps your UI consistent while integrating Localazy and building multilingual interfaces, a key part of modern Angular localization workflows.
1. Install dependencies 🔗
Run the following command to add Tailwind and PostCSS:
npm i -D tailwindcss @tailwindcss/postcss postcss
2. Create a PostCSS configuration 🔗
In your project root, create .postcssrc.json:
{
  "plugins": {
    "@tailwindcss/postcss": {}
  }
}
3. Import Tailwind into your global stylesheet 🔗
Since the project uses SCSS, open src/styles.scss and add:
@use "tailwindcss";

@layer components {
  .btn {
    @apply inline-flex items-center gap-2 rounded-lg bg-blue-600 px-3 py-1.5 text-white
           font-medium shadow hover:bg-blue-700 focus:outline-none
           focus:ring-2 focus:ring-blue-500/50 active:translate-y-px;
  }

  .btn-secondary {
    @apply inline-flex items-center gap-2 rounded-lg border border-gray-300 bg-white
           px-3 py-1.5 text-gray-700 shadow-sm hover:bg-gray-50 focus:outline-none
           focus:ring-2 focus:ring-gray-400/40;
  }
}
For more details, refer to the official Angular + Tailwind guide
Now, add the corresponding .btn and .btn-secondary classes to the two language switch buttons in your app.html.
4. Restart the development server 🔗
Once done, restart your Angular environment to apply the styles and confirm everything works correctly:
Ctrl + C
npm start
Your Angular app now has Tailwind CSS fully configured, and the localized buttons are styled consistently across languages.
You’ve just laid the foundation of your Angular PWA, setting up runtime i18n with ngx-translate, connecting your translation loader, handling missing keys gracefully, and giving the whole app a clean Tailwind base.
That’s a big step. You now have a flexible structure ready for real content and real users.
➡️ What next? 🔗
In the next part, you will bring this foundation to life. You’ll build the core of the invoice dashboard: creating, editing, and managing invoices with features like printing, exporting, and importing data. Each feature will quietly stay i18n-ready so that, when you move to Part 3, you can seamlessly plug everything into Localazy and localize the entire app in multiple languages, including pseudo-locales, and ICU plurals. See you there! 👋