React makes it simple to build fast, modern interfaces, but turning a UI into a real multilingual React app takes more than just hard-coded strings. In this guide, we’ll walk through a practical React localization setup using i18next and Localazy so your app can load translations from JSON files, switch languages at runtime, and keep all locales in sync.
🧱 What you'll build in this tutorial 🔗
We’ll combine i18next (the translation engine) with react-i18next (the React bindings) to handle text in the UI. Then plug in Localazy to manage your translation files, upload new keys, and download translated JSON back into your project. This guide is split into two parts:
- 🏗️ Part 1: Foundations. Set up your React project, configure i18next, handle missing translations, and wire up a language switcher.
- 🌎 Part 2: Full translation workflow. Integrate Localazy, manage the translation workflow, add pseudo-locales for testing, and use ICU pluralization for dynamic content.
You’ll build a small, focused example: a React app with text rendered via react i18n using i18next, a simple language switcher (English and French). We will also have a basic ICU-style plural message (“1 item” vs “5 items”). And finally, a repeatable React localization workflow using Localazy’s upload/download commands. The goal is not a fancy UI, but a solid, realistic foundation you can reuse in your own projects.
🧑💻 Who this guide is for 🔗
This guide is for developers who want to translate a React app without manually copying JSON files around, and for developers who want to use React internationalization patterns that scale. It is also handy fo anyone who wants to integrate Localazy with React as part of their build and deployment process.
You don’t need prior i18n experience, but you should be comfortable with basic React (components, props, hooks), Node.js and yarn, npm or pnpm, and running commands in your terminal.
📋 Requirements 🔗
Before you start, make sure you have:
- Node.js and a package manager (npm, pnpm, or Yarn) installed.
- A recent React toolchain (we’ll use Vite in this guide).
- A free Localazy account with access to your project’s write/read keys.
The steps below walk you through setting up a complete Localazy translation workflow in your React application. Follow along carefully to make sure each piece connects correctly before moving to the next.
⚡ But first: choose a build tool 🔗
React can be initialized in different ways depending on your stack: Create React App (CRA), Next.js, Remix, Vite, and others. For this guide, we'll use Vite — it boots faster than CRA (which is now deprecated), has a simpler config, works well with modern ES modules, and keeps the setup minimal so we can focus on localization rather than boilerplate.
👉 If you'd like to explore a different i18n library, we also have a guide using LinguiJS and Localazy
1️⃣ Step 1: Create the project 🔗
Let’s scaffold a new React project using Vite. Run this command in your terminal:
yarn create vite react-localized --template react
This generates a minimal React project in a folder named react-localized with React + JSX enabled. No extra dependencies, dev server ready.
After creation, move into the folder and install packages:
cd react-localized
yarn install
Now you can start the dev server:
yarn dev
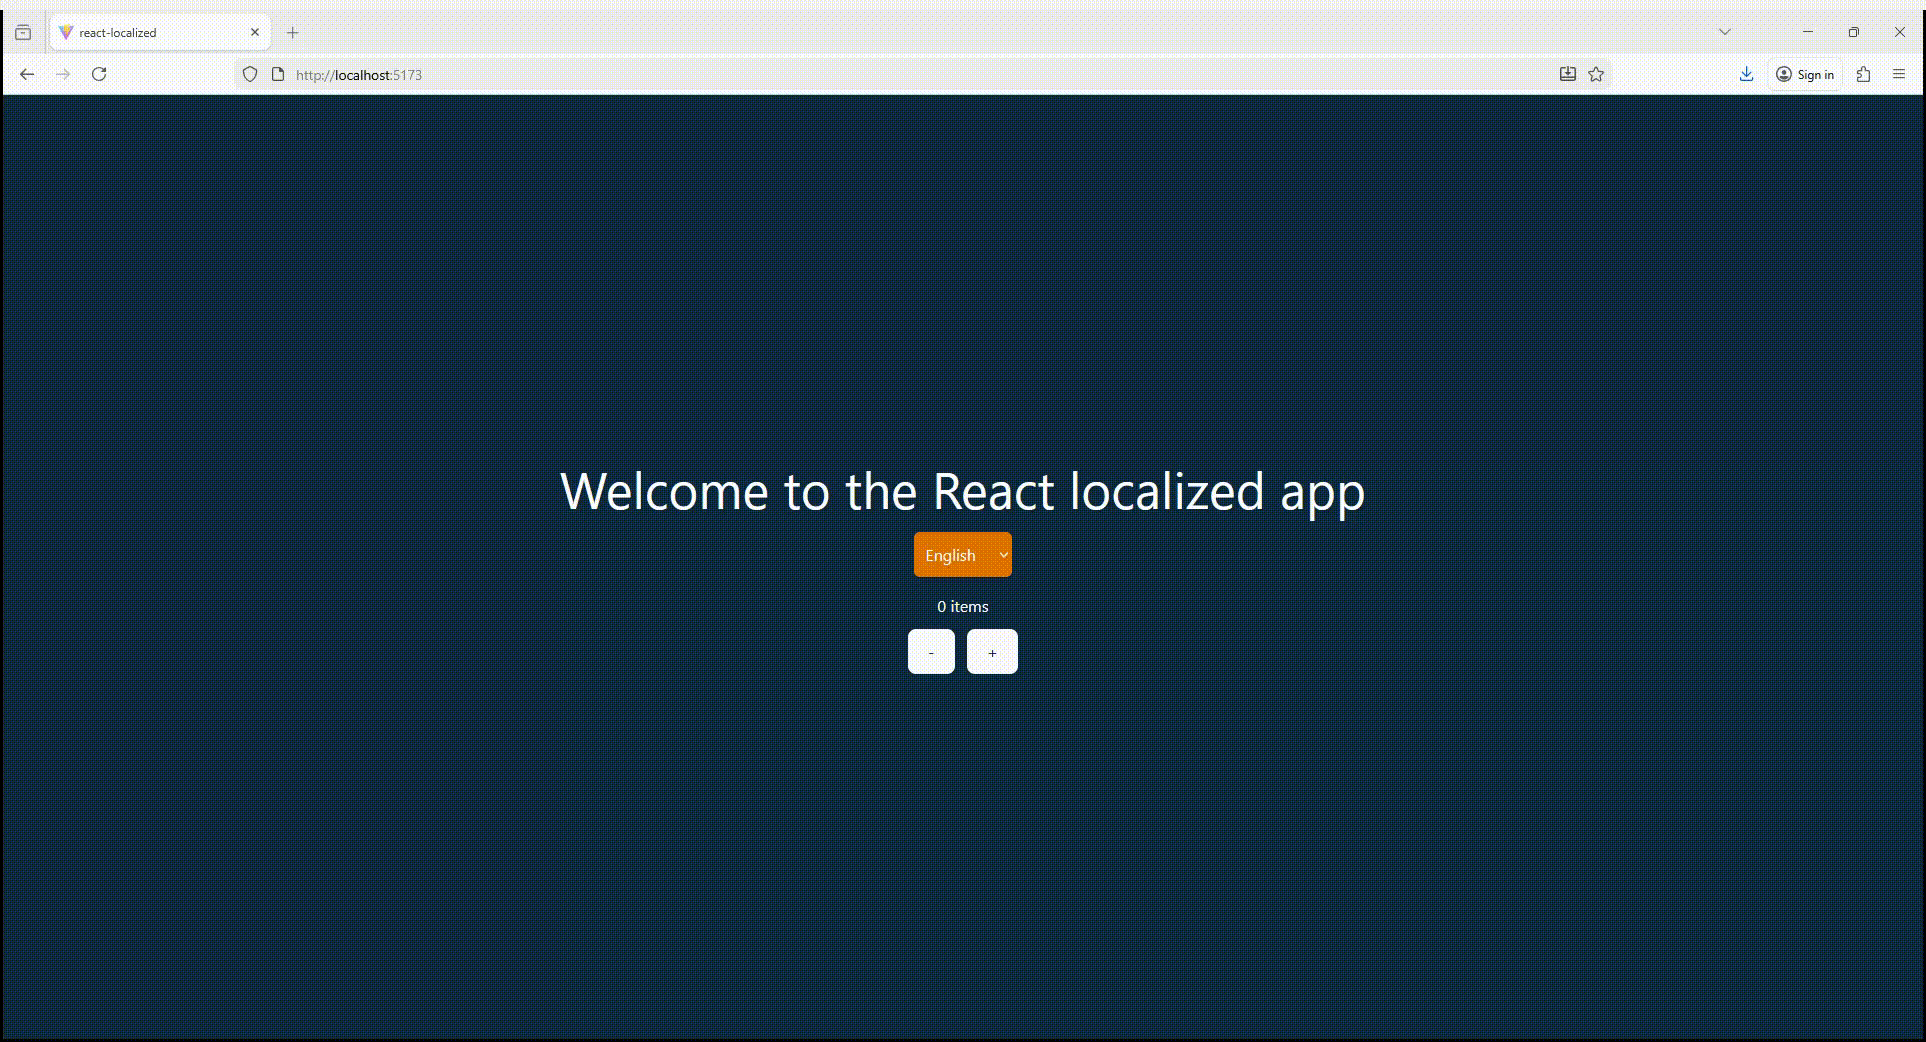
You should see Vite’s default React starter running at http://localhost:5173.
Project structure overview 🔗
This is the complete structure. We will build it progressively throughout the guide.
react-localized/
├─ public/
├─ src/
│  ├─ assets/
│  │  └─ i18n/
│  │     ├─ en.json
│  │     ├─ fr.json
│  │     ├─ qps.json
│  │     └─ index.js
│  ├─ App.jsx
│  ├─ App.css
│  ├─ main.jsx
│  └─ index.css
├─ .gitignore
├─ eslint.config.js
├─ index.html
├─ localazy.json
├─ localazy.keys.json
├─ package.json
├─ tailwind.config.js
├─ vite.config.js
└─ yarn.lock
The most important directory here is src/assets/i18n/. This is where all translation files live (en.json, fr.json, qps.json) along with the index.js file that initializes i18next. Everything related to localization stays in this folder so translations are easy to manage and version.
At the root, localazy.json defines how translations are uploaded and downloaded, while localazy.keys.json contains your API keys (excluded from version control). The vite.config.js and tailwind.config.js files ensure the build pipeline and styling work correctly. Finally, main.jsx initializes React and imports the i18n config so translations load automatically at startup.
Before adding translations, we’ll create a dedicated folder for localization files.
Create the i18n folder 🔗
Inside the src directory, create a new folder named i18n:
src/i18n/This folder will hold en.json (your source language, which you'll later upload to Localazy), any additional language files downloaded from Localazy, and the index.js file where we'll write the i18next config. Nothing goes inside it yet. This step just defines where all localization-related files will live.
2️⃣ Step 2: Install dependencies 🔗
Install i18next and react-i18next 🔗
You need two translation libraries: i18next, the translation engine that handles all the i18n heavy lifting, and react-i18next, which hooks it into React via the useTranslation() hook. Install both with:
yarn add i18next react-i18nextInstall Localazy CLI 🔗
Localazy will manage the upload and download workflow for your JSON translation files. Install it as a development dependency so you can run it through npx during the build process:
npx localazy upload
npx localazy download
You will set up the configuration file later, after we create the base translation files.
3️⃣ Step 3: Configure Localazy 🔗
Localazy needs a config file at the root of your project to understand the structure, what to upload, where to place translated files, and which features to enable.
Create the localazy.json file 🔗
Localazy needs a config file sitting right in the root of the project — otherwise it has no idea what to upload, where to dump the translated files, or which options you actually want turned on (like ICU features).
Create a new file at the project root:
localazy.jsonStart with a minimal structure:
{
  "upload": {
    "type": "json",
    "files": [{}]
  },
  "download": {
    "files": [{}]
  }
}
You will configure upload and download paths in the next steps.
Add upload settings 🔗
Since English is our base language and we're storing language files in src/i18n, we'll point Localazy to en.json. Update the upload section like this:
{
  "upload": {
    "type": "json",
    "files": [
      {
        "pattern": "src/i18n/en.json",
        "lang": "en",
        "path": "src/i18n"
      }
    ]
  },
  "download": {
    "files": [{}]
  }
}
This means that, when you run npx localazy upload, Localazy will push en.json as the source translation file.
Add download settings 🔗
Now we need to tell Localazy where to place downloaded translations. Since new locales should appear alongside en.json, we'll map each language to a file named after its code (fr.json, es.json).
Update the download section like this:
{
  "upload": {
    "type": "json",
    "files": [
      {
        "pattern": "src/i18n/en.json",
        "lang": "en",
        "path": "src/i18n"
      }
    ]
  },
  "download": {
    "files": [
      {
        "output": "${path}/${lang}.json"
      }
    ]
  }
}
Enable ICU plural parsing 🔗
If your translation files include ICU-style plural messages like:
"{count, plural, one {# item} other {# items}}"Localazy needs to know this so it can parse the message correctly and present plural fields properly to translators. Add this to your localazy.json:
{
  "upload": {
    "type": "json",
    "features": ["plural_icu"], // Add this
    "files": [
      {
        "pattern": "src/i18n/en.json",
        "lang": "en",
        "path": "src/i18n"
      }
    ]
  },
  "download": {
    "files": [
      {
        "output": "${path}/${lang}.json"
      }
    ]
  }
}
Without this, Localazy treats the plural string as plain text and translators see a raw ICU string instead of structured plural forms, which leads to formatting errors down the line. We'll create our first ICU plural example in the next step when we add keys to en.json.
Now that the integration part is ready, we will create the actual translation file that the React app and i18next will use.
4️⃣ Step 4: Add base translation files 🔗
As we mentioned earlier, English will be our base language and you will later pull additional languages from Localazy rather than creating them manually.
Create the English source file 🔗
Create the first translation file:
src/i18n/en.jsonInside, add a few keys to test basic React i18n behavior:
{
  "welcome": "Welcome to the React localized app",
  "language": "Langue",
  "items": "{count, plural, one {# item} other {# items}}"
}
This gives us enough content to verify that translations load correctly in React, that ICU plural formatting works with i18next, and that Localazy parses plural messages correctly after upload.
We're not creating any translated files yet. Localazy will generate them automatically once we upload this English file, add translations in the dashboard, and pull them back into the project. When that happens, you'll see new files appear alongside en.json, such as fr.json for French or qps.json for pseudo-localization.
5️⃣ Step 5: Initialize i18next in React 🔗
With the translation files in place, it's time to wire up i18next and connect it to React.
Create the i18n configuration file 🔗
Before React can read translations from en.json, we need to configure i18next and connect it to React through react-i18next. Create a dedicated file inside the i18n folder:
src/i18n/index.jsAdd the initial configuration:
import i18n from "i18next";
import { initReactI18next } from "react-i18next";
import en from "./en.json";

i18n
  .use(initReactI18next)
  .init({
    resources: {
      en: { translation: en }
    },
    lng: "en",
    fallbackLng: "en",
    interpolation: {
      escapeValue: false
    }
  });

export default i18n;
This file loads the English translations, registers the React bindings, and sets English as the default and fallback language. We’ll add more languages here once Localazy downloads additional JSON files.
Import the i18n config in the React entry file 🔗
Now that the i18n configuration exists, we need to make sure it loads before any components render. Open:
src/main.jsxAdd this in the import section:
import "./i18n";You don’t need to call anything explicitly, since just importing the file initializes i18next and attaches the React bindings so that components can use translations.
At this point, the app has a working translation system, even though we’re only loading English. Nothing will change visually yet because we haven't replaced any hard-coded text with translation calls, but the foundation is set.
Use translations inside components 🔗
Now that the i18n setup is loaded globally, we can start replacing hardcoded strings in components with real localized text. The react-i18next library provides a useTranslation() hook that gives access to the t() function, which retrieves values from en.json.
Open src/App.jsx and update it like this:
import { useTranslation } from "react-i18next";

function App() {
  const { t } = useTranslation();

  return (
    <div className="p-6">
      <h1>{t("welcome")}</h1>
    </div>
  );
}

export default App;
The text is now coming from the translation file instead of being typed manually. As you continue adding UI, you’ll replace normal strings with calls like t("language") or t("items", { count }) once pluralization comes into play.
This verifies that our React localization setup is actually working before we move on to language switching and syncing translations with Localazy.
Add a simple language switcher 🔗
To make the app multilingual rather than locked to English, we need a way to switch languages at runtime. i18next exposes a changeLanguage() method, which we can call from any React component.
For now, we’ll create a very simple toggle just to verify that switching works once additional language files are available.
Add this to src/App.jsx, below the useTranslation() hook:
<button
  onClick={() => i18n.changeLanguage("fr")}
  className="mt-4 bg-amber-600 p-3 rounded-md"
>
  {t("languange")}
</button>
Make sure to import i18n at the top:
import i18n from "./i18n";Right now, switching to "fr" won’t change anything yet because the French file hasn’t been generated. Localazy will handle that later. But wiring the switcher now helps us immediately verify translations once they download.
As the UI grows, you'll replace this button with a select, but this minimal setup is enough to confirm the React localization workflow is working.
➡️ What's next? 🔗
You've just laid the foundation of your React localization setup: i18next is wired up, English translations are loading, and a language switcher is ready to go. That's the hard part done.
In Part 2, we'll bring Localazy fully into the picture. You'll upload your English strings, manage translations in the Localazy dashboard, pull translated JSON files back into the project, add a pseudo-locale for visual QA, and handle ICU plurals for dynamic content. See you there! 👋