Localazy’s most prominent features are a pro-active review process, highly accurate translation memory supported by community-shared translations and non-disturbing, and crystal clear UI which is not bloated with rarely used options. And as I’ll show shortly, it works seamlessly with vue-i18n. Thanks to that, managing translation strings, even with open-source projects where anybody can contribute (with varying quality), is a piece of cake 🍰.
tldr; 🔗
- sign up for Localazy,
- create an app with English as source language and Use community translations (ShareTM) option enabled,
- select Vue.js integration option and install Localazy CLI,
- install and configure vue-i18n
- create
localazy.jsonin root and paste in and modify the configuration - create
localesfolder and in it createen.json. Add any translation key-value pair, e.g. - run
localazy upload, - in Localazy, add any language. Then review it and accept the suggested phrases,
- run
localazy downloadand check locales folder for the new locale, - run the app
npm run serve
Sign up and app creation 🔗
First of all, let’s set up a new account on Localazy and create a new application. In this article, we’ll use English as the source language, but you can generally choose any other. Make sure that the Use community translations (ShareTM) option is enabled. ShareTM is the highly accurate translation memory I mentioned. Thanks to it, most of the new applications have as much as 50 % of their strings automatically available for translation into 80+ languages.
Proceed to create the app. Afterward, select Vue.js on the integration screen. We’ll use the powerful CLI tool to manage the upload and download of phrases. Installation is available for Linux, MacOS and Windows. Note the read and write keys in step 2. We’ll need it shortly.
Set up Vue project 🔗
If you don’t want to follow the step-by-step guide here, you can take a look at the finished repo. Otherwise, stay awhile and listen.
Create a new Vue project with vue create vue-i18n-example (if you don’t have Vue CLI installed, run npm install -g @vue/cli) and use Vue 2 preset. Once everything is installed, add vue-i18n.
npm install vue-i18n
Now it’s time to add integration with Localazy. Create localazy.json in the root folder and paste the following configuration. Use the write and read keys from the step 2 of the integration guide page.
{
    "writeKey": "your-write-key",
    "readKey": "your-read-key",

    "upload": {
      "type": "json",
      "files": "src/assets/locales/en.json"
    },

    "download": {
      "files": "src/assets/locales/${lang}.json"
    }
}
Additionally, create src/assets/locales folder and en.json file inside. Since we’ve set English to be the source language, this file will contain the source phrases for our application. You can fill in any key-value pair you like. I’ll add this.
{
  "hello": "Hello, my friend",
  "stay_awhile_and_listen": "Stay awhile and listen"
}
At this point, the application is ready to have localization managed by Localazy. Before we upload the first bunch of strings, let’s prepare a test scenario with vue-i18n to get it off our plates.
First modify main.js.
import Vue from 'vue'
import App from './App.vue'
import VueI18n from "vue-i18n";
import en from "../src/assets/locales/en.json";

const messages = {
    en,
}

Vue.use(VueI18n);
const i18n = new VueI18n({
    locale: 'en',
    messages
})


Vue.config.productionTip = false

new Vue({
  i18n,
  render: h => h(App),
}).$mount('#app')
And then App.vue
<template>
  <div id="app">
    <h1>{{$t('hello')}}</h1>
    <h2>{{$t('stay_awhile_and_listen')}}</h2>
  </div>
</template>

<script>

export default {
  name: 'App',
}
</script>

<style>
#app {
  font-family: Avenir, Helvetica, Arial, sans-serif;
  -webkit-font-smoothing: antialiased;
  -moz-osx-font-smoothing: grayscale;
  text-align: center;
  color: #2c3e50;
  margin-top: 60px;
}
</style>
When you run npm run serve, you should see the two English phrases. Nothing fancy so far.
Uploading and downloading phrases 🔗
Let’s upload the English file to Localazy. From the root folder, run the following command
localazy upload -s
The -s argument stands for simulate. It is a good practice to test out the configuration without uploading anything to assure that nothing unexpected happens (such as some of the key-value pairs are incorrectly matched and override each other). The output should be something along these lines, depending on the CLI version
Localazy CLI, v1.1.9
Advanced file uploader/downloader for the Localazy translation platform.

Read more information at https://localazy.com/docs/cli

Uploading...
  - deprecate missing: false
  - import as new: false
  - app version: 0
  - groups: (default only)
  - folder: .

Processing files...

./src/assets/locales/en.json
  (file=file.json, lang=inherited, type=json)

Verifying...

Validating...

Done.
Everything worked out well and our English file was matched. This time let’s let upload it for real.
localazy upload
Refresh your app page and you should see the English language on the list. Open the Add languages tab and there you find a couple of languages with info about the percentage of automated translations. It is possible that you will see either 50 % or 100 %. The automated matching with ShareTM improves all the time and it’s likely that thanks to this article you would have all the phrases automatically translated. How cool is that? 🙂
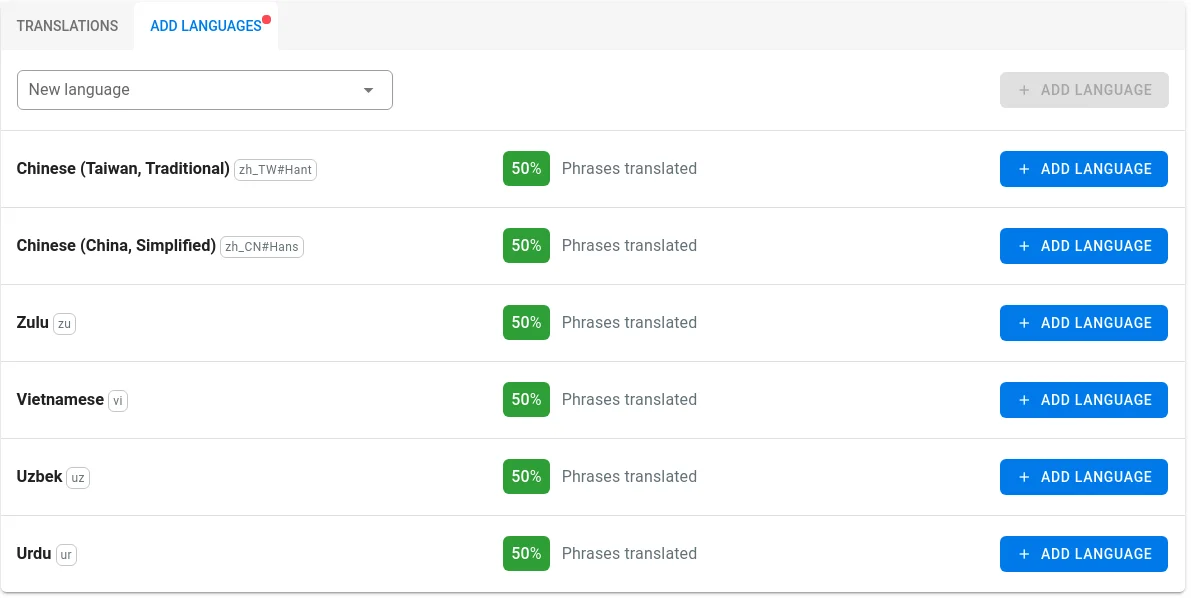
One way or another, look up German and add it to your app. You’ll see there is a review button. Every time ShareTM provides a translation suggestion it will have candidate status. This means that it will be ready for review and any reviewer can either approve it or decline. Go ahead and approve the suggested phrase(s).

In case that the ShareTM did not translate 100 % of phrases, come back to the languages list and notice that the review button now reads translate. Localazy recognizes that there is nothing to review but still something to translate, so it offers you the next most likely action in one click. Translate the other phrase (you may use a suggested phrase on the translation page). This time you do not need to go through the review process since you are a trusted translator as owner by default, so the translation is immediately approved.
It’s time to go back to the Vue project.
localazy download
With this command, you’ll download all the newly accepted phrases and newly added languages. In the locales folder, we can see there is newly de.json.
The last thing to be done is to update main.js and add the German locale resource file.
import Vue from 'vue'
import App from './App.vue'
import VueI18n from "vue-i18n";
import en from "../src/assets/locales/en.json";
import de from "../src/assets/locales/de.json";


const messages = {
    en,
    de
}

Vue.use(VueI18n);
const i18n = new VueI18n({
    locale: 'de',
    messages
})


Vue.config.productionTip = false

new Vue({
  i18n,
  render: h => h(App),
}).$mount('#app')
Now when you run the app again, you’ll see that the phrases were correctly translated to German.
Closing words 🔗
I hope you’ve enjoyed this short intro into Localazy with vue-i18n. If you’d like to get closer to us, join us on Discord.
Some parts of this article might not be accurate. This article mentions the ShareTM feature, which we've updated later. Learn more about the Localazy ShareTM improvements in this article.