👋 Introduction 🔗
Why did I even want to write this article in the first place? 😬 As a part of one of my tasks, I was supposed to handle long-running operations which use WebSockets for communication.
The goal was to test the events that follow after finishing a long-running operation. We use STOMP over WebSocket (I will explain what it means later, don't worry). We also take advantage of CI on GitHub and Cypress framework to ensure that the product passes the automated tests before we release a new feature.
I spent almost a day Googling and reading through GitHub threads for a good solution that would work for our case - unfortunately, without any success. 😤
Basically, all of the methods I found use Socket.IO or a non-specified message format, and most of the solutions discussed on Stack Overflow and GitHub ended up not working for most of the users, which really surprised me.
Do developers just not test the actions that happen after a WebSocket message is received? I do not certainly know the answer to this question, but it definitely motivated me to write this post. 🤠
🤔 What is STOMP over WebSocket? 🔗
STOMP itself is a simple text-oriented messaging protocol. It defines an interoperable wire format so that any of the available STOMP clients can communicate with any STOMP message broker to provide easy and widespread messaging interoperability among languages and platforms.
Raw WebSockets can be used without STOMP. STOMP is derived on top of WebSockets. STOMP just mentions a few specific ways in which the message frames are exchanged between the client and the server using WebSockets.
Besides STOMP, there are various standardized protocols, e.g. Socket.IO or WAMP. For the sake of maintainability, you should definitely use something standardized. 👈
Why do we use STOMP, then? Well, both Broker and client are easy-to-implement. We use ActiveMQ as the broker, which works basically out of the box. Also, there are good TypeScript libraries that are easy to use and work well.
🚩 Localazy Alerts 🔗
Now, I’d like to give you a quick overview of alerts in Localazy to fully understand the problem. In the screenshot below, you can see a Success and a Wait alert type at the bottom. Apart from those, we have a few more types, not relevant at this moment.
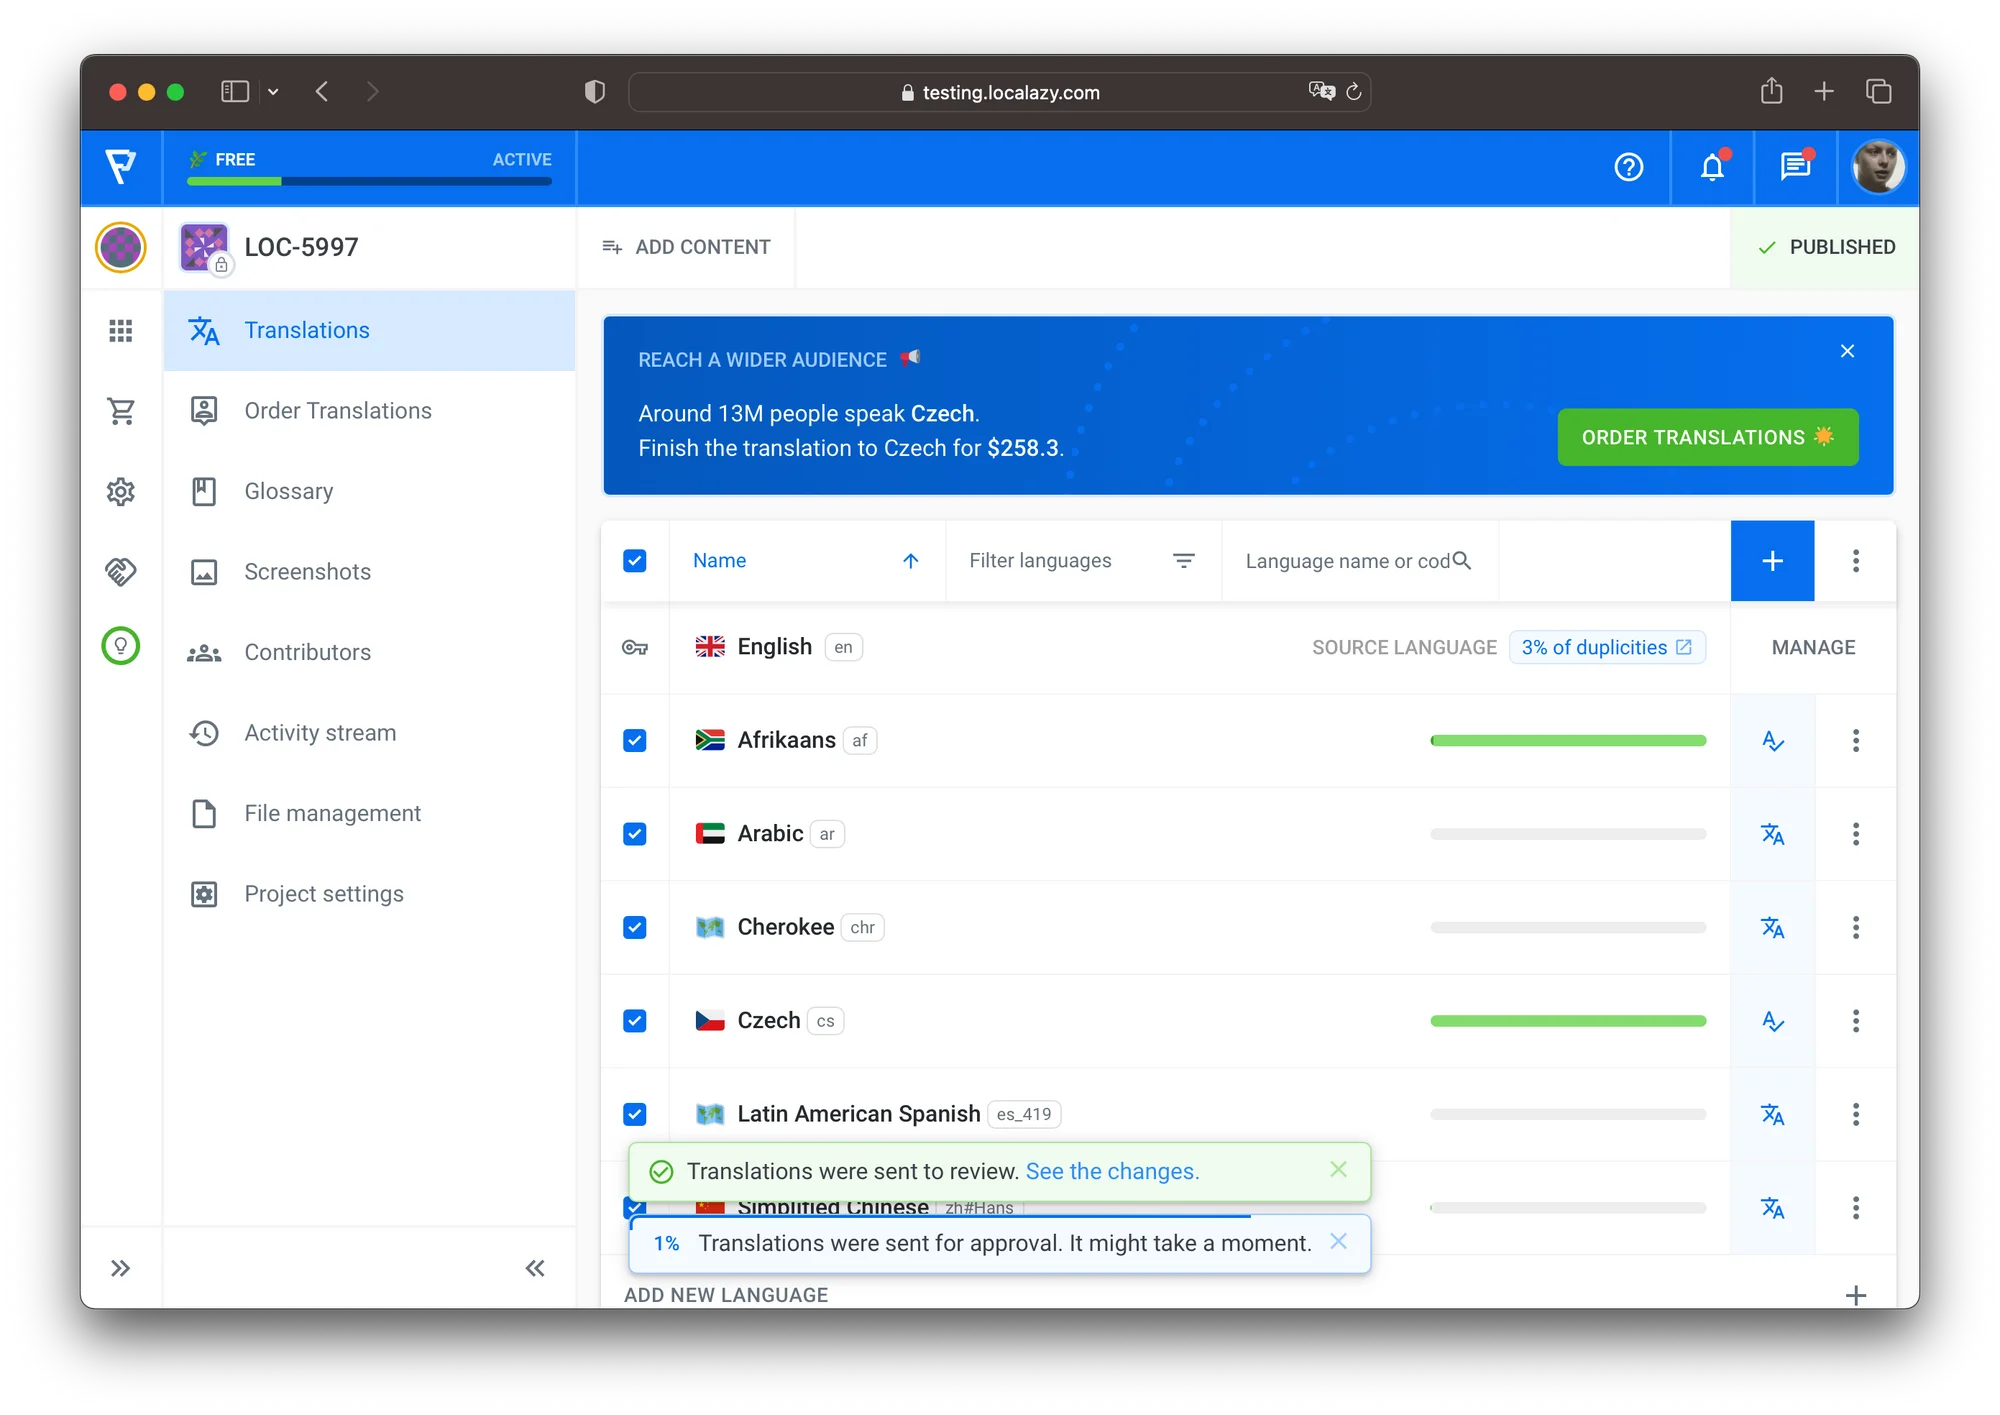
Obviously, not all of the alerts are controlled over WebSockets. Although, some of them are:
- project publishing status,
- long-running operations,
- approving translations,
- sending translations back to review,
- MT pre-translate keys.
“Why are these tasks time-consuming and therefore cannot be processed immediately?” you may ask. There are quite complex internal database processes in our backend, sometimes, we need to create physical files and make them ready for an eventual download. MT pre-translate is processed by a machine translation engine provider on the fly, which also takes time, especially when there are lots of keys sent.
These long-running operations can also be grouped (for improved UX). What do I mean by that?
An API sends these long-running operations per language (or file). Therefore triggering the pre-translate action for eight languages at the same time sends eight requests to the backend. Another example could be approving all translations in three files at once, which would send three requests.
I believe the topic of long-running operations and their grouping is clear now. Let’s move on to the next part.
🎯 Our goal 🔗
Now, I’d like to summarize the goal and give you some more important details. So, here's a bullet list:
- include alerts testing in our E2E tests
- long-running operation API request returns the
taskIdof a task - under this
taskId, the request will be processed on the backend - when the task finishes, a STOMP message will be sent to the client, including the
taskId- this is the moment we know that the task is finished - want to ensure that when the project is published
- need to make sure that long-running operations are processed properly
- Wait alert is initiated correctly
- Wait progress is calculated correctly
- when one of the tasks in the tasks group is done, update the percentage progress
- when all of the tasks in the group are finished, turn the Wait notification into a Success notification
- also, when tasks from other groups finish during the processing of multiple tasks groups together (which in terms of UI means having multiple Wait notifications at one time), it should impact only the group the task is assigned to
- we want to include those tests in the CI process on GitHub
- we have all of the data for our E2E tests mocked and prepared in fixtures; therefore, no real server endpoints are called
🧭 Failed attempts 🔗
Before we get to my solution, here's a list of some of the packages dedicated to solving our goal I’ve found and tried, such as:
And as I’ve already mentioned in the Introduction, none of the options above did work for me for various reasons.
That’s why I decided to solve it my way.
💎 The Solution 🔗
Own STOMP Broker 🔗
I decided to code my own STOMP Broker - I don’t mean the whole implementation, of course, but only a part of communication that needs to be mocked I could use while writing tests. So what I needed to achieve was to inform the STOMP Client that a task with some taskId has been finished so the application can react to such an event.
I used the stomp-broker-js package for the implementation. It was simple to set up, the README example was mostly enough to get the inspiration for how it works.
I needed to handle messages as the real STOMP Broker (that we use) does. Quick facts:
- service is subscribed to a topic
/topic/localazy.notifications, - process the
NOTIFY/N/21/[some_id]message for Project Published event - process the
TASK/[some_id]/[finished_task_id]message for Long-running operation event
const http = require("http");
// eslint-disable-next-line import/no-extraneous-dependencies
const StompServer = require("stomp-broker-js");

const server = http.createServer((request) => {
  console.log(request.url);
});
const stompServer = new StompServer({
  server,
  debug: console.log,
  path: "/api/ws/stomp",
  protocol: "ws",
  // v10.stomp', 'v11.stomp', 'v12.stomp'
  heartbeat: [10000, 10000],
});
console.log(" [*] Listening on 0.0.0.0:3322");
server.listen(3322, "localhost");

stompServer.subscribe("/e2e/long-running-operation.finished", (msg, headers) => {
  const topic = headers.destination;
  console.log(`topic:${topic} messageType: ${typeof msg}`, msg, headers);
  stompServer.send(
    "/topic/localazy.notifications",
    headers,
    `TASK/some_id/${msg}`,
  );
});

stompServer.subscribe("/e2e/project.published", (msg, headers) => {
  const topic = headers.destination;
  console.log(`topic:${topic} messageType: ${typeof msg}`, msg, headers);
  stompServer.send(
    "/topic/localazy.notifications",
    headers,
    "NOTIFY/N/21/some_id",
  );
});
As can be seen in the code snippet above, the broker is listening to two topics:
/e2e/long-running-operation.finished/e2e/project.published
Why did I do that? The mocked broker needs to work differently than a real backend-to-broker communication does. The real backend would process the task, and then (when finished) it would inform the broker, which would send a message to the client.
But in our test case, nothing is really being processed. That’s why we programmatically need to send a message to our subscribed topics from the E2E test code (and hence trigger the “Hey, I’m the task with taskId and I’ve just finished processing” procedure). And we need to do so after the long-running operation was initiated.
That would then return the very same message as the real broker would do. Voilà!
Ping the STOMP Broker from Cypress 🔗
Notice one of the earlier sentences:
… we programmatically need to send a message to our subscribed topics from the E2E test code…
How can we do that? How do we access the very same STOMP Client instance from the App in Cypress? The solution is quite simple and effective and does not make basically any mess in the application code.
We’ll reuse a similar concept as described in the Cypress Docs. That way, we can attach the client instance to the global window object, which can then be accessed in the test code (by calling a cy.window method - I’ll show you that later).
this.client = Stomp.client(process.env.VUE_APP_WSS_URL);

/**
 * To access the client from Cypress tests, attach it to the window object.
 */
if ((window as any).Cypress) {
	(window as any).stompClient = this.client;
}
Another note: Make sure to pass the correctVUE_APP_WSS_URLenvvariable regarding the environment.
I.e. for the tests, you’d want to pass the one where our mocked STOMP Broker is running.
Normally, you’d want to pass the testing/production address of the broker, depending on your setup.
Write the Tests 🔗
Writing the tests is just the icing on the cake if you know Cypress. If not, there are dozens of materials on the web - check that out! I’ll assume you do know how to work with Cypress.
Therefore, I’ll just summarize what I had to deal with while writing WebSockets-related tests.
Returning a Different Response for the Same Request 🔗
As mentioned above, there’s a long-running operation request sent per every language (or file). It means that every request returns its own taskId. And when the task finishes, a STOMP message is sent containing that particular taskId - identifying that the task has been finished.
Normally, to intercept a request in Cypress that always returns the same response, I’d do something like this:
const body = {
	result: true,
	id: 'my-task-identifier-xx'
};

cy.intercept("POST", "/api/project/**/phrases/batch", { body }).as("phrasesBatchPOST");
But to deal with the problem, Cypress offers a times property which can be sent in an object that’s passed to the cy.intercept method:
const apiIdResult1 = {
	result: true,
	id: 'my-task-identifier-01'
};

const apiIdResult2 = {
	result: true,
	id: 'my-task-identifier-02'
};

cy.intercept({ method: "POST", url: `/api/project/${project.slug}/phrases/batch`, times: 1 }, (req) => {
      req.reply({ body: apiIdResult1 });
    }).as("phrasesBatchPOST1");

cy.intercept({ method: "POST", url: `/api/project/${project.slug}/phrases/batch`, times: 1 }, (req) => {
      req.reply({ body: apiIdResult2 });
This way, we can make sure that when we call cy.wait("phrasesBatchPOST1"), the request would be intercepted only once.
So to wait for two requests (e.g. handling of two languages) to be sent, we’d call:
cy.wait("@phrasesBatchPOST1");
cy.wait("@phrasesBatchPOST2");
Accessing the STOMP Client Instance 🔗
Just to remind ourselves, we need to access the very same instance of the STOMP Client from Cypress as there is in the application. As I already demonstrated earlier, we’ve attached the client’s instance to the global window object.
To access it in the test code, we have to invoke the cy.window method, like so:
cy.window().then((win) => {
      const { stompClient } = (win as any);
      stompClient.send(
	      "/e2e/long-running-operation.finished",
	      {},
	      apiIdResult1.id
	  );
});
In the code snippet above, the cy.window returns a Promise. We then (.then) resolve the Promise. When it’s resolved, we access the stompClient.
With the stompClient available, we can simply call its send method. Notice that we also sent the mocked apiIdResult1.id as a taskId as a part of the message. The mocked STOMP Broker immediately sends a MESSAGE containing the information that TASK with taskId equal to apiIdResult1.id finished.
At this point, the test would react as if it was a response from the real (non-mocked) STOMP Broker implementation we use for Localazy.
Now, all the non-usual Cypress (at least for me) stuff is explained.
Update the CI Process 🔗
As mentioned in the beginning, the goal is also to integrate the whole thing into the CI Process. What does that exactly mean in my case?
Well, besides running the E2E testing process, we also need to start the mocked STOMP Broker. When the tests finish, we need to kill the STOMP Broker process respectively. All of that, using the GitHub Workflows.
Our newly updated e2e.yml looks something like this:
# ...
# Run WS server has been added
- name: Run WS server
  run: npm run test:e2e:start-stomp
- name: Run e2e tests
  run: npm run test:e2e:ci
# Stop WS server has been added
- name: Stop WS server
  run: npm run test:kill-stomp
# ...
We just simply added two new steps to the workflow. Let’s see what the scripts look like:
// ...
"scripts": {
	"test:e2e:start-stomp": "forever start ./tests/support/mock-stomp-broker.js",
    "test:kill-stomp": "forever stopall",
    // ...
}
// ...
We use the forever npm package. It offers an easy and intuitive way to run node process in the background and kill it on request when needed… Let’s push the code and run the tests!
All tests passed, and we’re all done!
✔️ Conclusion 🔗
In this blog post, I demonstrated how to test STOMP over the WebSocket communication we use at Localazy for long-running operations. I also demonstrated a little sneak peek at the dev stack we use.
We went through problems I faced during the implementation - and I gave you my solutions.
Lastly, we updated the CI process and ran tests to ensure they passed!