
Directus is a popular, open-source, headless CMS loved by developers, marketers, founders, and product managers for its flexibility. It offers an easy-to-use platform for both technical and non-technical users who need to manage their digital content.
One of its key strengths is its ability to work with any SQL-based database, giving you full control over your data while staying adaptable to various needs. It also helps bridge the gap between software engineers and non-technical users by offering custom user interfaces and managing and delivering content across any platform or device.
This article will explore some extensions available on the Directus platform so you can modify and expand your favorite functionalities to meet any specific needs. But first, let's look at some of the prerequisites you'll need to check off the list before you get started. ✅
Looking to localize your Directus content? Then take a look at our detailed guide to learn more
📋 Prerequisites 🔗
Before you can use extensions to modify our project, the first prerequisite is to create a project on Directus. You can do this through three different methods:
- Directus Cloud,
- installation via Docker,
- or NPM installation.
We recommend Docker installation because certain dependencies may result in errors when using other methods to install. In contrast, Docker eliminates all environment-specific setbacks beforehand.
Docker installation 🔗
Install Docker on your computer. Then you'll need to make sure the Docker daemon is active.
Within a new project file, open up the terminal and run the code snippet:
Docker run -p 8055:8055 -e SECRET=our-secret-value directus/directus
The code will run the Docker command to start a new container with a port mapped to 8055.
The command -e SECRET=secret-value sets an environment variable named SECRET inside the container, while directus/directus specifies the official Directus image to pull from Docker Hub.
The initial admin email address and password show in the CLI as below. The Directus dashboard can be accessed at http://localhost:8055/

Create a collection 🔗
The next step is to create a new collection within your project. Once logged in, follow the steps below:
- Click the Create Collection button, and a side menu will appear.
- For the purpose of the demonstration, we will use the name Book because we intend to develop a data model for books when we are finished.
- Leave the other options at default. Click the forward arrow and the Optional Fields menu will open. Keep the values in this menu at default, toggled off.
- Click the check in the menu header.

5. We will add three additional fields for this data model: title, author, and summary. Click on the Create Field button, select the input field type with a key of title, and then save.
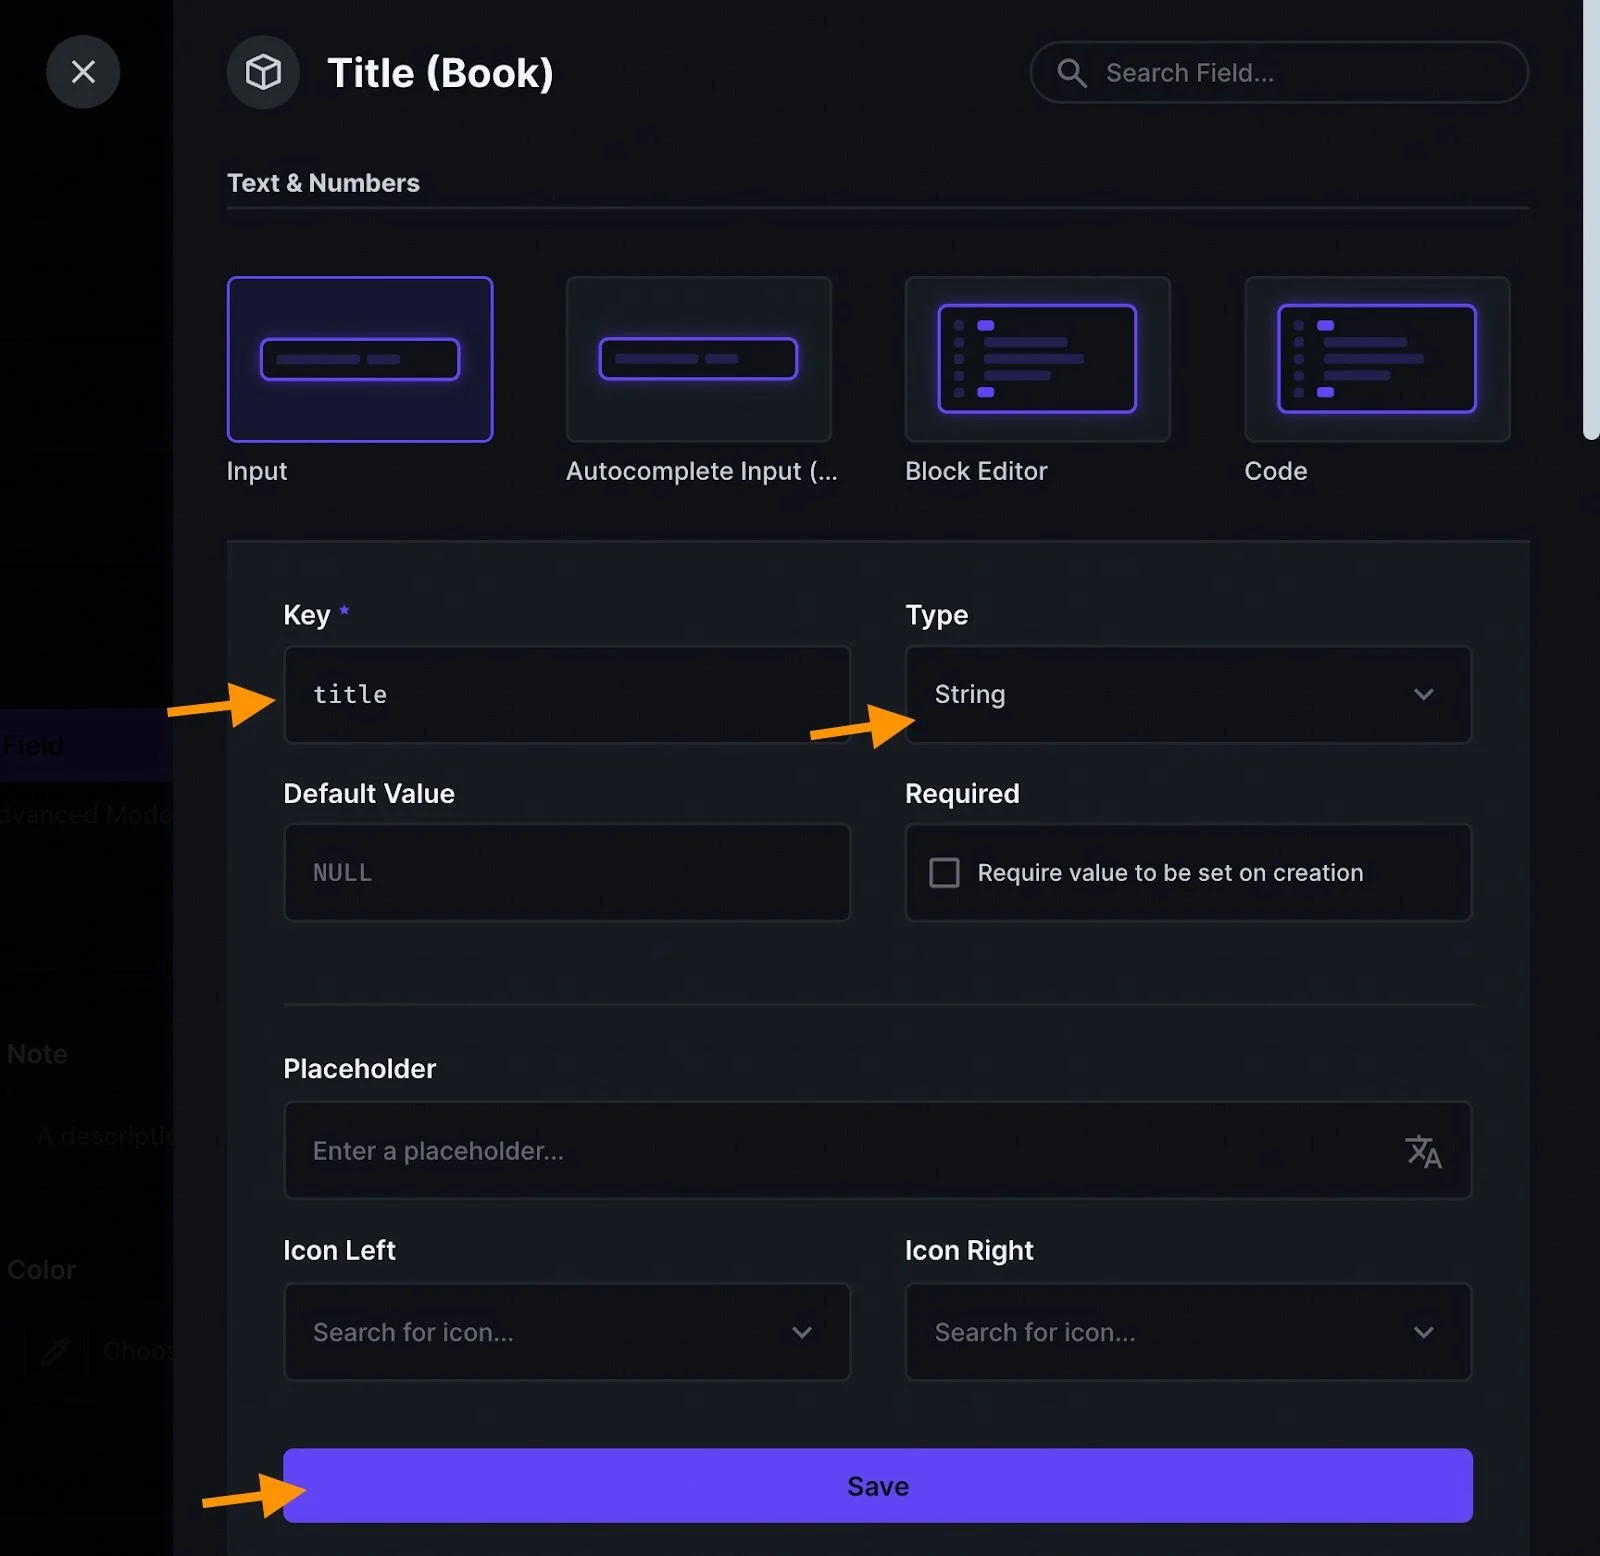
6. Repeat step 5 for the author and summary fields.

Now we have our model upon which we will create content. 🎉
Switch to the content menu and add a new book item. From here on, we're ready to install our favorite extensions as well.

✍️ Our recommendations 🔗
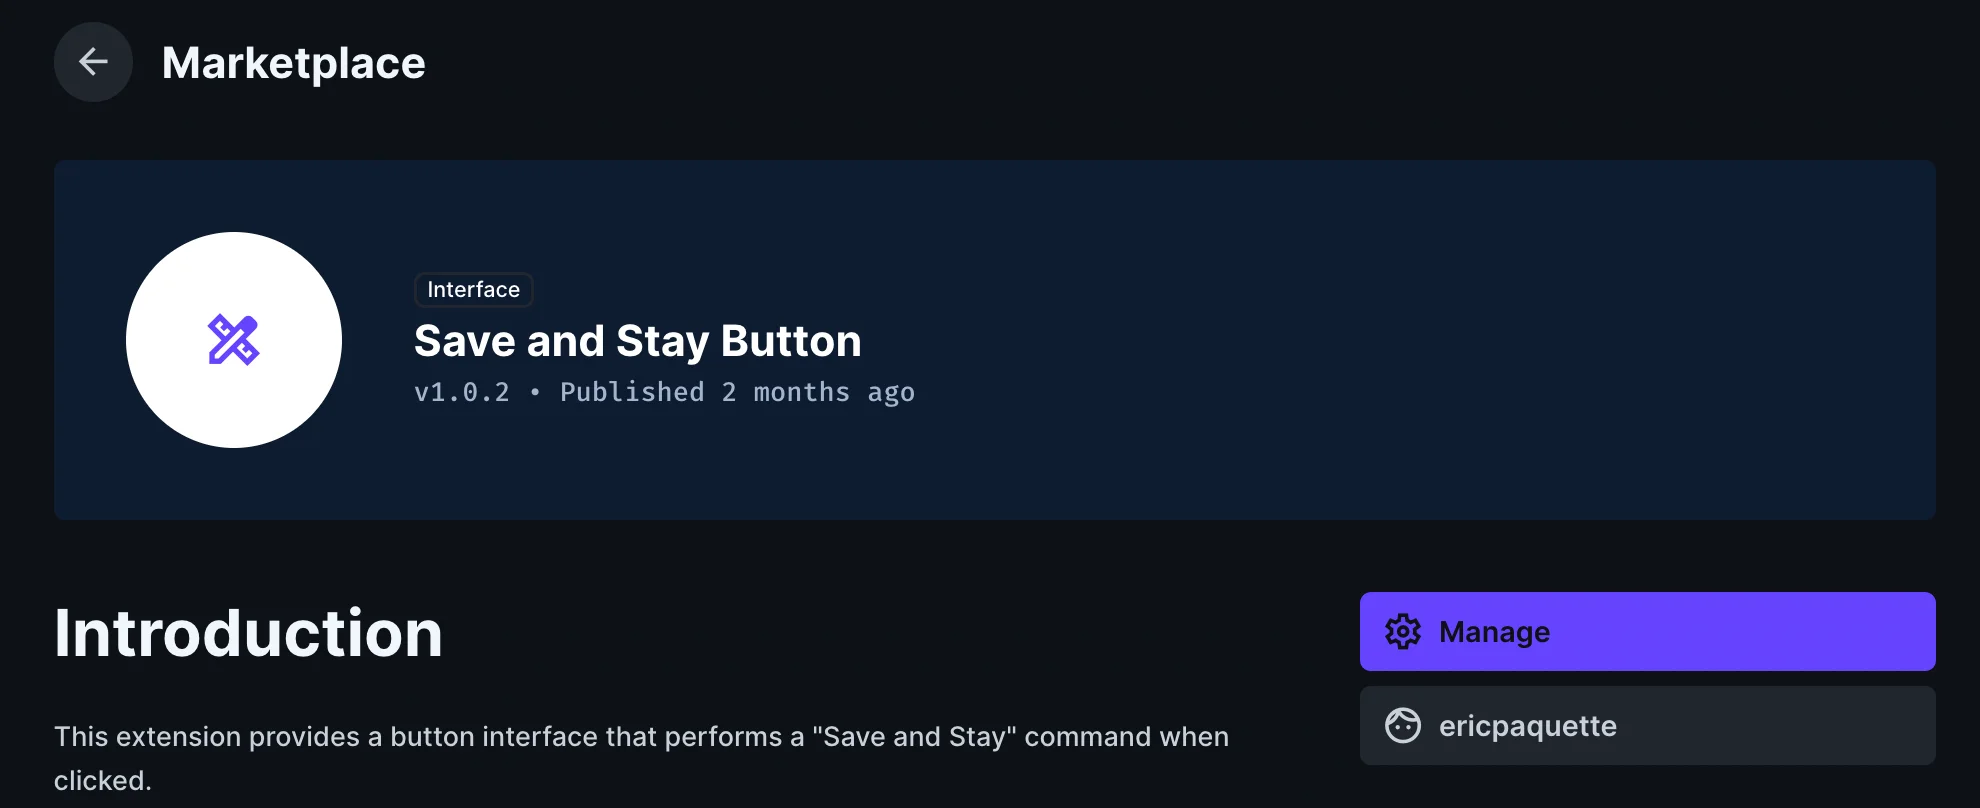
1. Save and Stay Button 🔗
The Save and Stay extension offers a button interface that executes a command that saves content and then remains on the same page when clicked.
Installation 🔗
The extension can be installed via the marketplace:
Alternatively, it can be installed through npm:
npm i @quickifyai/directus-extension-save-and-stay-button

Configuration 🔗
Head to the settings and click on the data model Book in the collection that we initially created.
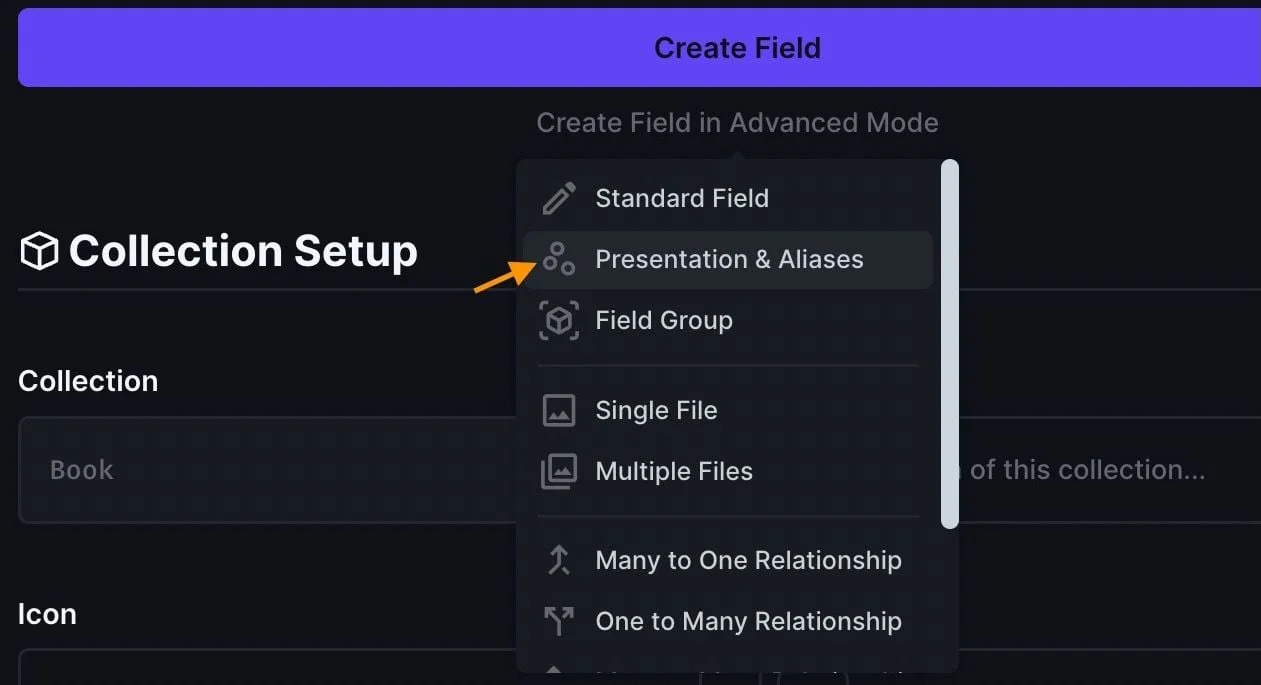
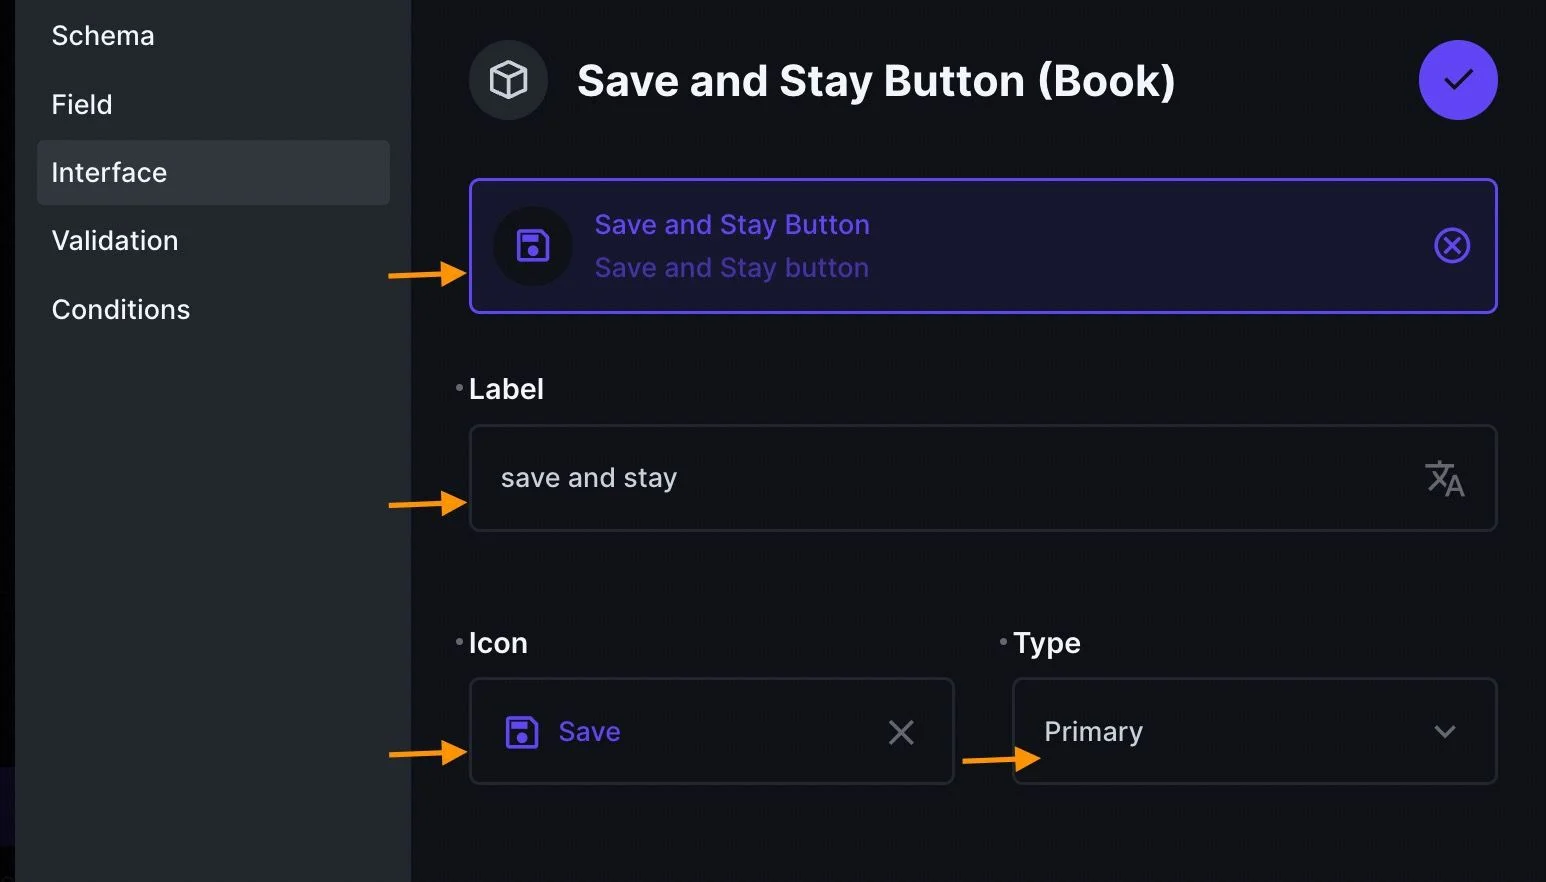
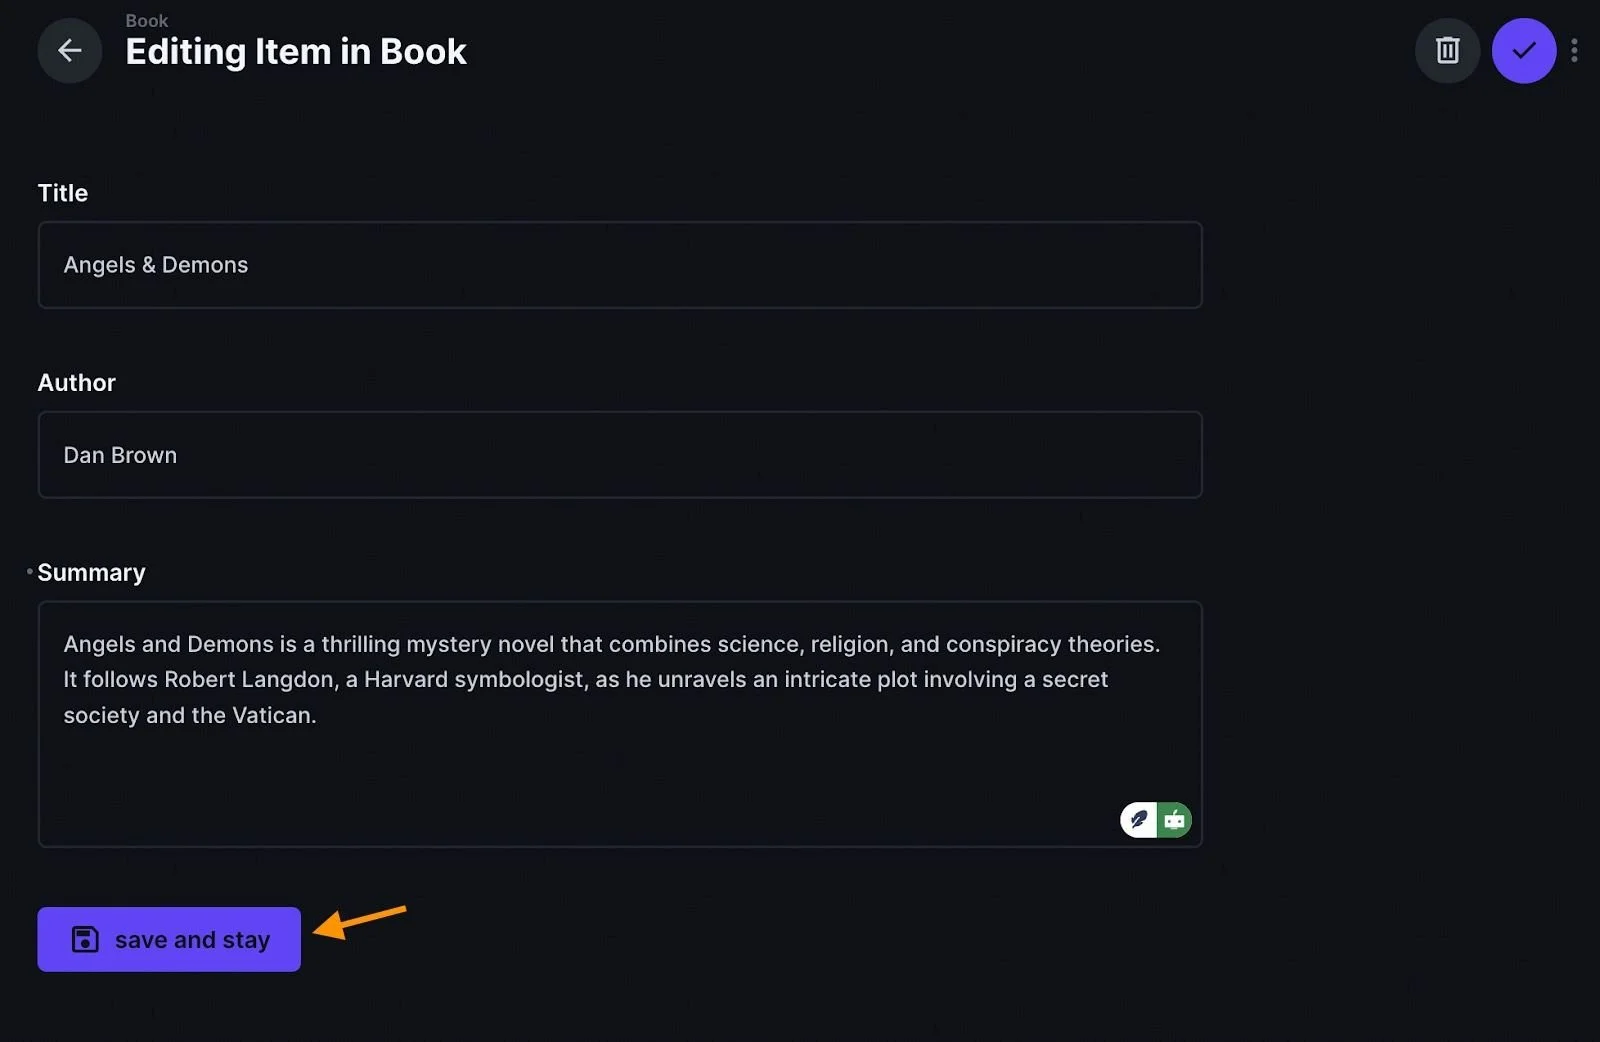
Now create a field in advanced mode: select Presentation and Aliases, and in the interface section, select the Save and Stay button.

Fill in the label to save and stay, search for the save icon, and select a type based on the color of the button you prefer.
Return to the content tab. If any modifications are made to the item in the collection, the Save and Stay button will become active. If you click on this button, you¡ll save the modifications while remaining on the same item.
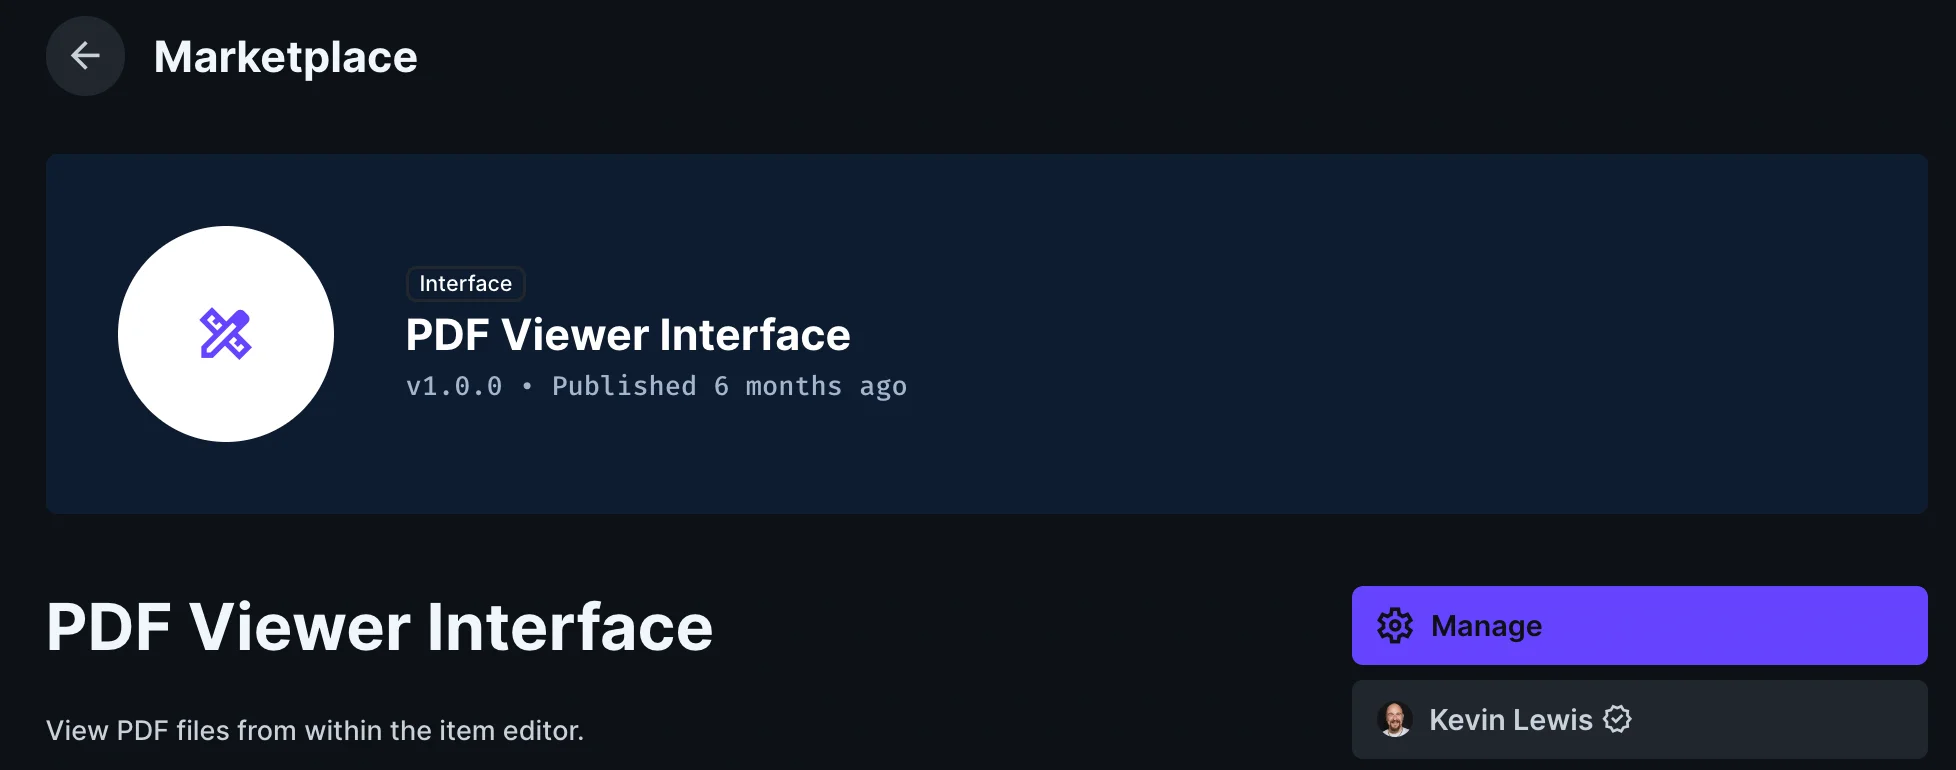
2. PDF Viewer 🔗
PDF Viewer is a custom field interface available in the Directus Marketplace. It allows users to preview PDF files directly within the Directus administration panel.
Installation 🔗
Go to the marketplace and install the extension:
Configuration 🔗
Create a new field for storing PDFs from our Book collection, set the data type to File, and save the file with the key set to pdf.

In the following step, you will need to create another field using the advanced mode. Select Presentation and Aliases. The key for the schema should be pdf_viewer, and the interface should be set to PDF Viewer. For the interface, select the PDF field, and then fill in the button label as shown below.

Save this and you should get a data model as this:

To view the PDF file within the admin dashboard, you will need to return to the content tab, choose a file, and then click on the Open PDF button.

3. URL Preview 🔗
This extension allows you to seamlessly preview URLs and display their content in a fullscreen dialog, letting you interact with web content. A browser-like interface that is embedded within the extension allows you to view and edit your Google Spreadsheets directly, making it much simpler to manage your documents without having to leave the extension.
The extension is especially useful for content editors, since it allows them to visualize a summary or visual representation of a link without having to leave the CMS.
Installation 🔗
Look for the extension on the Directus marketplace:

You can also install it via npm:
npm i directus-extension-url-preview-interface
Configuration 🔗
Create a new field using the presentation field type in our Book collection.
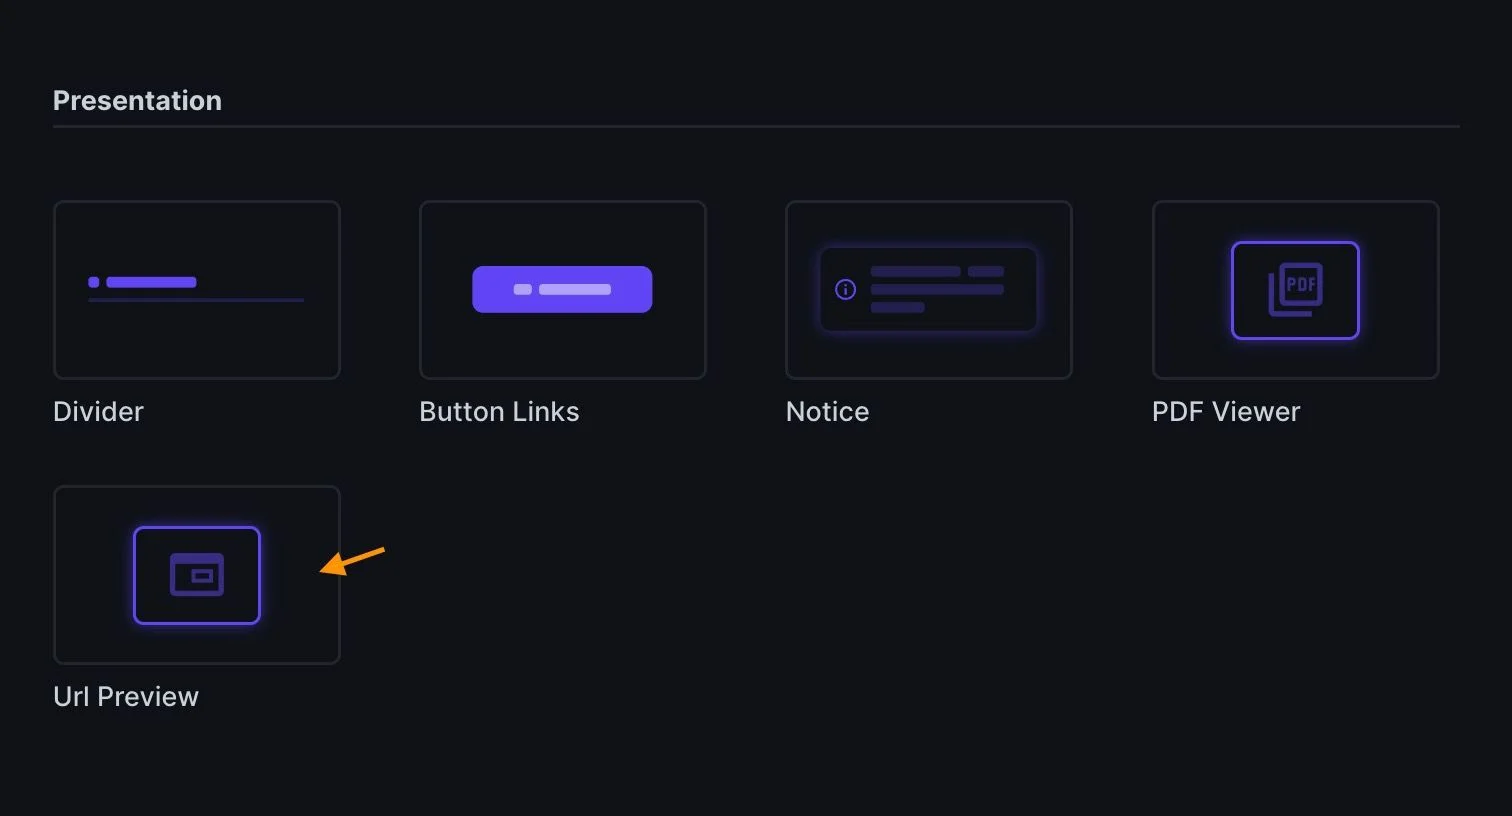
After choosing URL Preview, save the key as an Excel viewer. Then enter the URL of the Excel sheet in the URL field. You will find configuration options like width and height, which can be defaulted, and a checkbox to allow editing while previewing.

Return to the content tab to view the Excel sheet preview. The sheet can now be edited within this preview because it was checked within the configuration.

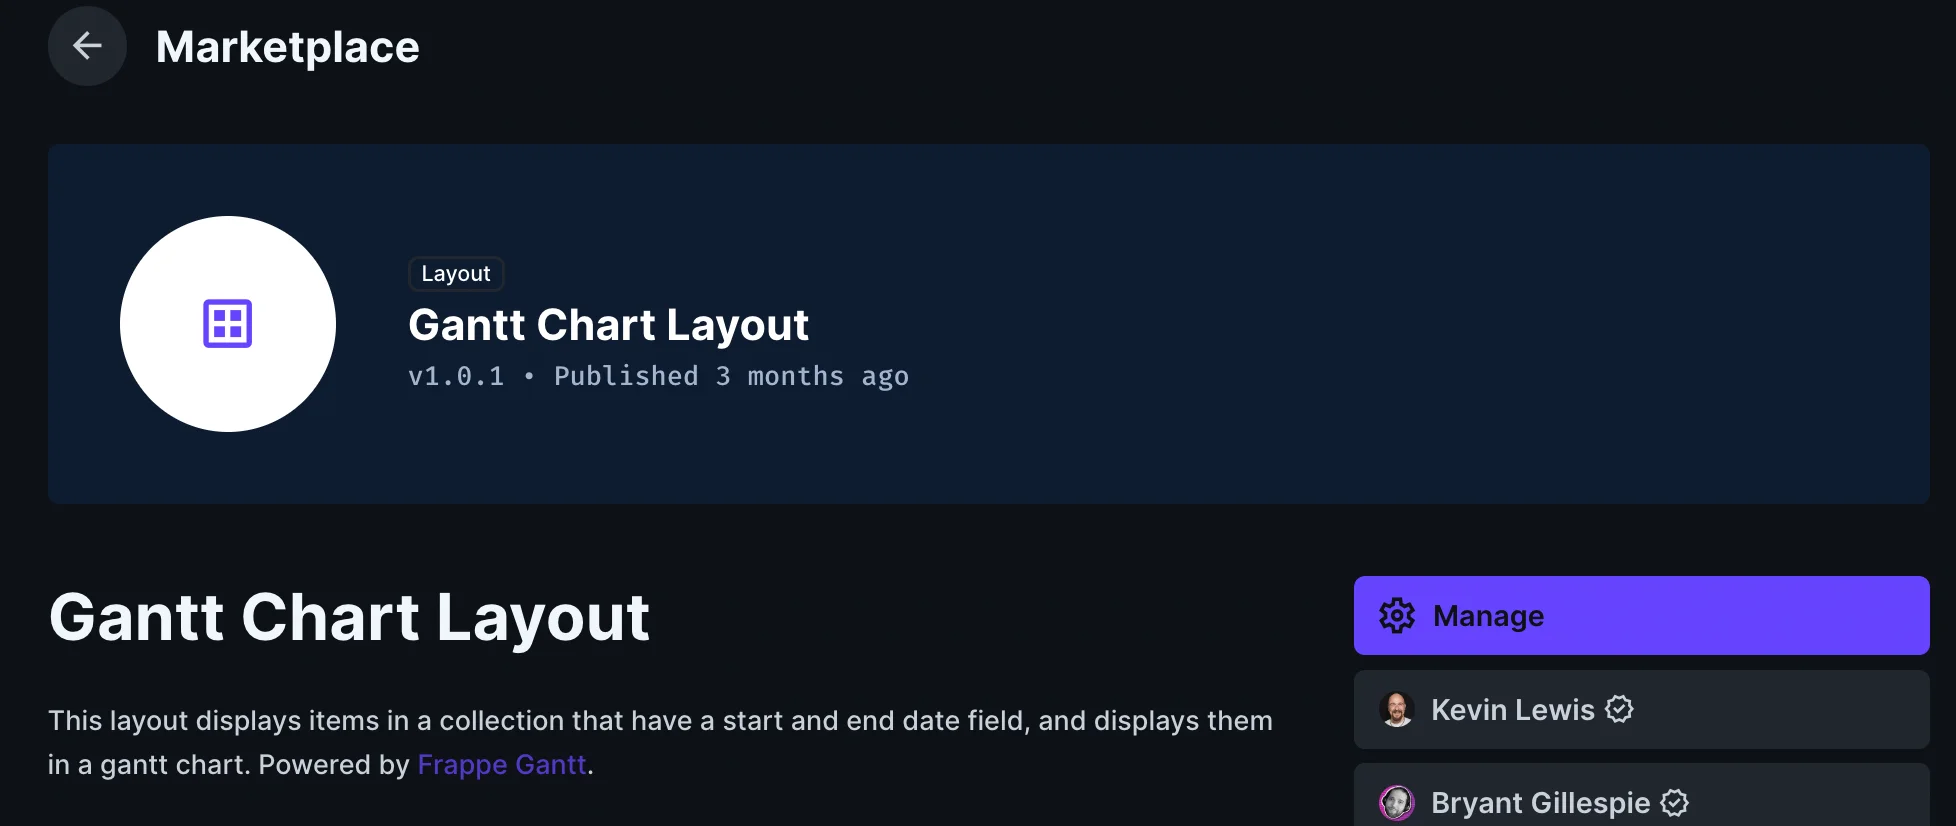
4. Gantt Chart Layout 🔗
The Gantt Chart Layout extension can be used with collections that have a start date and an end date field. These items are then displayed in a Gantt chart.
Installation 🔗
You'll find the extension on the marketplace:
Configuration 🔗
Create two fields of the datetime type in the book model, including startDate and endDate as the keys for each field.

You must fill out these fields to establish the timeline and plot the graph of the content. Keep in mind that you'll need to go to the Content tab to change the start and end dates of each book item. When you look at the layout options, you should check that the table is the default layout for the content.
If the extension has been installed correctly, you should be able to see the Gantt Chart option on the Layout dropdown menu. Select this option.
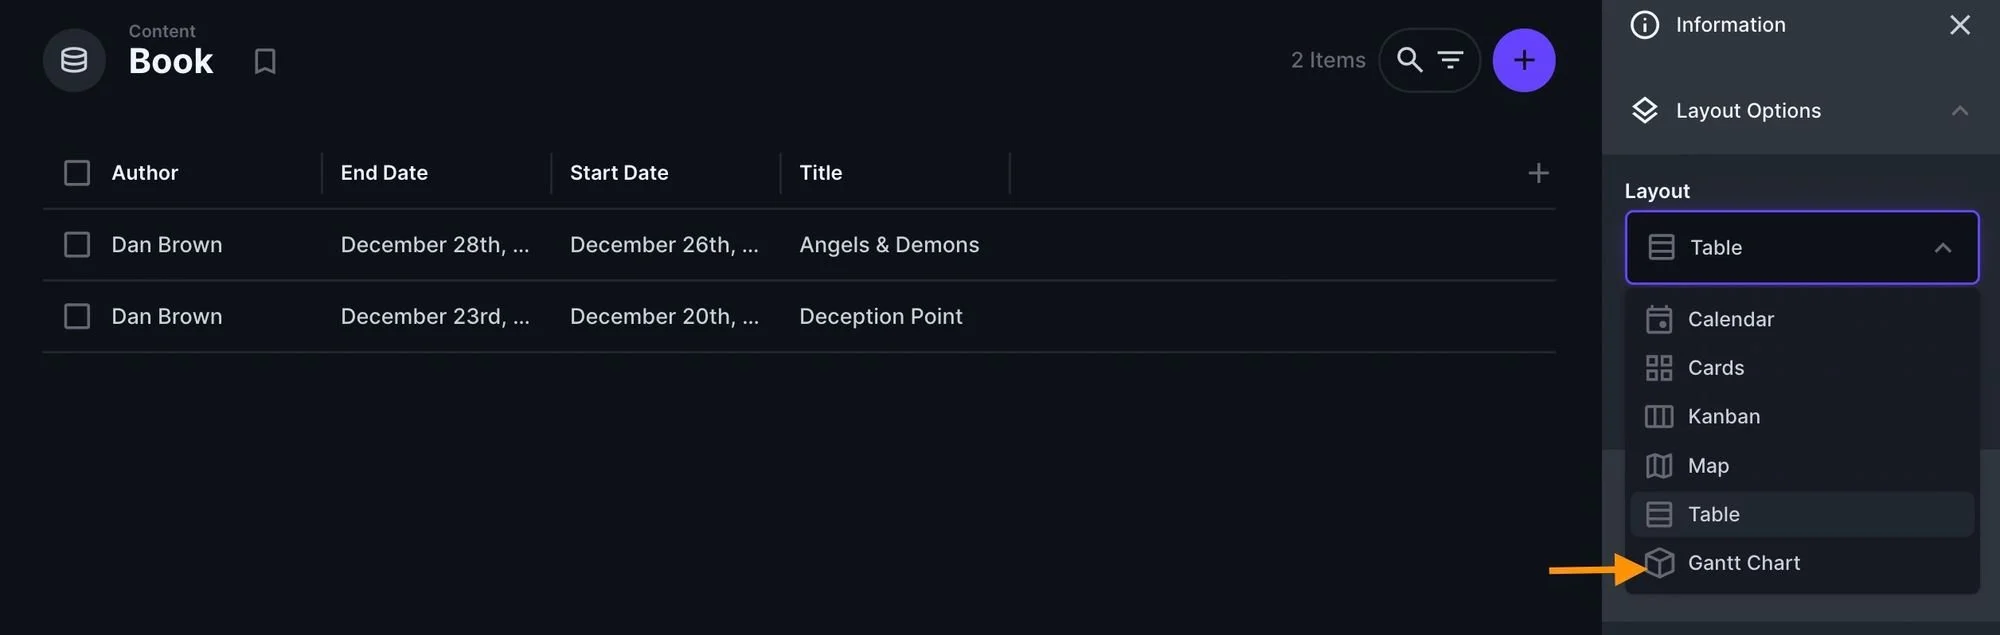
To obtain a valid chart timeline, make sure that the start date is set earlier than the end date. Additionally, the Label field can be updated to include the book titles.

5. Calculated Fields Bundle 🔗
Directus' Calculated Fields Bundle is an extension that allows you to define fields whose values are automatically computed based on the values of other fields in the collection where they are contained. This is especially helpful when you want to create dynamic fields, like totals and concatenations, without having to manually update them.
Installation 🔗
The extension can be installed via the marketplace:

Configuration 🔗
As part of the book collection, we will create an integer-type Price and Quantity field. The sales price of a book item will be determined by concatenating these fields. Then we will create a third field, which will be referred to as the Sales Price.
This will be the field that is automatically calculated. It should be created in advanced mode with the key name salesPrice. Next, choose the calculated interface. Our formula will concatenate the text for Sales Price with the formula for calculating Sales Price, which is Price multiplied by Quantity.

Save this model and navigate back to the content to edit the item. We can now see that the Sales Price changes based on the values of the Quantity and Price, as seen below:

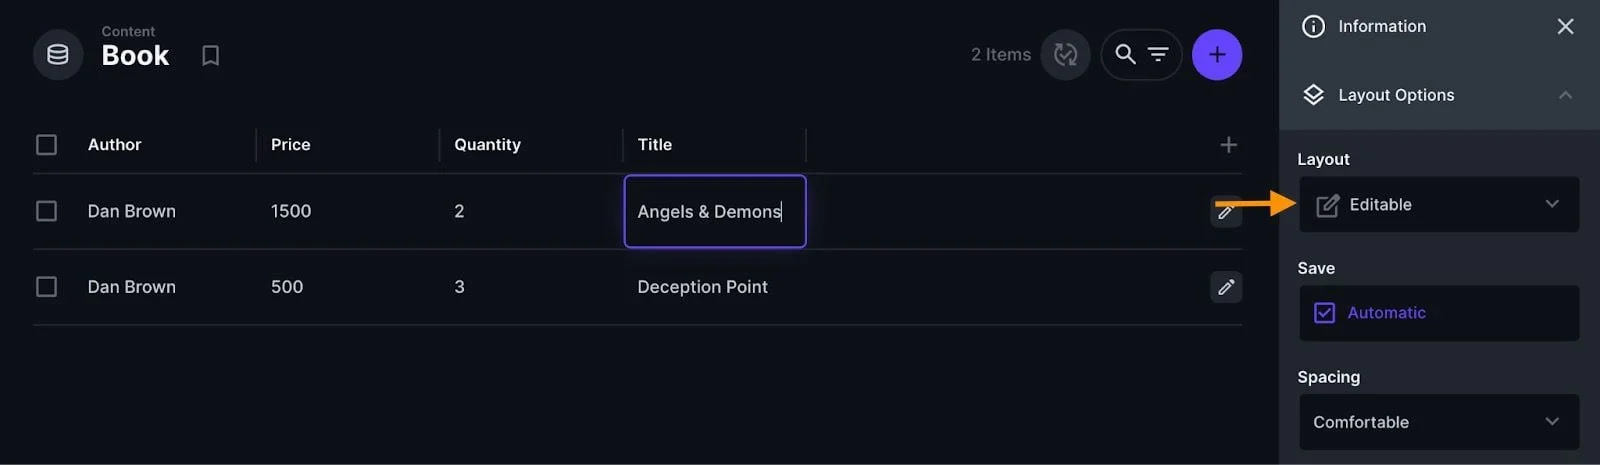
6. Editable Layout 🔗
The Editable Layout extension allows you to edit item fields directly during the inline editing process.
Installation 🔗
Go to the marketplace to find and install it:
Configuration 🔗
After selecting the Content tab, you should see the editable option on the Layout dropdown menu. This indicates that the extension has been installed correctly. When you select this option, you will be able to view the inline editing functionality of the book item's content.
7. Month Picker 🔗
The Month Picker extension allows you to choose a particular month and year. This extension is typically included as a component of a custom interface extension. Applications that require data entry or filtering by month, such as budget planning, report writing, or scheduling, can benefit from this feature.
Installation 🔗
You can install the extension via the Directus marketplace:
Configuration 🔗
Within the book model, scroll to the selection group and choose the Month Picker option from the list of available options.
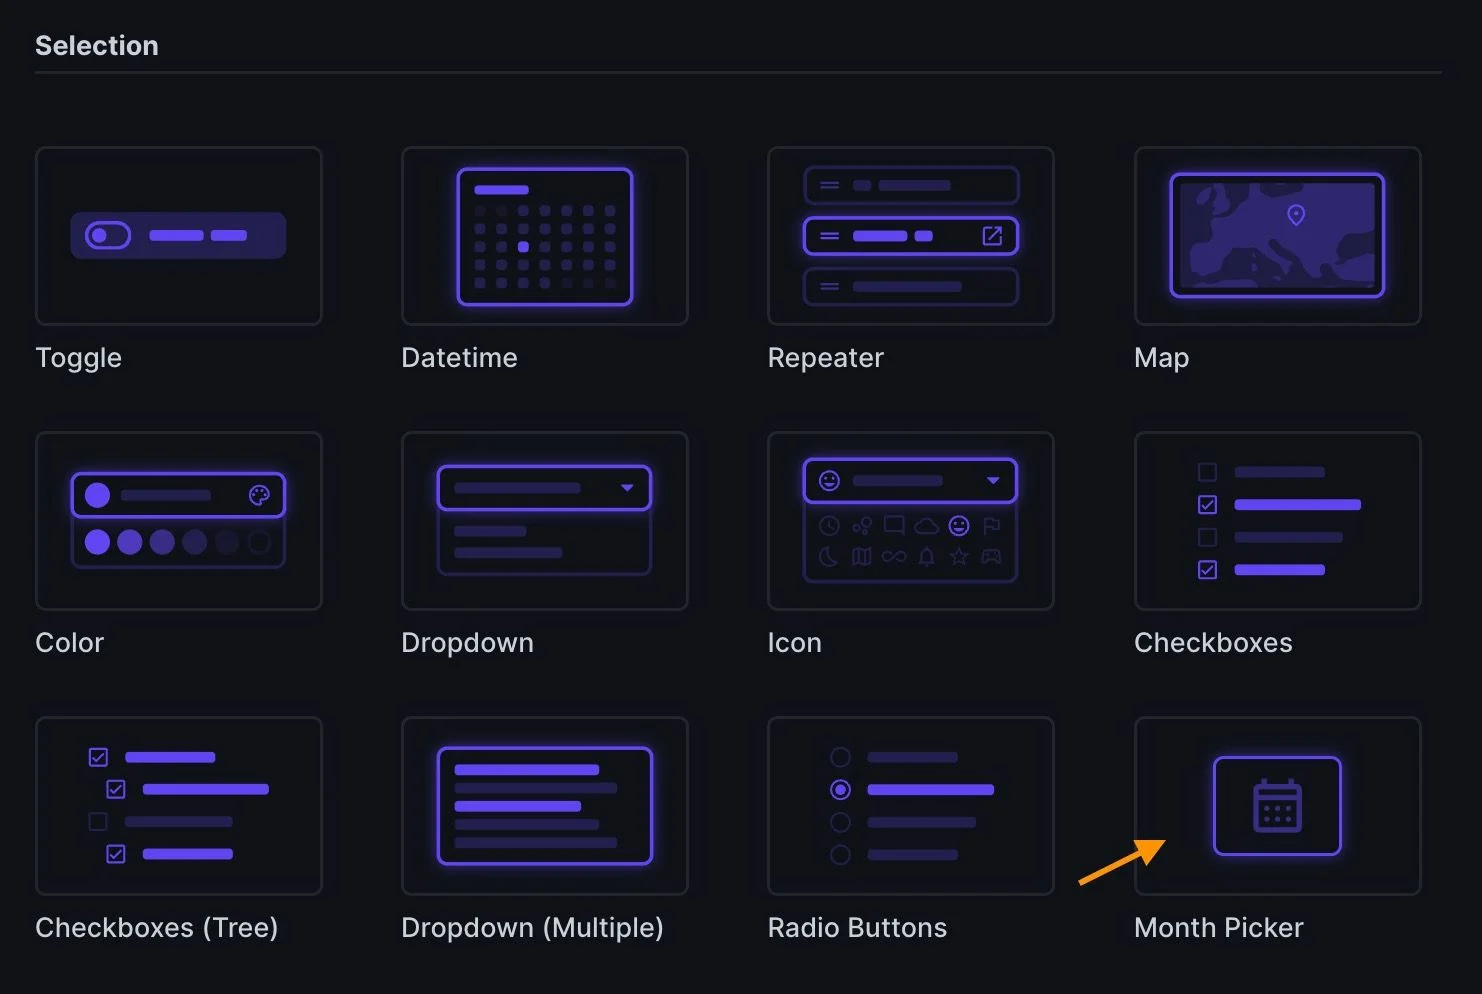
Create a field with the Datetime type and the key purchasedDate. Go to the content tab and use the month picker item to choose the purchase period.

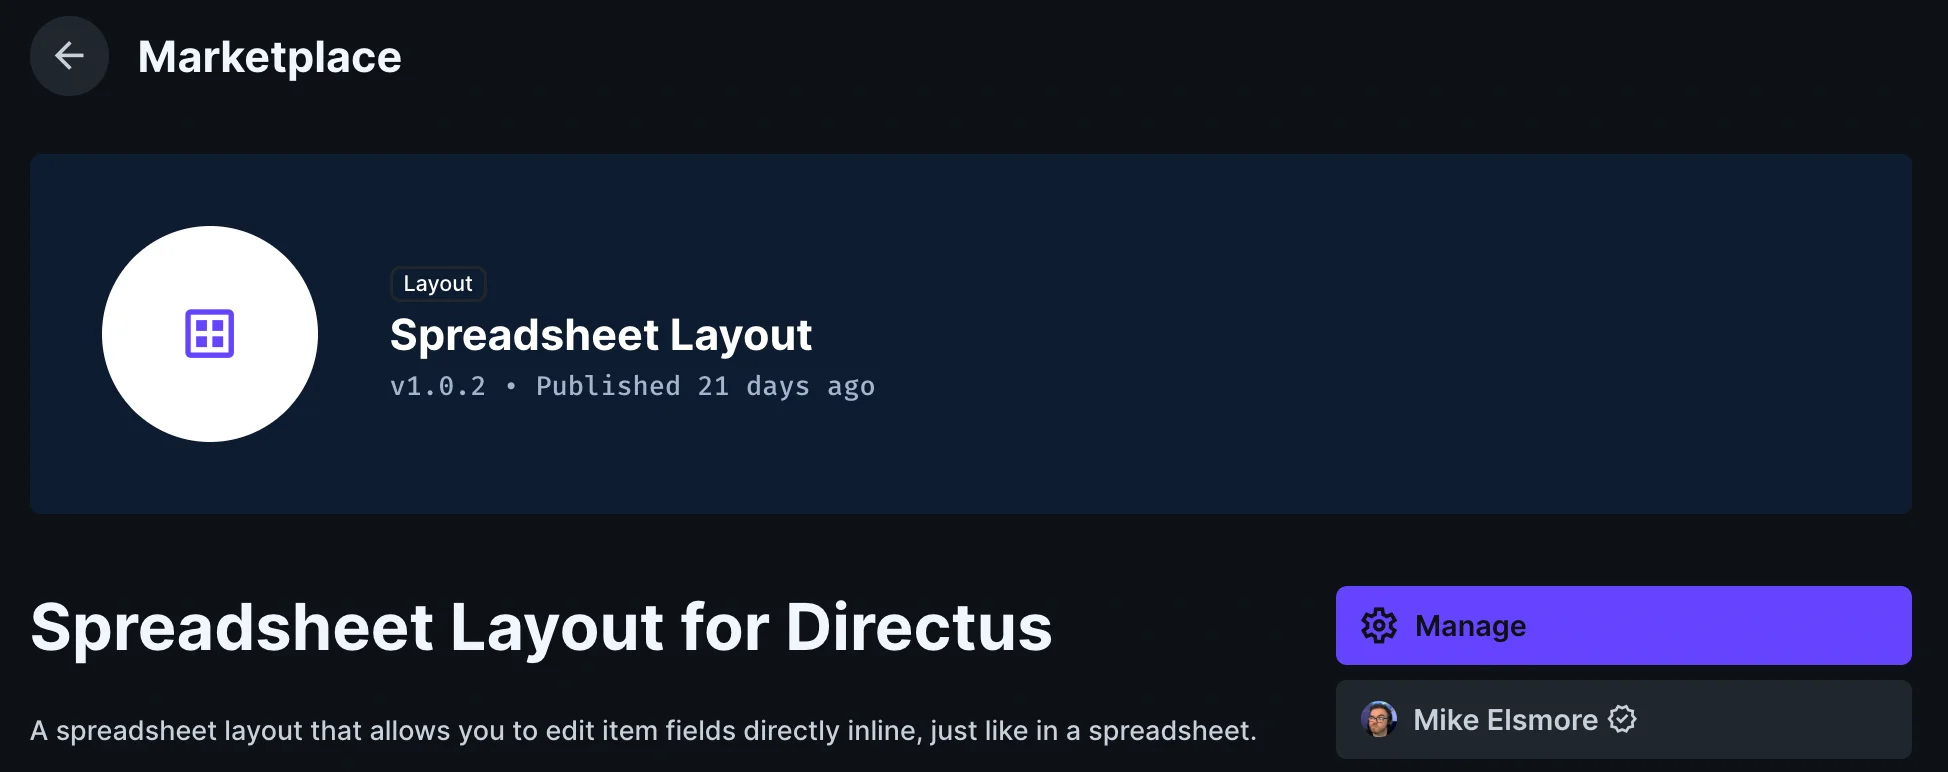
8. Spreadsheet Layout 🔗
The Spreadsheet Layout extension allows you to edit item fields directly inline, similar to a spreadsheet.
Installation 🔗
It can be installed via the marketplace:
Configuration 🔗
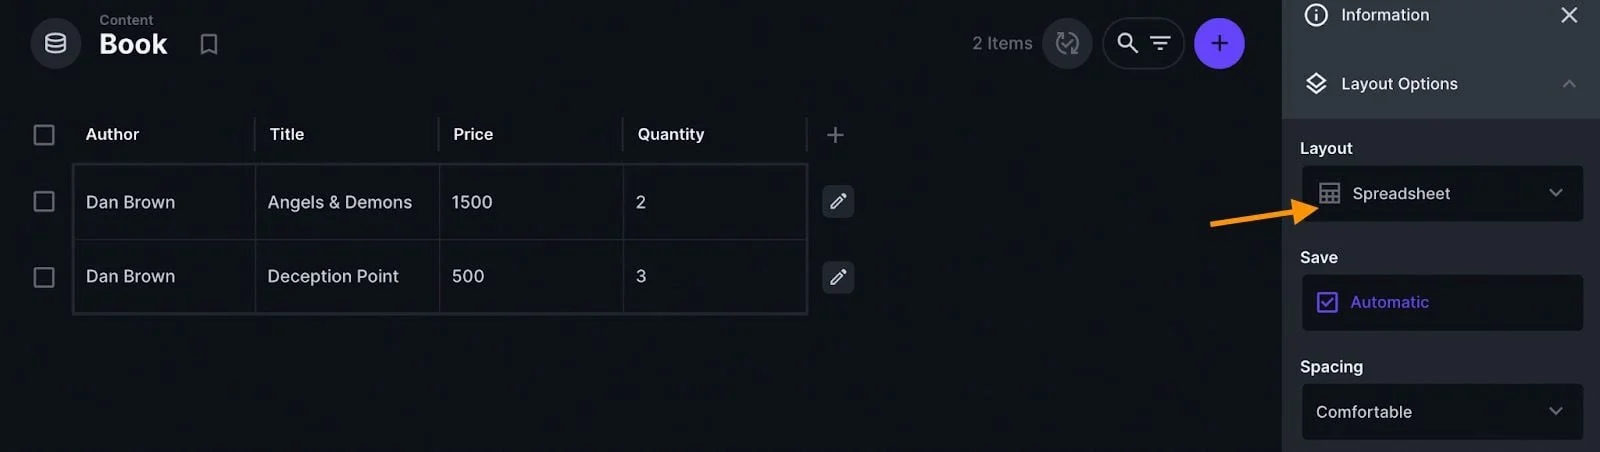
Once installed, you will see Spreadsheet in the layout dropdown under the content tab.
If the Automatic box is checked, changes will be saved automatically. If it is not checked, click the Save button at the top right to save changes.
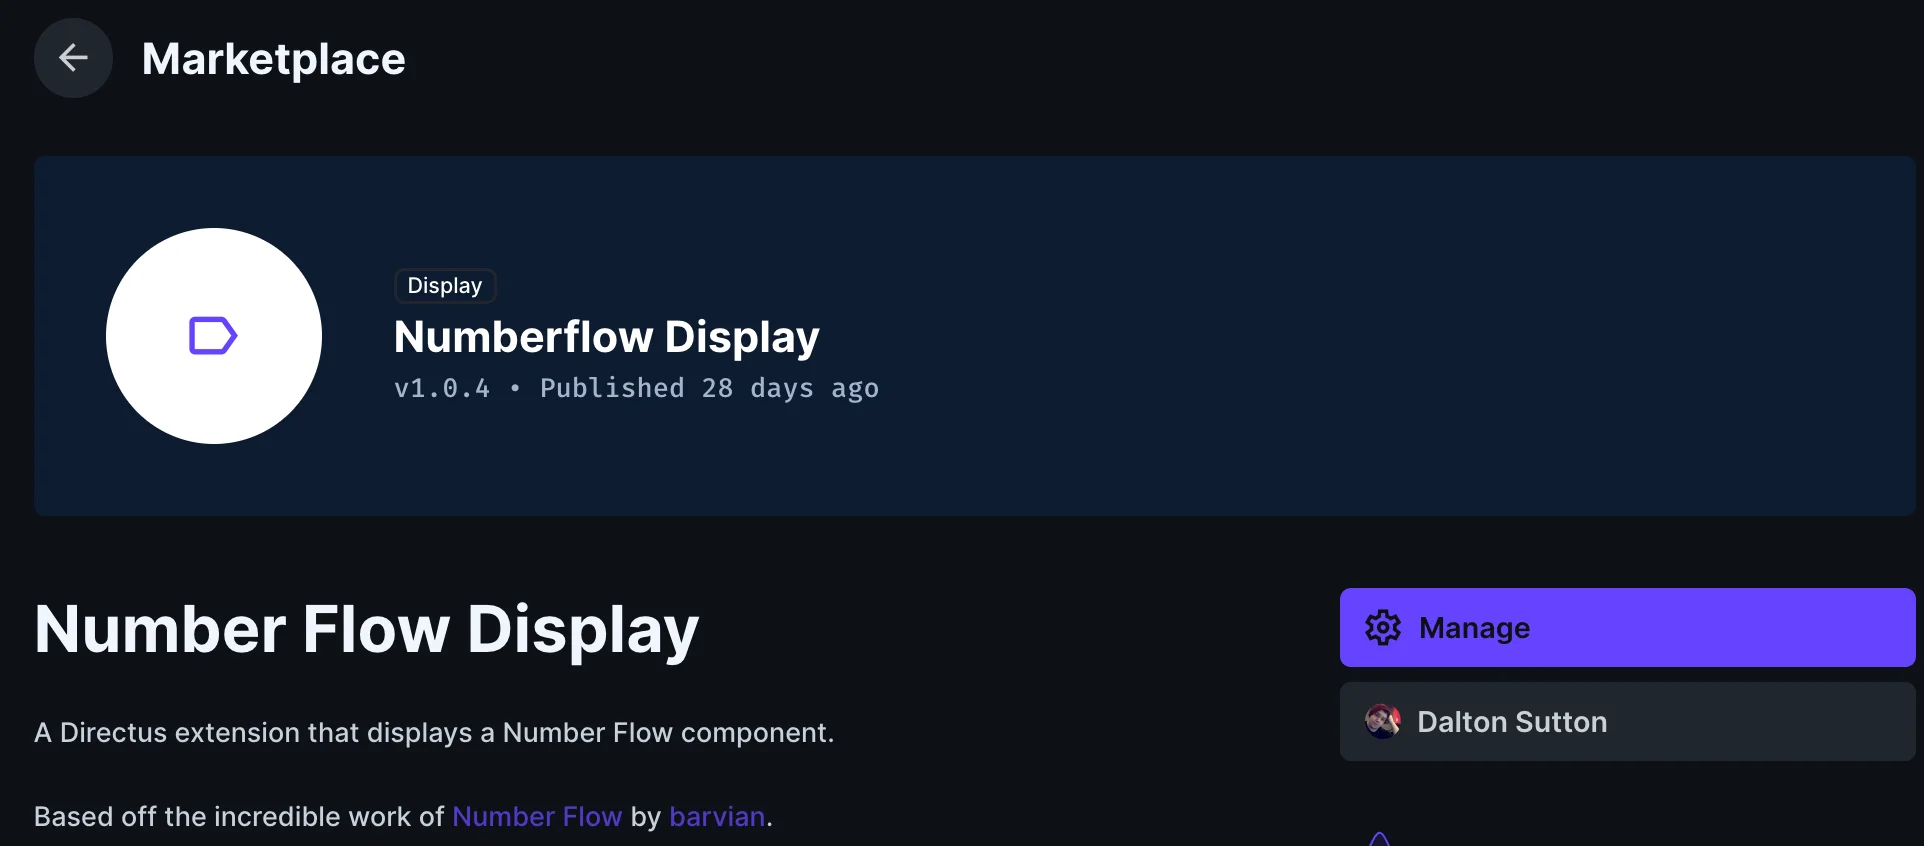
9. Number Flow 🔗
The Number Flow Display extension is a method for dynamically visualizing numerical data. It is frequently utilized in dashboards to display key performance indicators (KPIs), progress, or trends.
Installation 🔗
The extension is available on the Directus marketplace:
Configuration 🔗
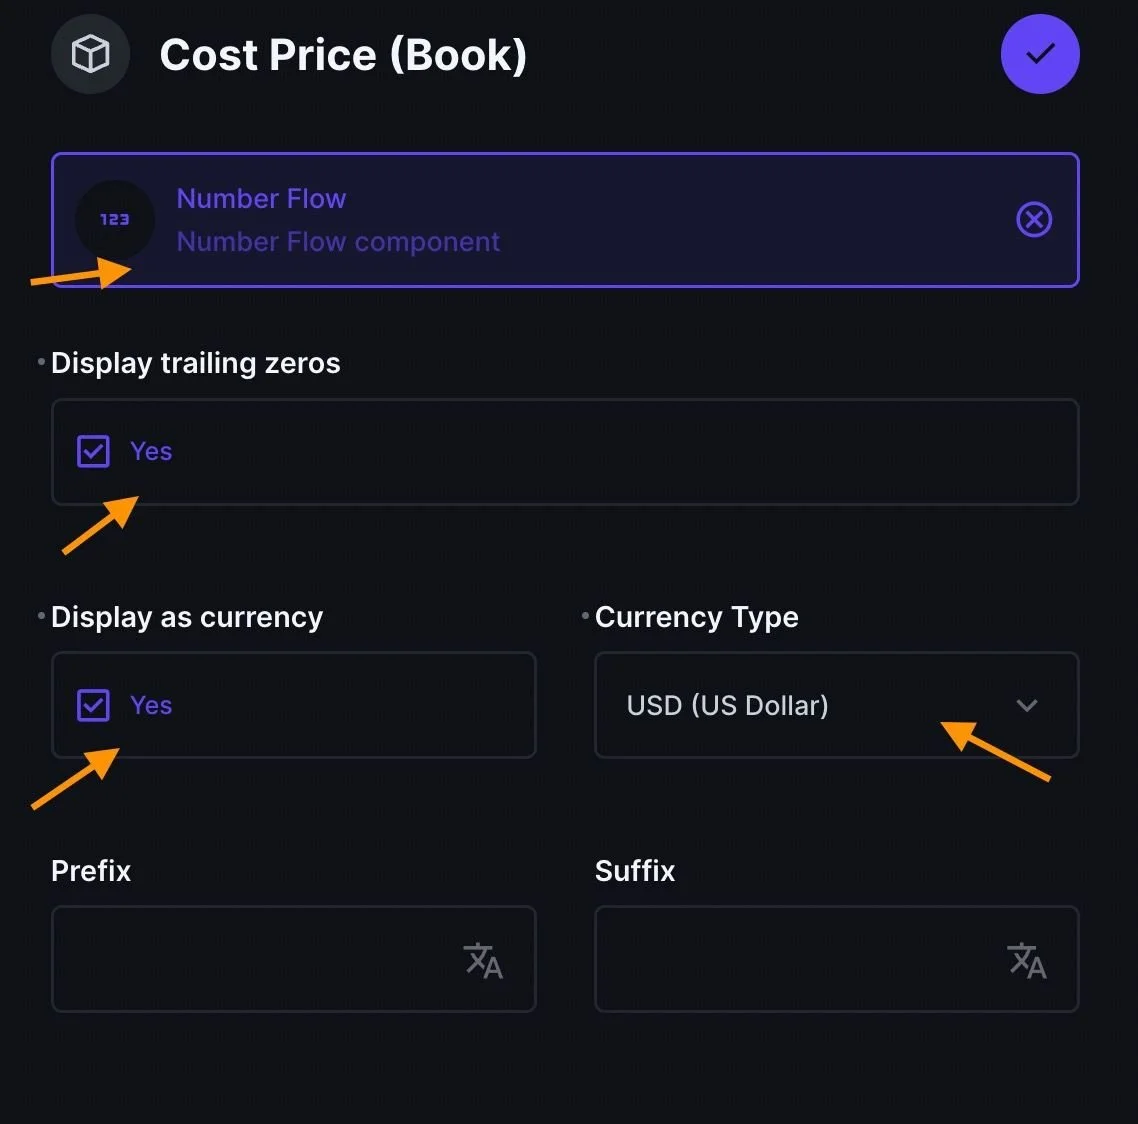
Create a new field with the input type within the book model. Choose that and then fill in the cost_price key with a data type that is either an integer or a float.
Proceed with the advanced creation mode by navigating to the Display tab. Then choose Number Flow, and make a few small adjustments in that field as shown below.
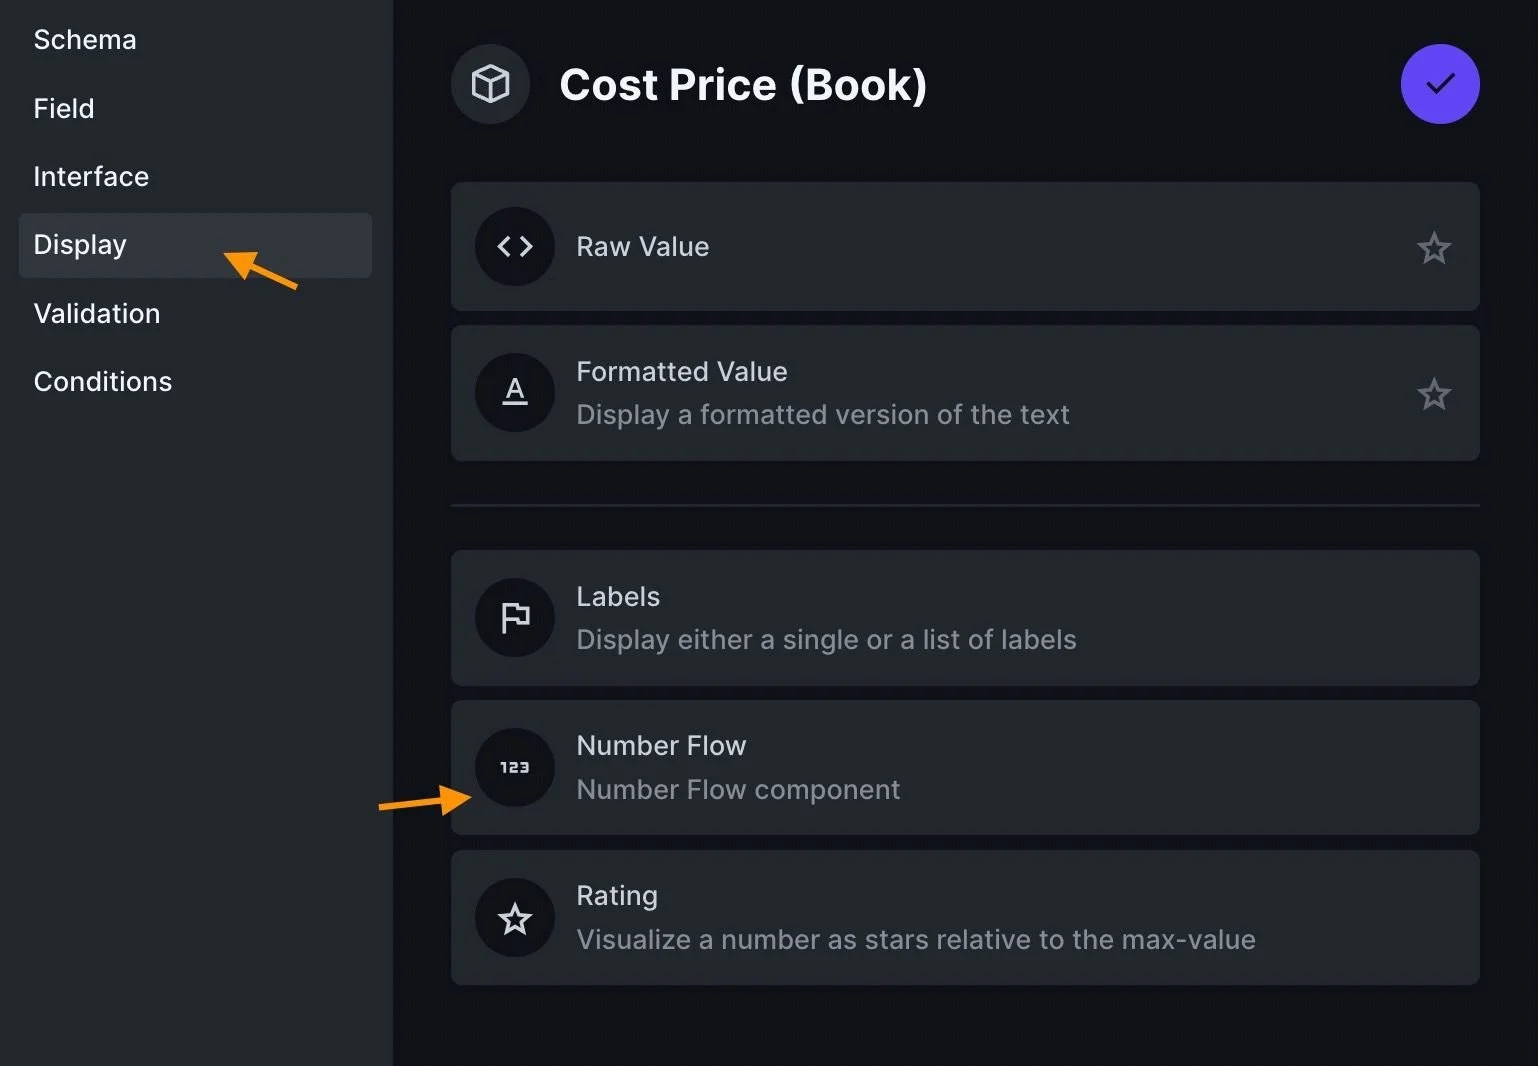
Save these changes and switch back to the content tab. When you look at the book's cost-price column, you will now see the animated number flow.

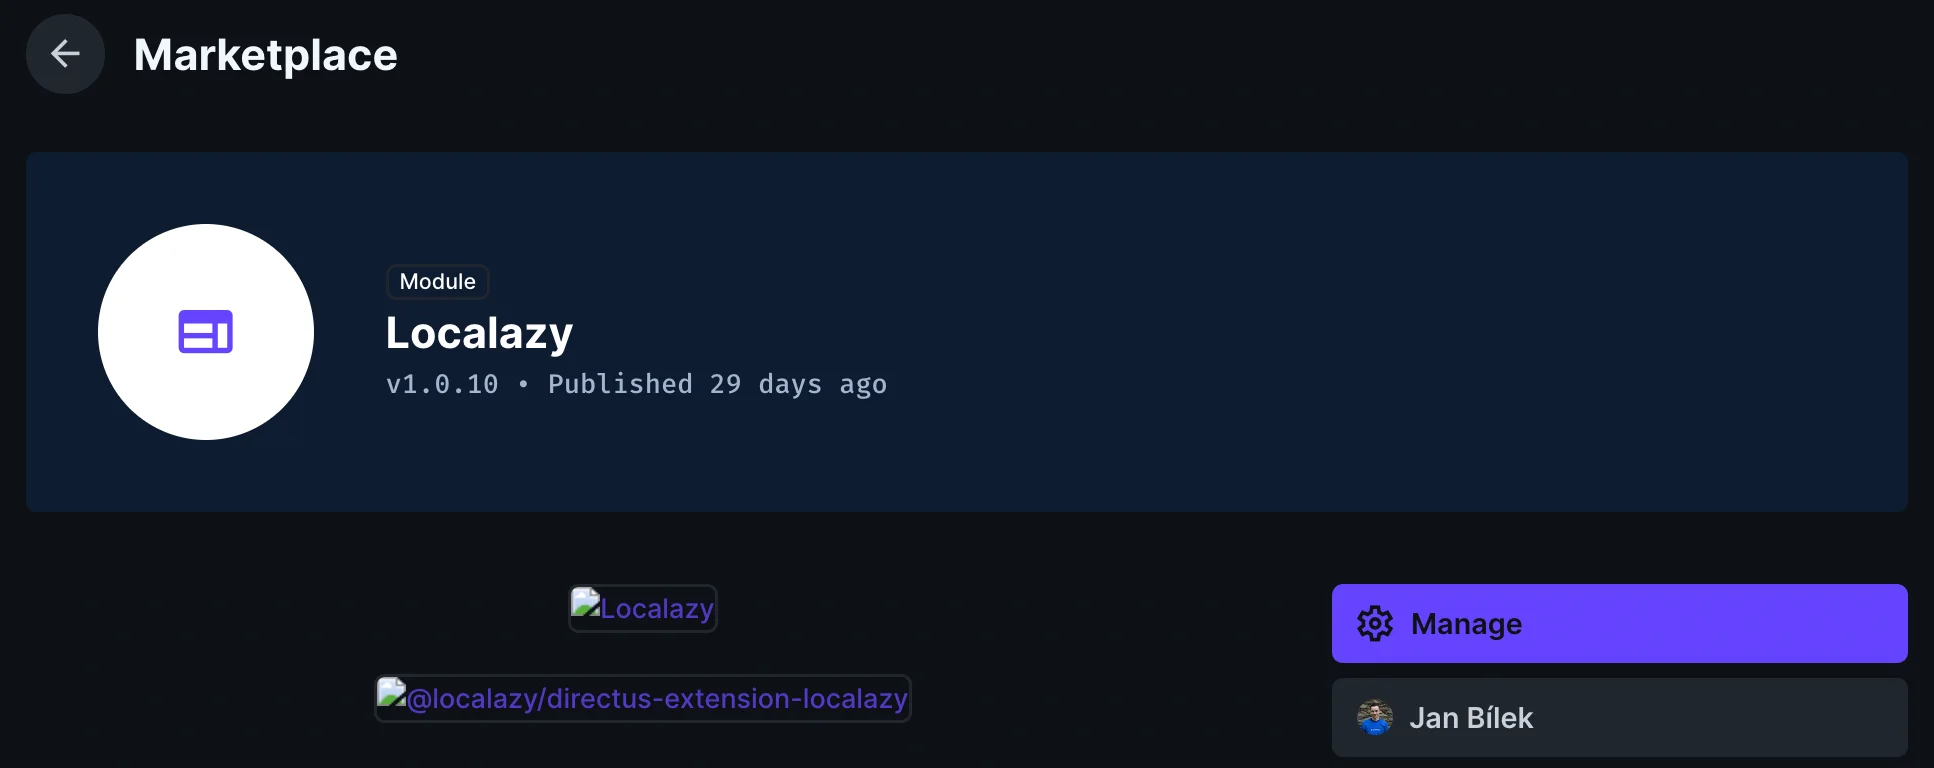
10. Localazy 🔗
The Localazy Directus extension makes the translation of your project a straightforward and enjoyable process. It manages content localization for a global audience, allowing you to synchronize it with Localazy and translate your materials to the languages of your choice.
This extension lets you maintain separate language versions and conveniently translate new content without copypasting or file importing.
Installation 🔗
The extension can be installed via the Directus marketplace:
Or it can be installed via npm:
npm install @localazy/directus-extension-localazy
Configuration 🔗
We will create a new collection called Language to store different languages (check the detailed process here). Go to the Book collection and use the Translations Interface to add a new field for translations. This will create a new junction collection within your project.
Once installed, go to Settings > Project Settings > Modules and turn on the Localazy module.
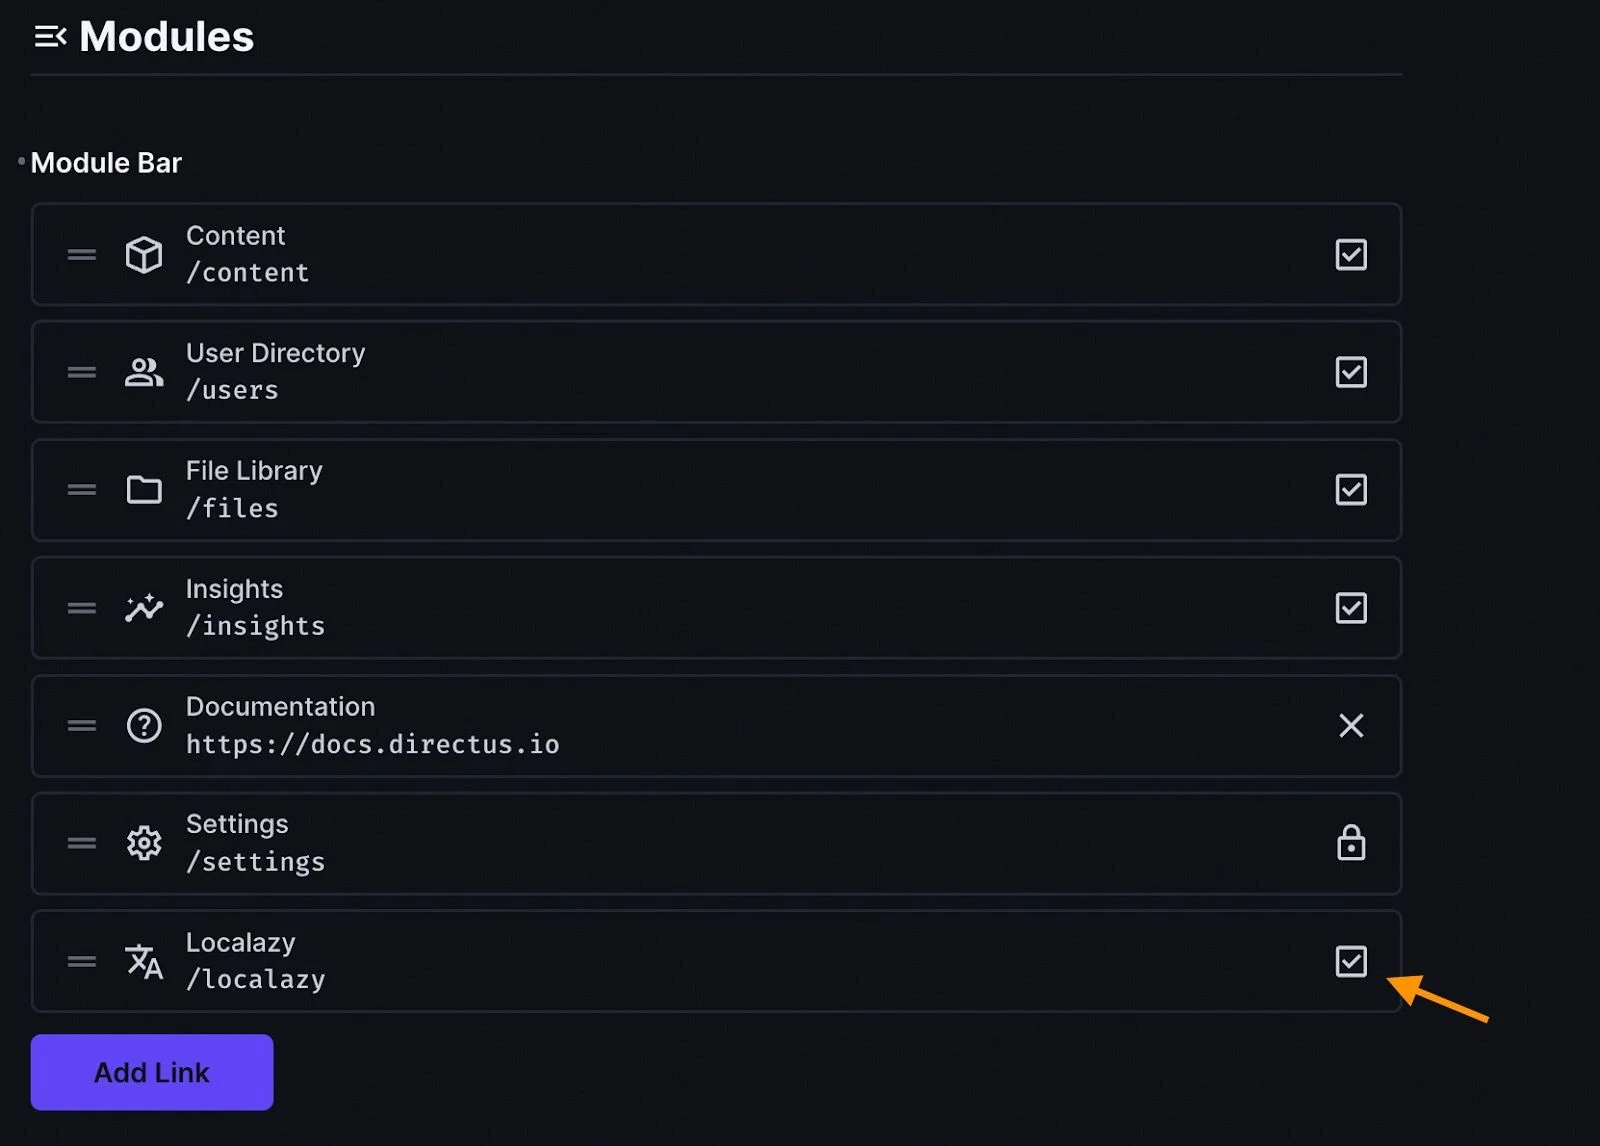
This action will add the localazy feature to the sidebar icons. Save this, and you should see the translation icon amongst the icons on the left sidebar. Select it and you will see that your project is not connected to Localazy yet.

👉 Learn how to connect your Directus project to the Localazy plugin here
✔️ Wrapping up 🔗
Directus extensions make the platform flexible, allowing organizations to customize their data management systems. With extensions' custom interfaces, hooks, and integrations, users can create better automatic workflows, improve usability, and improve functionalities.
Directus extensions help businesses build scalable and customizable solutions. More flexibility means more productivity and a better user experience, making this headless CMS a dynamic data management tool.