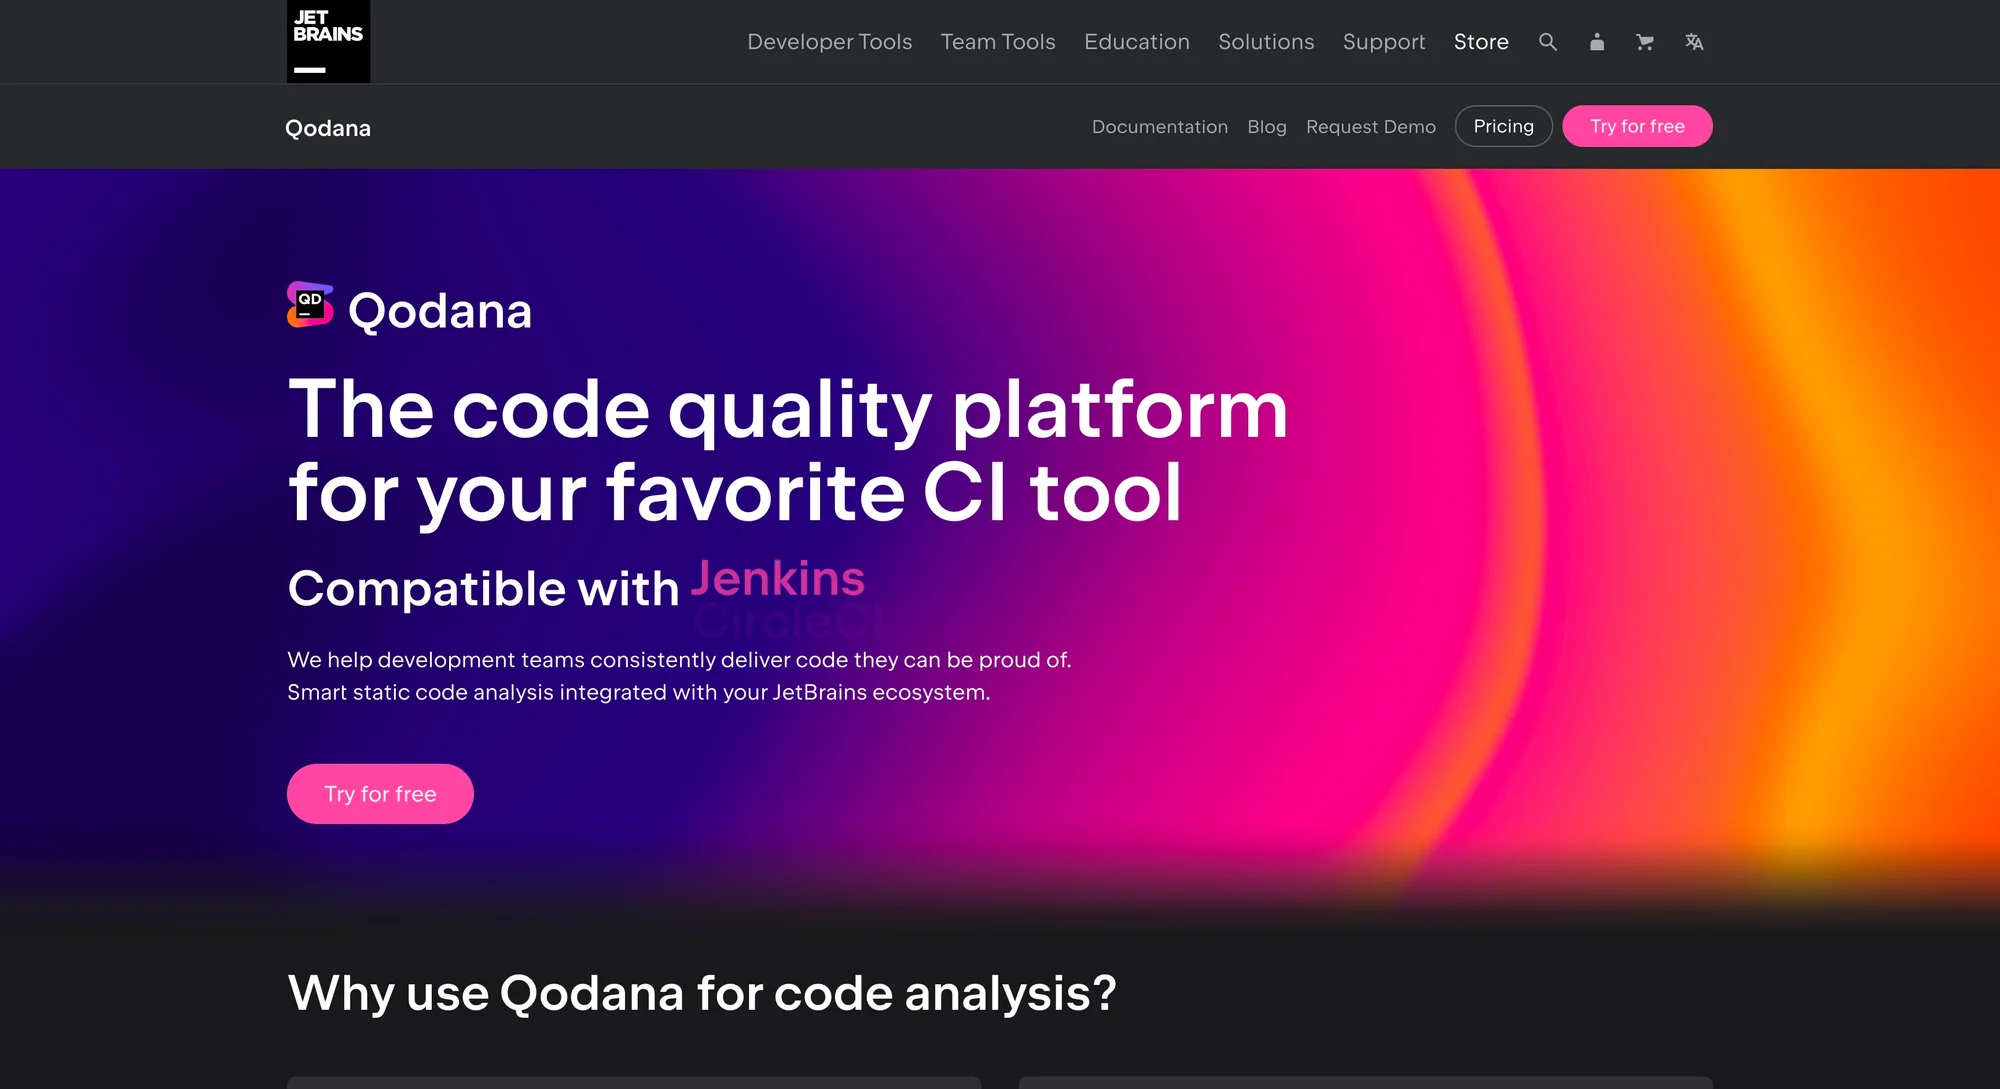
🤔 What is Qodana? 🔗
Qodana is a platform for monitoring code quality and evaluating code integrity. It incorporates all of the innovative features found in the JetBrains IDE into your CI/CD pipelines. It helps development teams consistently deliver code that meets quality and industry standards.
Why use it? 🔗
Qodana provides a high-level overview of project quality, establishes quality checks, and monitors progress on these various checks. Qodana can perform three different types of analysis components.
- Static analysis: This performs an automated codebase analysis.
- Linters: This component allows you to analyze code and identify duplicate functions or licenses that are incompatible.
- Code inspections: This linter component instantly analyzes code for specific issues.
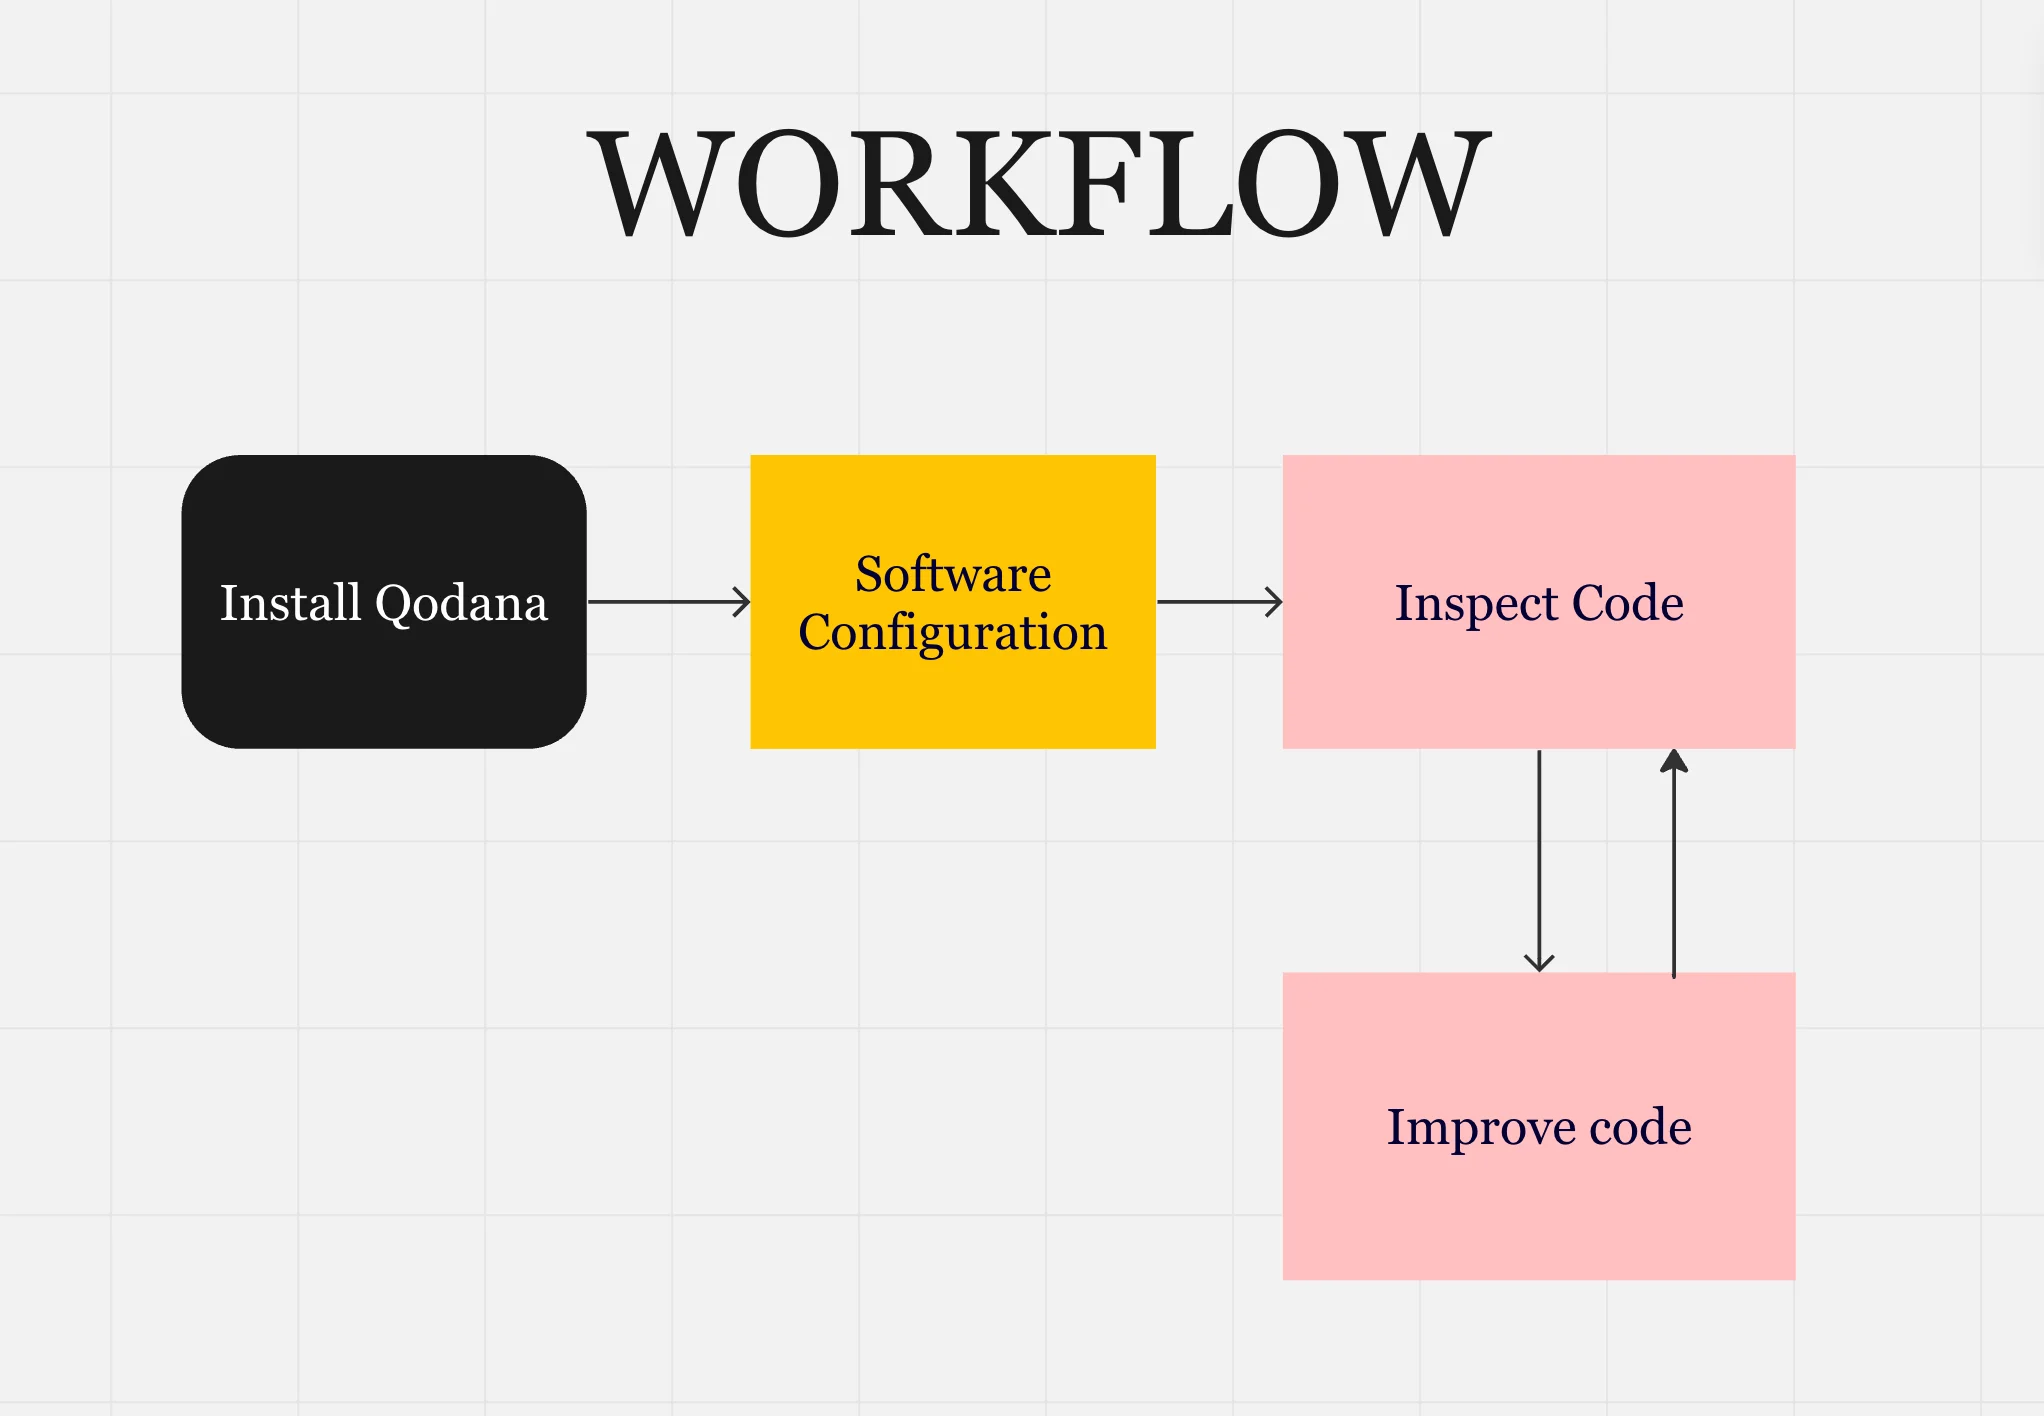
The diagram above depicts a typical workflow for Qodana.
- Install Qodana: Qodana is integrated into JetBrains IDE, so installing the Qodana plugin within your IDE is necessary.
- Software configuration: Qodana can be configured following your project's specifications.
- Inspect code: Inspections can be performed using the code analysis available.
- Improve code: Codes can be improved further based on the results of a Qodana inspection to meet project requirements and standards.
- Repeat inspection: Code inspection and improvement are both iterative processes.
🔌 Installation 🔗
Qodana can be run locally on a PC or server or as part of a building or deployment process within a CI/CD pipeline. Qodana can analyze projects written in Java, Kotlin, PHP, Python, TypeScript, JavaScript, .NET, and Golang. However, in this article, we will be analyzing a project written in Java programming language.
Before installing Qodana, configuring the Java Development Kit (JDK) is essential, as Qodana runs only on certain versions. Qodana JVM Community's default version is JDK 17. Qodana JVM uses JDK 17, while Qodana for Community Android uses Amazon Corretto 11. Aside from these default versions, Qodana can run on various other versions, which can be found in the documentation.
Qodana offers two options for installation:
- Using the Qodana Command Line Interface (CLI)
- The use of a Docker image
We will use the CLI in our project because it is the simplest way to get started. We would install Qodana CLI using Homebrew for macOS, but other installation options are available in the official documentation.
Enter the following command into your terminal:
brew install jetbrains/utils/qodana
Following installation, we will start the process by running the command in the root directory of the project you intend to analyze. This command generates a .yaml file containing all configuration files.
qodana initYou would get a few prompts along the way, and you'd be able to choose the linter based on the IntelliJ edition you're using. The jetbrains/qodana-jvm-community:2023.1 linter is based on the Intellij community edition, whereas the jetbrains/qodana-jvm:2023.1 linter is based on the Intellij Ultimate edition. A qodana.yaml file is generated.
When initialization is complete, the command below can be used to inspect the code.
qodana scan --show-reportA sample of the screenshot of the report page can be seen below:

✂️ What is String Externalization? 🔗
String externalization is a technique used to manage a project's textual content. It is the process of loading strings from an external source, such as a .json or .properties file. Software translation is a common practice among developers because it maintains translation effectively. This is due to the ease with which strings that are not hardcoded can be localized and translated into other languages.
How to perform string externalization? 🔗
String externalization differs by programming language. The Java programming language will be the focus of this article. String externalization entails the following steps:
- The first step in this process is identifying hardcoded strings in your project. These strings could be user output or error messages, among other formats. Content visible from a user interface can be identified as an externalizable string.
- Create an external file: According to our definition of string externalization, we must load strings from an external source. This is where we create the external source to load strings. The external file varies depending on the programming language; for example, Javascript uses a.json file with an object within it, whereas in Java, the external source is the resource bundles. The resource bundle contains.properties files for each language supported by the application. This concept will be discussed in depth in the subsequent section.
- String Extraction: String extraction is the process of extracting hardcoded strings into the default language.properties file. Strings are typically stored as a key-value pair. For instance, if the string "Please input your correct credentials" is hard coded, it is externalized as
credential.message=Please input your correct credentialsin the.properties file. The hard-coded string is subsequently replaced withcredential.message. - Handle translation: IntelliJ has an interesting feature that allows easy translation to other languages via an en.properties file. The value of the key
credential.messageis translated into the content of other languages using the other locales properties file. - Testing: After making changes to the properties file, check that the application is working properly and that all externalized strings have been loaded correctly.
When using Qodana as a code analysis tool, these procedures are simplified. The following section explains how Qodana guarantees proper externalization and localization of our project while also ensuring high-quality checks and code inspection.
🚩 How to use Qodana for Localization? 🔗
Qodana is not a localization tool, but it facilitates seamless localization management. The strings to be translated are stored in properties files, which can then be bundled into a resource bundle.
IntelliJ can then easily detect strings that require localization. Properties are text files with the .properties extension that contain localized key-value pairs. These localized strings can be accessed and rendered in the user interface.
You can use this official documentation to create a simple Java application that prints "Hello, world!" to the system output by following the instructions. If you have an existing Java application, we can proceed to the next section.
Setup 🔗
In the subsequent steps, the Resource Bundle Editor Plugin will be installed.
- In the settings menu (command+comma), choose plugins
- Go to the marketplace and search for Resource Bundle Editor Plugin
- Install this plugin, apply the changes, and click OK to close the dialog box.
In the following section, we will create our properties file. Create a new file with the .properties extension in the directory of your project, which in our case, is the src folder of the HelloWorld application. Our file would be called locales_en.properties. Repeat the process for locales_fr.properties. We can see that both property files have been merged into a Resource Bundle<locales>.
A resource bundle is a collection of properties files with the same base name but distinct locale suffixes. Due to the similarity in their names, IntelliJ merged the two properties files into a resource bundle in our example.
Finding hardcoded strings 🔗
Our project includes literal strings that are hard-coded, so we would enable the inspection for hard-coded strings to highlight them. These strings can be extracted and stored in the properties files.
Open the settings (command+comma), expand Editor, and then click on inspections. Navigate to Java and select and expand Internationalization. Select Hardcoded strings and apply the changes before clicking OK to close the dialog.
The hard-coded strings should be highlighted in your code editor and displayed as a warning at the top right of the editor.
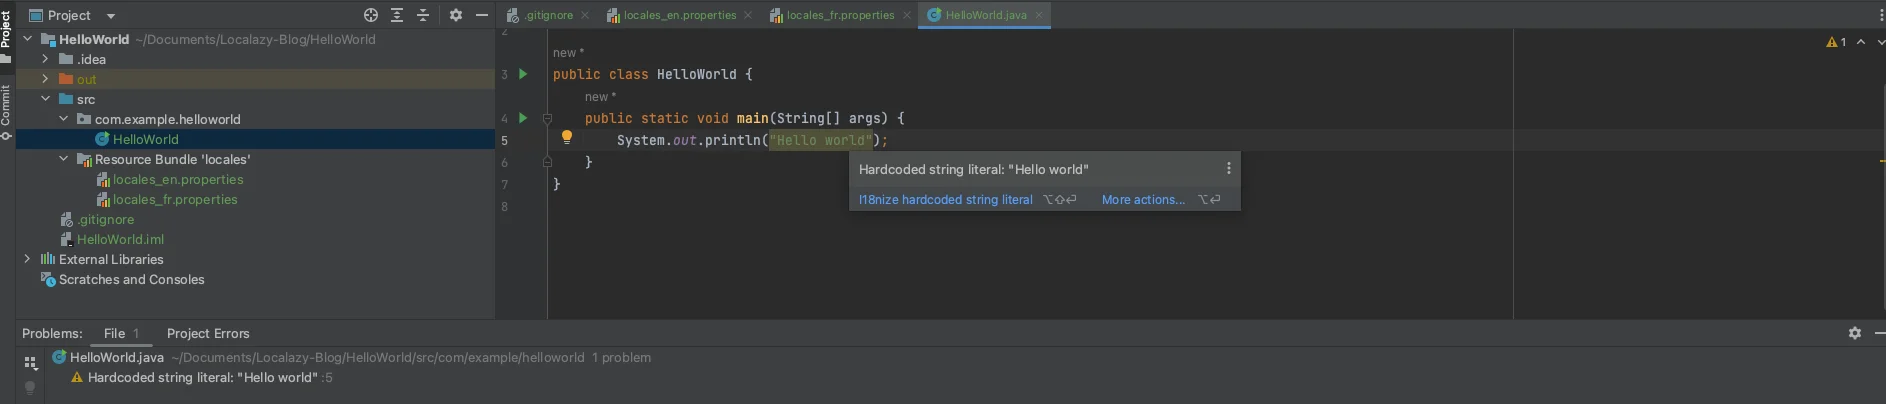
Now that IntelliJ has assisted with code analysis and inspection of hard-coded literals, we want to extract the hard-coded strings into the properties file. Using an action called i18n hard-coded string literal, IntelliJ has made this possible.
Externalize hardcoded strings 🔗
Include the following code snippets just above the System.out.print() method in your source code. The snippets specify the resource bundle in which extracted strings will be stored.
ResourceBundle <name> = ResourceBundle.getBundle("<bundle name>");
Where name is a variable name and bundle name is the resource bundle's base name, which in our Java application is locales.
ResourceBundle myBundle = ResourceBundle.getBundle("locales");
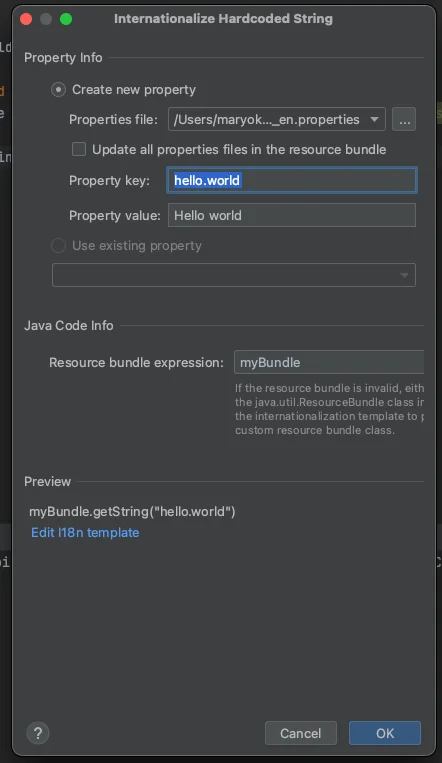
Click on the hard-coded string and press the option key + enter key. You should see a list of actions. Choose the i18nize hardcoded string literal, and a dialog box appears.
The fields are usually prefilled, but the property key and value can be changed to match our desired naming conventions. Check that the properties file points to the locales_en.properties file and that "Update all properties files" is unchecked. This ensures that only the English strings are internationalized. We would manually translate the French string content. A screenshot is provided below.
Click OK, and you'll see that the hardcoded string has been replaced by
System.out.println(myBundle.getString("hello.world"));Here, we will manually edit the French translation's keys and values. Click on the Resource Bundle 'locales' and then press the command + arrow down keys to bring up a screen where you can include the French translation for the content, as shown below.

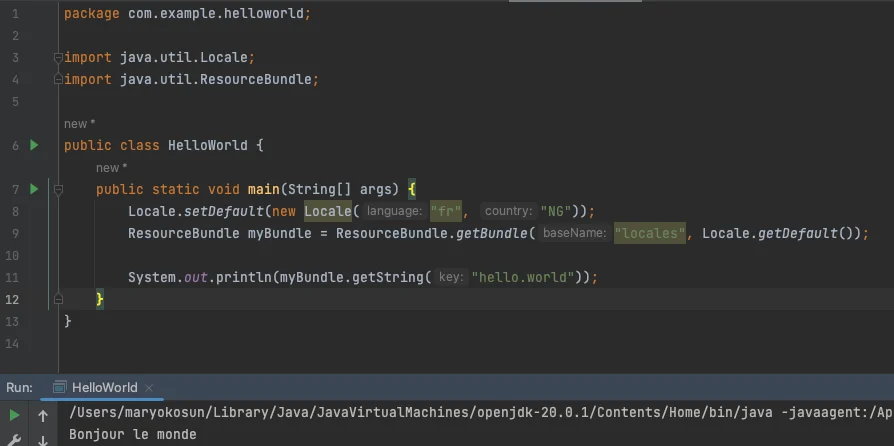
In the next section, we'll use the locale class to get the default locale and then use that information to show the extracted strings. Locale.getDefault() would be added as a second parameter to the Resource.getBundle() method.
ResourceBundle myBundle = ResourceBundle.getBundle("locales", Locale.getDefault());Setting the locale 🔗
According to Oracle documentation, Locale.getDefault() retrieves the default locale and returns the locale determined by the Java Virtual Machine (JVM) when it was first loaded. That is, the default locale is determined by the JVM based on the host environment.
As shown in the screenshot, running the code returns the en locale of our properties. We can manually set our locale by using the Locale.setDefault() function at the top of our source code within the main function.
Locale.setDefault(new Locale("fr", "NG"));If we run the code again, we should see the fr translated strings as shown below.
✔️ Conclusion 🔗
In this article, we learned how string externalization works and the difference between localization and internationalization. We also learned how Qodana, a tool for analyzing code, helps IntelliJ localize software for a wider and more international audience. A Java application was utilized to test string externalization with Qodana.
The source code can be found in the GitHub repository.