Have you ever wondered how to make those floating windows used by Facebook Heads and other apps? Have you ever wanted to use the same technology in your app? It’s easy, and I will guide you through the whole process.
I’m the author of Floating Apps; the first app of its kind on Google Play and the most popular one with over 8 million downloads. After 6 years of the development of the app, I know a bit about it. It’s sometimes tricky, and I spent months reading documentation and Android source code and experimenting. I received feedback from tens of thousands of users and see various issues on different phones with different Android versions.
Here’s what I learned along the way.
Before reading this article, it’s recommended to go through Floating Windows on Android 3: Permissions.
In this article, I will teach you how to show the actual floating window over other apps.
WindowManager 🔗
WindowManager is an interface that the app can use for communication with the window manager.
And the window manager on Android handles everything you can see on the screen. Fortunately, it allows us to add and remove views directly, and if we add them with correct parameters, we have our floating windows!
// Obtain WindowManager
val windowManager = context.getSystemService(Context.WINDOW_SERVICE) as WindowManager

// Add view
windowManager.addView(rootView, windowParams)

// Remove view
windowManager.removeView(rootView)
LayoutParams 🔗
In the short source code sample above, we called addView with the second parameter being windowParams of type WindowManager.LayoutParams. What are the correct params?
Here it goes:
private val windowParams = WindowManager.LayoutParams(
  0,  // Width
  0,  // Height
  0,  // X position
  0,  // Y position
  if (Build.VERSION.SDK_INT >= Build.VERSION_CODES.O) {
    WindowManager.LayoutParams.TYPE_APPLICATION_OVERLAY
  } else {
    WindowManager.LayoutParams.TYPE_PHONE
  },
  WindowManager.LayoutParams.FLAG_LAYOUT_NO_LIMITS or
            WindowManager.LayoutParams.FLAG_NOT_FOCUSABLE or
            WindowManager.LayoutParams.FLAG_NOT_TOUCH_MODAL or
            WindowManager.LayoutParams.FLAG_WATCH_OUTSIDE_TOUCH,
  PixelFormat.TRANSLUCENT
)
The first four parameters specify the position and size of the window. Usually, I tend to have layout params defined on class level, so I keep these four being zero and calculate them later. Technically, we can set them right in place, but I rather move this code outside of the variable assignment. For calculation, it’s possible to use something like this to consider also screen size:
private fun getCurrentDisplayMetrics(): DisplayMetrics {
    val dm = DisplayMetrics()
    windowManager.defaultDisplay.getMetrics(dm)
    return dm
}

// Set LayoutParams for a window that is placed in the center
// of the screen.
private fun calculateSizeAndPosition(
  params: WindowManager.LayoutParams,
  widthInDp: Int,
  heightInDp: Int
) {
  val dm = getCurrentDisplayMetrics()
  // We have to set gravity for which the calculated position is relative.
  params.gravity = Gravity.TOP or Gravity.LEFT
  params.width = (widthInDp * dm.density).toInt()
  params.height = (heightInDp * dm.density).toInt()
  params.x = (dm.widthPixels - params.width) / 2
  params.y = (dm.heightPixels - params.height) / 2
}
The next parameter is the type of window. This one is critical, and using the right type, we tell Android how it should treat our view. Before Android O, the recommended type was WindowManager.LayoutParams.TYPE_PHONE. There are other types, and it’s possible to mix them to achieve different priorities of windows. However, as it’s unavailable from Android O, I don’t recommend using it. From Android O, the recommended type is WindowManager.LayoutParams.TYPE_APPLICATION_OVERLAY, and other types fallback to it.
The next comes flags, and they are also critical as they tell Android how we want our window to be interacting with touches, buttons and key input.
FLAG_LAYOUT_NO_LIMITS- Allow window to extend outside of the screen. This one is optional, but I tend to use it and calculate limits on my own.FLAG_NOT_FOCUSABLE- The window won’t ever get key input focus, so the user can not send key or other button events to it. Those will instead go to whatever focusable window is behind it. This one is extremely important, because it allows us to control the apps behind the floating window.FLAG_NOT_TOUCH_MODAL- Allow any pointer events outside of the window to be sent to the windows behind it.FLAG_WATCH_OUTSIDE_TOUCH- Receive events for touches that occur outside of your window. This one will be important in the future.
The last parameters is the pixel format. I recommend PixelFormat.TRANSLUCENT as it tells Android to select a format that supports translucency. And having windows partly transparent is fun  .
.
Layout 🔗
Unfortunately, we can’t use Jetpack Compose for floating windows as we need just a view, and there is no activity and thus no lifecycle.
However, we can use old good layout XML. To use it, we need to get instance of the LayoutInflater and inflate the view:
val layoutInflater = context.getSystemService(Context.LAYOUT_INFLATER_SERVICE) as LayoutInflater

// The second parameter is null as we don't have any ViewGroup
// to attach our newly created view to.
val rootView = layoutInflater.inflate(R.layout.window,  null)
For demonstrational purposes, let’s rely on LinearLayout. It nicely demonstrates how our window layout is structured. In Floating Apps, I use the base layout for the window and insert the content dynamically, but we can have just a single layout file as there is only one window type.
<?xml version="1.0" encoding="utf-8"?>
<LinearLayout xmlns:android="http://schemas.android.com/apk/res/android"
  android:layout_width="match_parent"
  android:layout_height="match_parent"
  android:orientation="vertical"
  android:weightSum="1">

  <LinearLayout android:id="@+id/window_header"
    android:layout_width="match_parent"
    android:layout_height="wrap_content"
    android:background="@color/windowHeader"
    android:orientation="horizontal"
    android:weightSum="1">

    <TextView android:id="@+id/window_title"
      android:layout_width="0dp"
      android:layout_height="wrap_content"
      android:layout_gravity="start|center_vertical"
      android:layout_weight="1"
      android:paddingStart="8dp"
      android:paddingTop="4dp"
      android:paddingEnd="8dp"
      android:paddingBottom="4dp"
      android:text="@string/add_note"
      android:textColor="@color/windowHeaderText" />

    <ImageButton android:id="@+id/window_close"
      android:layout_width="24dp"
      android:layout_height="24dp"
      android:layout_gravity="end|center_vertical"
      android:layout_margin="4dp"
      android:background="?android:attr/selectableItemBackground"
      android:padding="0dp"
      android:src="@drawable/baseline_highlight_off_black_24"
      android:tint="@color/windowHeaderClose"
      android:tintMode="src_in" />

 </LinearLayout>

 <LinearLayout android:id="@+id/window_content"
   android:layout_width="match_parent"
   android:layout_height="0dp"
   android:layout_weight="1"
   android:background="@color/windowBody"
   android:orientation="horizontal">

   <EditText  android:id="@+id/content_text"
     android:layout_width="0dp"
     android:layout_height="wrap_content"
     android:layout_weight="1" />

   <ImageButton  android:id="@+id/content_button"
     android:layout_width="32dp"
     android:layout_height="32dp"
     android:layout_gravity="end|center_vertical"
     android:layout_margin="4dp"
     android:background="?android:attr/selectableItemBackground"
     android:src="@drawable/baseline_send_black_24"
     android:tint="@color/windowSend"
     android:tintMode="src_in" />

  </LinearLayout>

</LinearLayout>
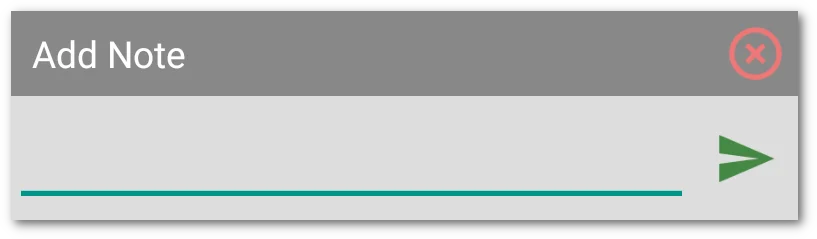
I’m not good designer, so I just pick a few semi-random colors for the window design  .
.
<resources>
 <color name="windowHeader">#FF888888</color>
 <color name="windowHeaderText">#FFFFFFFF</color>
 <color name="windowHeaderClose">#FFEE7777</color>
 <color name="windowBody">#FFDDDDDD</color>
 <color name="windowSend">#FF448844</color>
</resources>
And, voála, the result of my designing skill:
Floating Window 🔗
We have prepared view, layout parameters, and window manager. Now, let’s put the code together, and our very first floating window is ready!
Let’s create Window class to encapsulate the whole logic. The full source code:
class Window(private val context: Context) {

  private val windowManager = context.getSystemService(Context.WINDOW_SERVICE) as WindowManager
  private val layoutInflater = context.getSystemService(Context.LAYOUT_INFLATER_SERVICE) as LayoutInflater
  private val rootView = layoutInflater.inflate(R.layout.window, null)

  private val windowParams = WindowManager.LayoutParams(
      0,
      0,
      0,
      0,
      if (Build.VERSION.SDK_INT >= Build.VERSION_CODES.O) {
          WindowManager.LayoutParams.TYPE_APPLICATION_OVERLAY
      } else {
          WindowManager.LayoutParams.TYPE_PHONE
      },
      WindowManager.LayoutParams.FLAG_LAYOUT_NO_LIMITS or
              WindowManager.LayoutParams.FLAG_NOT_FOCUSABLE or
              WindowManager.LayoutParams.FLAG_NOT_TOUCH_MODAL or
              WindowManager.LayoutParams.FLAG_WATCH_OUTSIDE_TOUCH,
      PixelFormat.TRANSLUCENT
  )

  private fun getCurrentDisplayMetrics(): DisplayMetrics {
    val dm = DisplayMetrics()
    windowManager.defaultDisplay.getMetrics(dm)
    return dm
  }

  private fun calculateSizeAndPosition(
      params: WindowManager.LayoutParams,
      widthInDp: Int,
      heightInDp: Int
  ) {
    val dm = getCurrentDisplayMetrics()
    // We have to set gravity for which the calculated position is relative.
    params.gravity = Gravity.TOP or Gravity.LEFT
    params.width = (widthInDp * dm.density).toInt()
    params.height = (heightInDp * dm.density).toInt()
    params.x = (dm.widthPixels - params.width) / 2
    params.y = (dm.heightPixels - params.height) / 2
  }

  private fun initWindowParams() {
    calculateSizeAndPosition(windowParams, 300, 80)
  }

  private fun initWindow() {
    // Using kotlin extension for views caused error, so good old findViewById is used
    rootView.findViewById<View>(R.id.window_close).setOnClickListener { close() }
    rootView.findViewById<View>(R.id.content_button).setOnClickListener {
      Toast.makeText(context, "Adding notes to be implemented.", Toast.LENGTH_SHORT).show()
    }
  }

  init {
    initWindowParams()
    initWindow()
  }

  fun open() {
    try {
      windowManager.addView(rootView, windowParams)
    } catch (e: Exception) {
      // Ignore exception for now, but in production, you should have some
      // warning for the user here.
    }
  }

  fun close() {
    try {
      windowManager.removeView(rootView)
    } catch (e: Exception) {
      // Ignore exception for now, but in production, you should have some
      // warning for the user here.
    }
  }

}
Floating Apps 🔗
If you are interested in how complex the logic behind simple floating windows can get, there is a bit of the background from Floating Apps.
There are many mini-apps. Each of them has a header file that contains the necessary information about it - localized name, internal identifier, icon, list of required permissions, launch preferences, window presets, etc. Headers files are kept in memory and used for listing available apps.
When the app is launched, the information from its header file is used to create the app’s instance and an instance of Window.
Each of the apps extends Application that provides a basic set of features for managing its lifecycle, defining menus, handling window size, position, minimizing, etc. Also, the Application class can automatically solve a lot of shortcomings in floating technology. I will teach you more about all these issues in one of the next articles.
Also, all running apps are registered with the global list of active windows, and that allows for many exciting features - listing all active apps, running some of them only once, reactivating running apps instead of rerunning them, cross-app state refreshing, etc.
As you can see, there can be a vast logic. As normal Android apps rely on the system to provide many of these features, I had to rewrite all of these features for Floating Apps from scratch.
Results & Missing Pieces 🔗
As you can see in the animation below, we open our new floating window and even switch apps. The window is still there visible above them.
However, there are two main issues:
- The window stays in the center of the screen, and we can’t move it anywhere.
- It’s not possible to type texts. The keyboard is not activated and doesn’t appear.
We will address both of these problems in the next articles.
Source Code 🔗
The whole source code for this article is available on Github.
Stay Tuned 🔗
Eager to learn more about Android development? Follow me (@vaclavhodek) and Localazy (@localazy) on Twitter, or like Localazy on Facebook.
The Series 🔗
This article is part of the Floating Windows on Android series.
- Floating Windows on Android 1: Jetpack Compose & Room
- Floating Windows on Android 2: Foreground Service
- Floating Windows on Android 3: Permissions
- Floating Windows on Android 4: Floating Window
- Floating Windows on Android 5: Moving Window
- Floating Windows on Android 6: Keyboard Input
- Floating Windows on Android 7: Boot Receiver
- Floating Windows on Android 8: The Final App
- Floating Windows on Android 9: Shortcomings
- Floating Windows on Android 10: Tips & Tricks
