Localization is crucial to building modern, accessible web applications that cater to a global audience. However, it can be daunting, especially if you're just starting with it. In the case of NestJS, that's where nestjs-i18n and Localazy come in; to help simplify its implementation and enable you to focus on the more important task of building amazing applications.

👋 Introduction 🔗
Let's quickly explain the definitions of localization (l10n) and internationalization (i18n) and introduce Localazy. You can skip this part if you are already familiar with the terms and platform.
What is Localization? 🔗
Localization is an important part of the process of adapting software to suit the end user's needs. It is usually implemented by translating applications to the user's geographic language and creating locale-specific components to create a dynamic experience suited to the target locale. Localization is not limited to translation, but translation plays a big part in localization. For applications to be localized, internationalization is used to enable easy adaptation.
Internationalization is the process of creating applications in a way that supports them being used in different locales and geographic regions, which makes the application globally or universally available. For example, nestjs-i18n is a package that integrates i18n - an internationalization module - with NestJS and makes it easy to use.
What is Localazy? 🔗
Localazy is a continuous translation management platform that strives to make the localization and translation process efficient and enjoyable for any project. It supports a wide variety of frameworks and an even more comprehensive range of formats through its command line interface (CLI) and API.
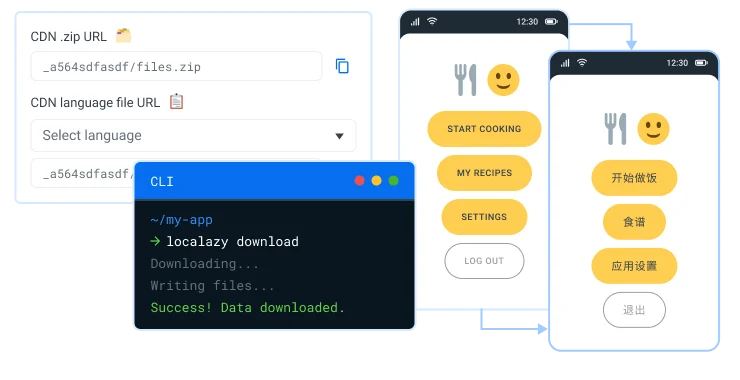
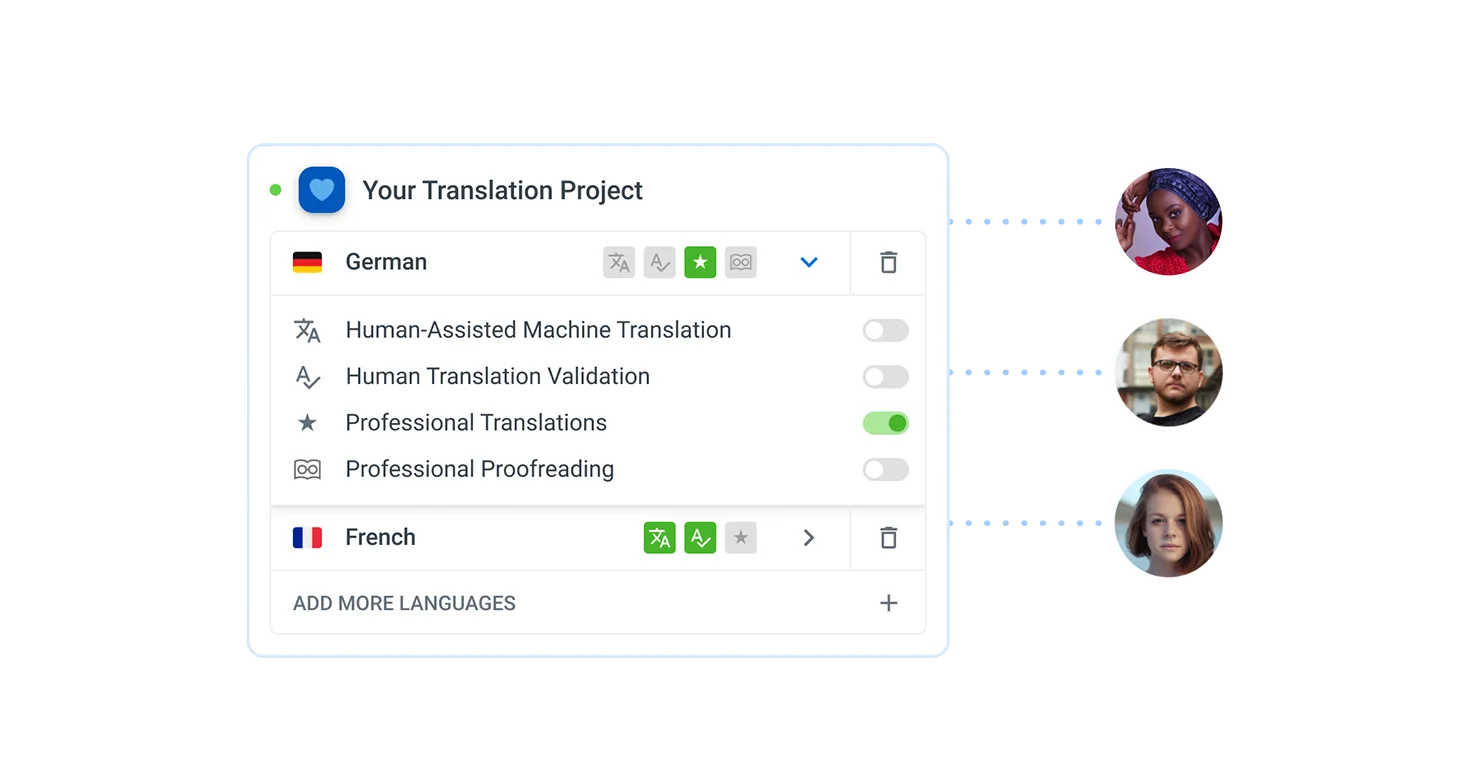
Localazy also offers various translation services depending on the project's needs, such as highly accurate translation memory supported by community-shared translations, continuous translation services such as professional translations and human-assisted machine translations, and machine translations. The translation interface is very simple and easy to use, with only important features.
Localazy works seamlessly with the nestjs-i18n library, which is one of the most popular choices when it comes to internationalization in NestJS applications. Without a localization management platform, the default would be manually translating every word and putting it in the files. This could lead to loss of meaning of words and manual errors.
Why use Localazy?
- It enables easy translation of applications using either machine, human-assisted, or professional translation services.
- It enables easy expansion of businesses globally as their applications can support various locales and geographic markets.
- It leads to increased revenue as more users can access the application.
- Developers can focus on the application features rather than worrying about manual translations.
- It utilizes a one-time setup, and it is easy to use.
Learn why Localazy is the best tool for translation automation or the 12 reasons why Localazy is better than spreadhseets, even for simple projects!
Now that you know what is localization, internationalization, and the benefits of using a translation management system such as Localazy to localize your project, we can get to the practical part! 🤠
🕹️ First steps 🔗
We would be creating a NestJS application with an endpoint reset-password that would allow users to reset their passwords. We would then view the application response in various languages to test the integration.
Prerequisites 🔗
- Basic understanding of NestJS and what i18n does
- Have NodeJS and NPM
- Code Editor or your favorite IDE
- Postman to test the results
Creating a NestJS application 🔗
If you already have a NestJS application you want to localize, skip to the next section.
To create a NestJS application, install the NestJS CLI globally.
npm i -g @nestjs/cliThen, create a new project in your operating system terminal. The nest-i18n-localazy-example is the project name. You can name yours differently.
nest new nest-i18n-localazy-example👨💻 Integrating nestjs-i18n 🔗
Now we need to set up the i18n library for our project.
Installation 🔗
Install nestjs-i18n in the Nest application to use the internationalization tools using the command:
npm install nestjs-i18nSet up the file or files to be translated 🔗
Create a folder named i18n in the src folder of your project. Create the default locale folder. In this case, we would use en as the default locale is English.
Create the translation file with your choice filename in this folder. The filename used in this example is test.json. Other files to be translated can also be added in this folder src/i18n/en .
// src/i18n/en/test.json

{
    "HELLO": "Hello",
    "PRODUCT": {
      "NEW": "New Product: {name}"
    },
    "ENGLISH": "English",
    "ARRAY": ["ONE", "TWO", "THREE"],
    "cat": "Cat",
    "cat_name": "Cat: {name}",
    "set-up-password": {
      "heading": "Hello, {username}",
      "title": "Reset password",
      "followLink": "Please follow the link sent to your email address {email} to reset your password"
    },
    "day_interval": {
      "one": "Every day",
      "other": "Every {count} days",
      "zero": "Never"
    },
    "nested": "We go shopping: $t(test.day_interval, {{\"count\": {count} }})"
}
We would not be using all the strings in this file in the endpoint, as I am just trying to show that different key definitions can be used, but you can try using some of the other strings while practicing. Localazy also provides a lot of information on the allowed key and value types here.
Enable the i18n folder to be compiled to the dist folder during the build. 🔗
Navigate to nest-cli.json and modify the compilerOptions object by adding the assets property. The include property specifies the path of the files to be watched.
// nest-cli.json

{
  "$schema": "https://json.schemastore.org/nest-cli",
  "collection": "@nestjs/schematics",
  "sourceRoot": "src",
  "compilerOptions": {
    "deleteOutDir": true,
    "assets": [
      { "include": "i18n/**/*", "watchAssets": true }
    ]
  }
}
Setting up the i18n Module 🔗
Now, we set up the i18n Module to be accessible throughout the application by adding in the root of the application. Add resolvers.
// src/app.module.ts

import { Module } from '@nestjs/common';
import { AppController } from './app.controller';
import { AppService } from './app.service';
import * as path from 'path';
import {
  AcceptLanguageResolver,
  I18nJsonLoader,
  I18nModule,
  QueryResolver,
} from 'nestjs-i18n';

@Module({
  imports: [
    I18nModule.forRoot({
      fallbackLanguage: 'en',
      loaderOptions: {
        path: path.join(__dirname, '/i18n/'),
        watch: true,
      },
      resolvers: [
        { use: QueryResolver, options: ['lang'] },
        AcceptLanguageResolver,
      ],
    })
  ],
  controllers: [AppController],
  providers: [AppService],
})
export class AppModule {}
Breakdown of the code snippet above and what it does:
- fallbackLanguage: is the language to be used when a translation does not exist in the selected locale or no language is chosen.
- watch: setting this property to
truein theloaderOptionsenables live reloading of the application. - resolvers: option is used to determine how the language is detected. In this case, we use a
QueryResolverwith options as lang which would enable us to dynamically use query parameters to set the language. We will see how this works when viewing the translated application.
Start translating your applications 🔗
Start translating your applications by adding the translated variables in your code using the i18n.t method. Navigate to the app.controller.ts file, create a new endpoint route called ‘set-password’ as shown in Lines 15-23, and make use of the localized strings.
To access the localized strings, the filename comes first, then the object property. Nested objects and arrays can be accessed using dot notation.
Dynamic strings require a second argument to be passed containing the dynamic data. Check the nestjs-i18n documentation for a more in-depth study on string formatting and how to deal with various data such as Plurals, referencing other strings, and more.
// src/app.controller.ts

import { Body, Controller, Get, HttpCode, Post } from '@nestjs/common';
import { AppService } from './app.service';
import { I18n, I18nContext } from 'nestjs-i18n';
import { passwordDto, SetUpPasswordDto } from './password.dto';

@Controller()
export class AppController {
  constructor(private readonly appService: AppService) {}

  @Get()
  getHello(): string {
    return ('Hello World!');
  }

  @Post('reset-password')  // line 15
  @HttpCode(200)
  setUpPassword(@I18n() i18n: I18nContext, @Body() setUpPasswordDto: SetUpPasswordDto): passwordDto {
    return {
      title: i18n.t(`test.set-up-password.title`),
      text: `${i18n.t('test.set-up-password.heading', { args: { username: resetPasswordDto.username }})},

       ${i18n.t(`test.set-up-password.followLink`, { args: { email: resetPasswordDto.email }})}`.replace(/\s\s+/g, ' ')
    }
  }  // line 23
}
In the above code snippet, the replace method on the text property is used to strip new lines and multiple spaces.
A dto file called password.dto.ts was created in the src directory for validation, and it was used in the app.controller.ts file. Here is the content of the file:
// src/password.dto.ts

export class ResetPasswordDto {
    username: string;
    email: string
}

export class passwordDto {
    title: string;
    text: string;
}
🗺️ Translating using Localazy 🔗
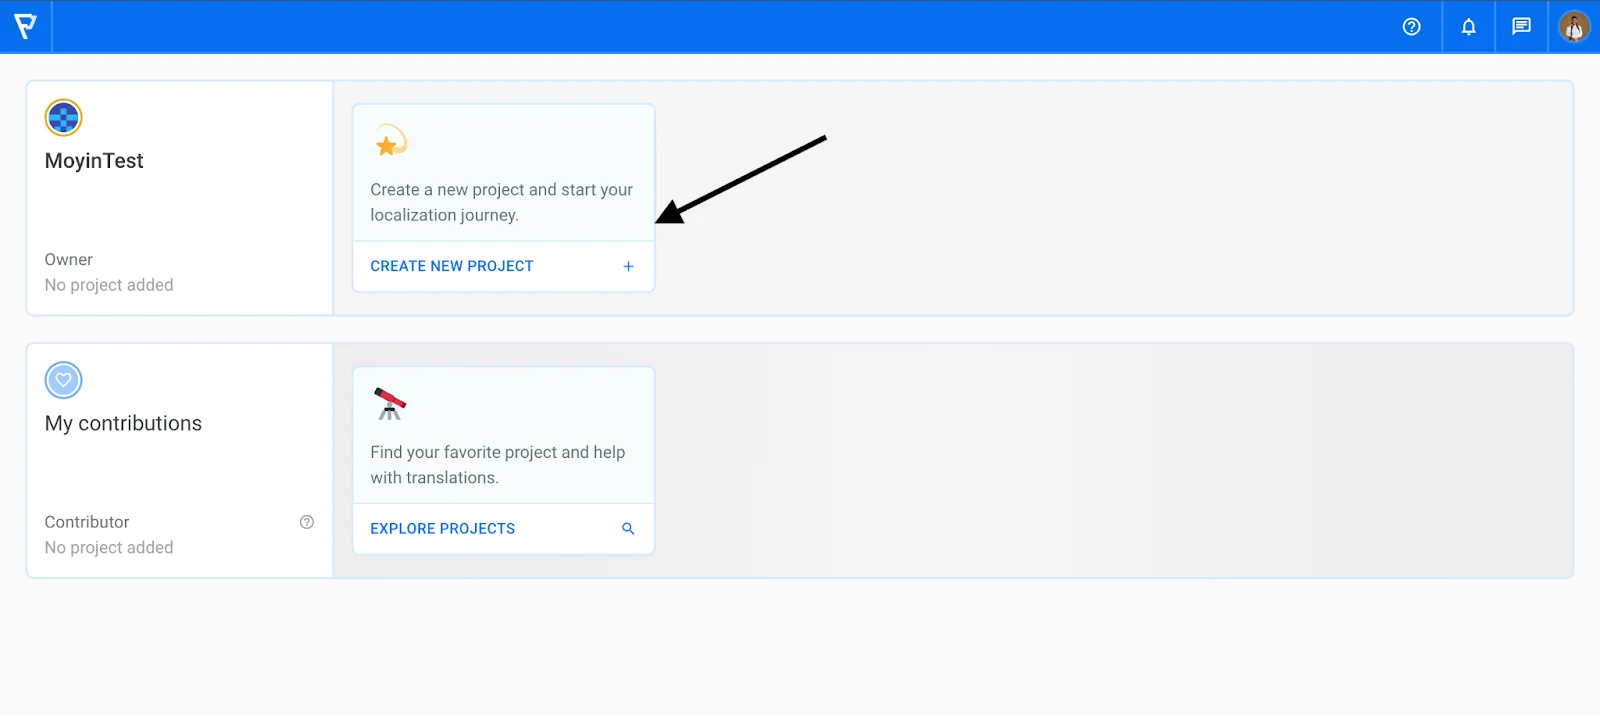
Log in or create a Localazy account if you do not have one.
Create a new project.
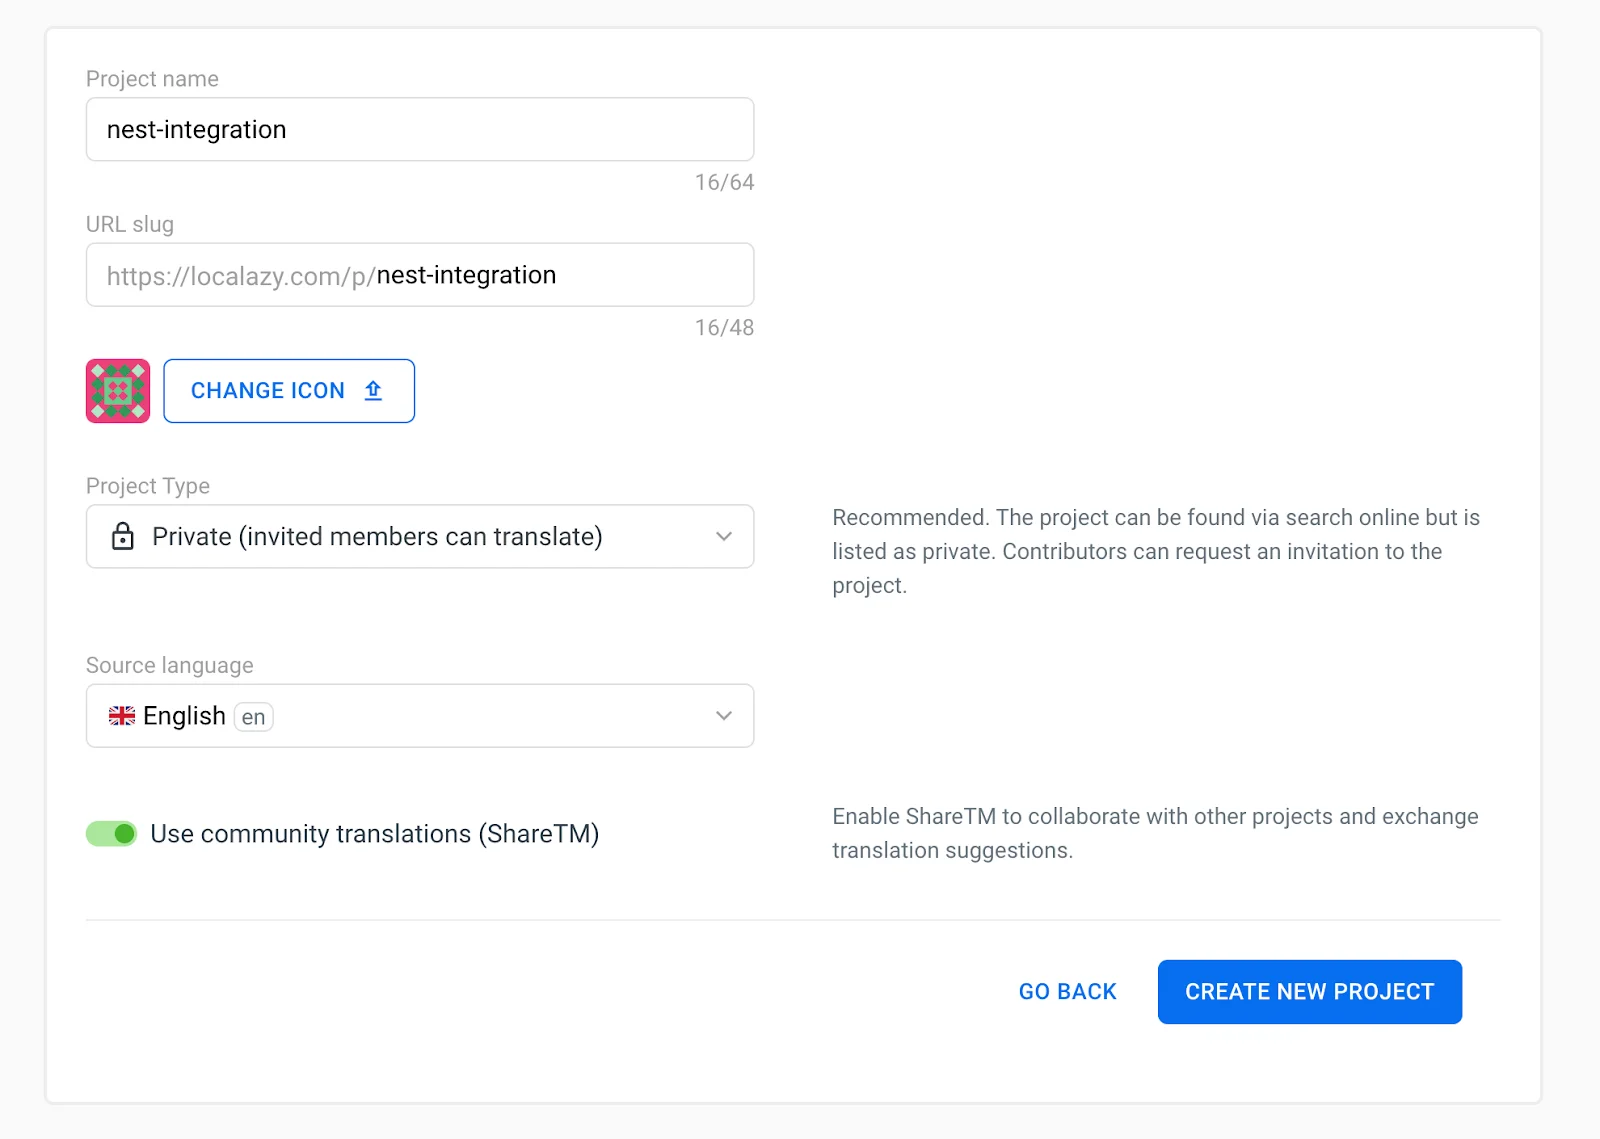
Enter a project name of your choice. I used nest-integration, but you can decide to use a different name. Change the source language if the strings to be translated are not in English, but it's generally recommended to use English to get the most accurate machine translation suggestions and be able to order professional translations. Then, click the Create new project button.
Now, let us go back to our application code.
Install Localazy CLI 🔗
Install the Localazy CLI locally as a dev dependency using the npm package to enable anyone that runs the code to install it when running the npm install command. Use the command
npm i --save-dev @localazy/cliAdd Localazy configuration script 🔗
In the project root folder, create a configuration script called localazy.json which tells the CLI what files to upload and how to process the downloaded translations. There are a lot of configurations that can be done, and you can have an in-depth read of them here. It’s also good to note some of the features also depend on the pricing tier being used. For example, format conversions are not available in the free tier.
// localazy.json

{
    "writeKey": "<your-apps-write-key>",
    "readKey": "<your-apps-read-key>",
    "upload": {
      "type": "json",
      "files": "src/i18n/en/*.json"
    },
    "download": {
      "files": "src/i18n/${lang}/${file}"
    },
    "conversion": {},
    "transformations": []
}
Breakdown of the code snippet above and what it does:
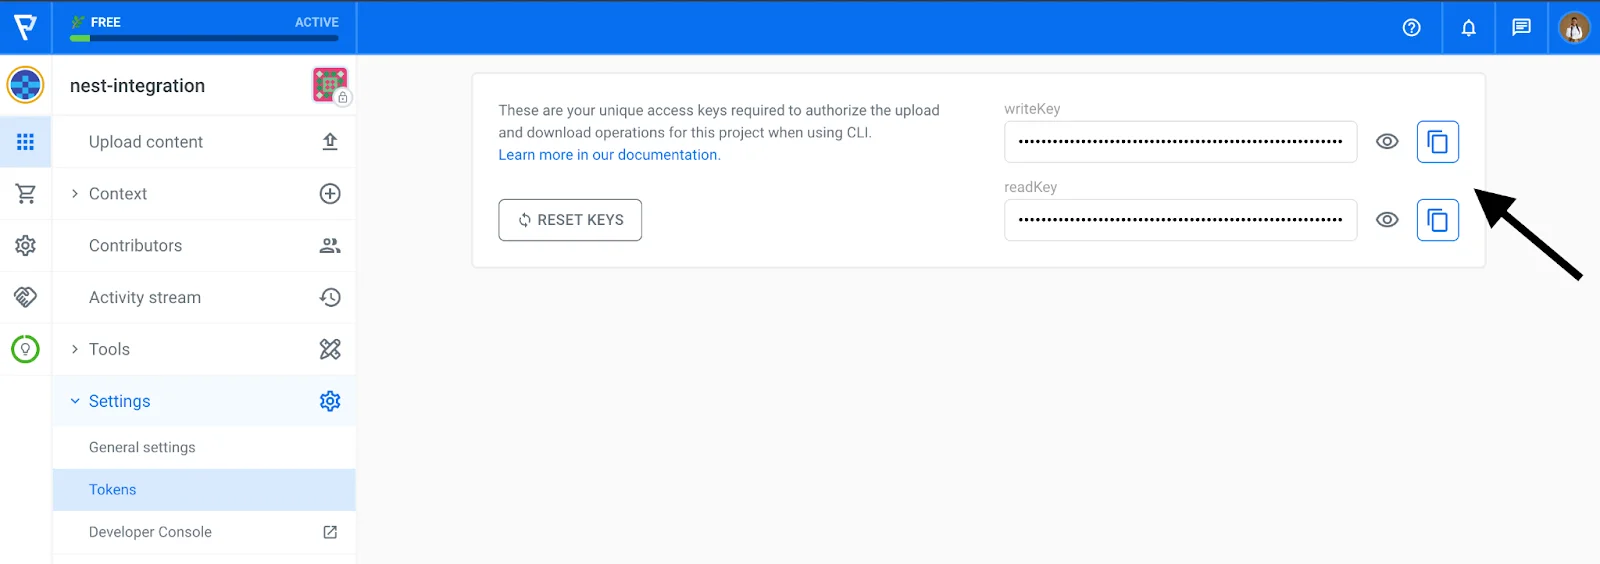
- writeKey and readKey: are used to authorize the request. Navigate to the Localazy project directory and the settings tab to copy the keys.
- upload: object specifies the type of files to be uploaded and the path of the files.
- download: object describes how to process translated files and where to store them in the directory.
- ${lang}: is a variable used to specify the language translated to using the language code such as es, de, fr, and more.
- ${file}: is used to ensure the filename remains the same under the translated locales folders when the translated files are downloaded.
- conversion: is used to specify how to process downloaded files. It could be by converting to a different file format, specifying variable replacements in files, and more. We do not need to do any conversion, so we leave it empty.
- transformations: are used to clean up paths, file names, and other parameters before files upload using the operations specified. We do not need to do any transformation, so we leave it empty.
Go to the project settings to copy the write and read key values and paste them into the localazy.json file.
Add Localazy commands to package.json 🔗
To enable working with others on the project, we would add the localazy download and upload commands in the package.json script commands to make it easily accessible.
"scripts": {
    // ... other commands
    "upload": "localazy upload",
    "download": "localazy download",
    // ... other commands
},
Note: Do not remove other commands in the scripts property
Upload files 🔗
Upload the files with the strings to be translated to the Localazy platform using:
npm run uploadView uploaded strings 🔗
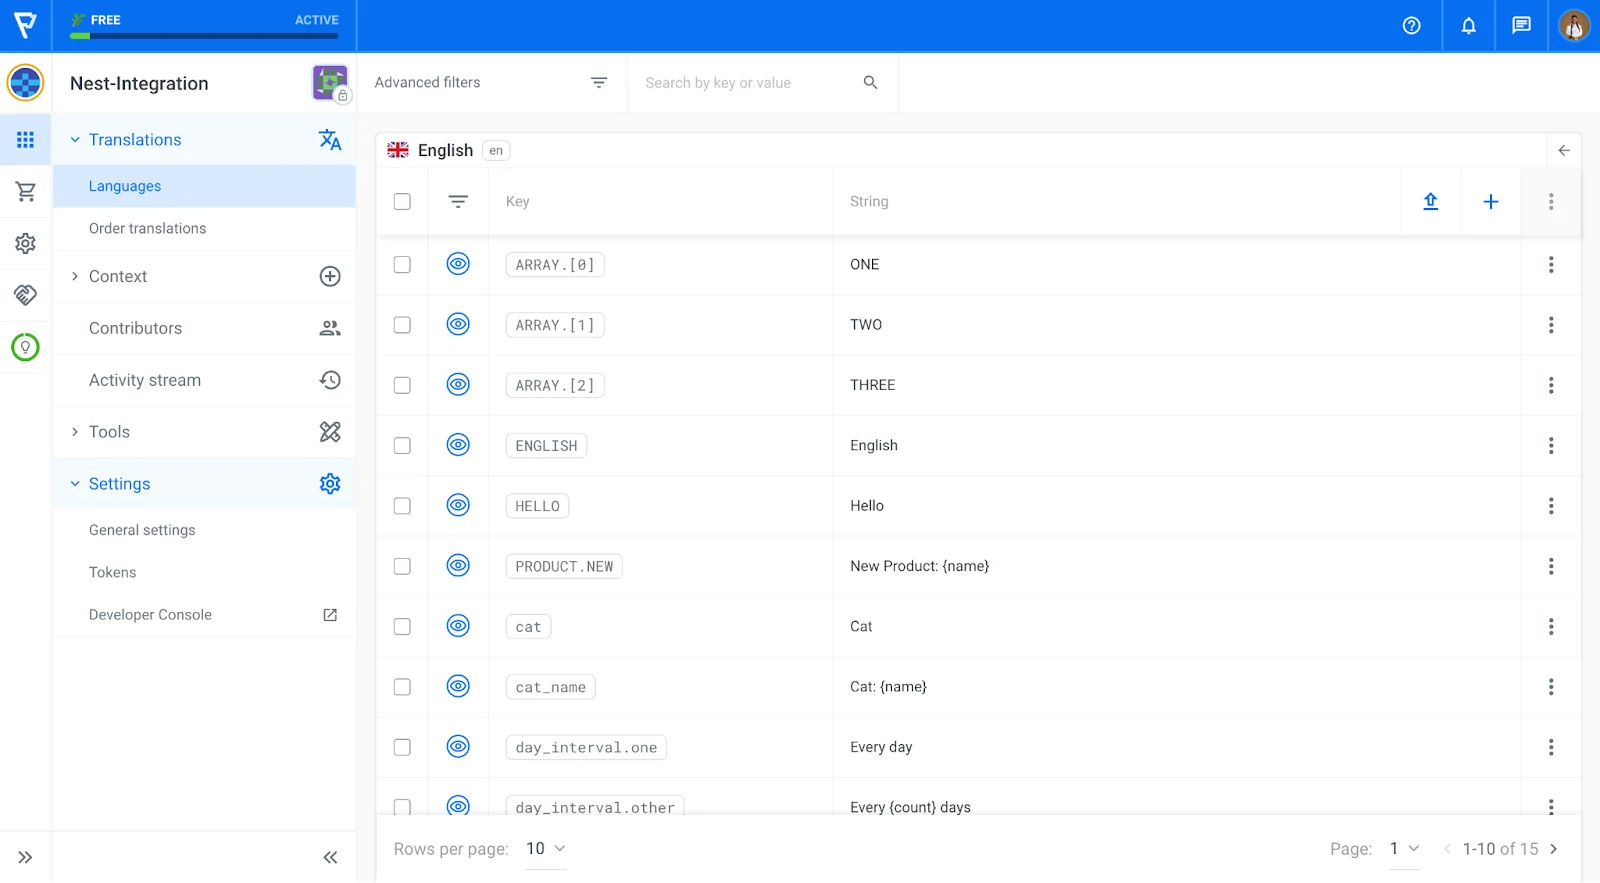
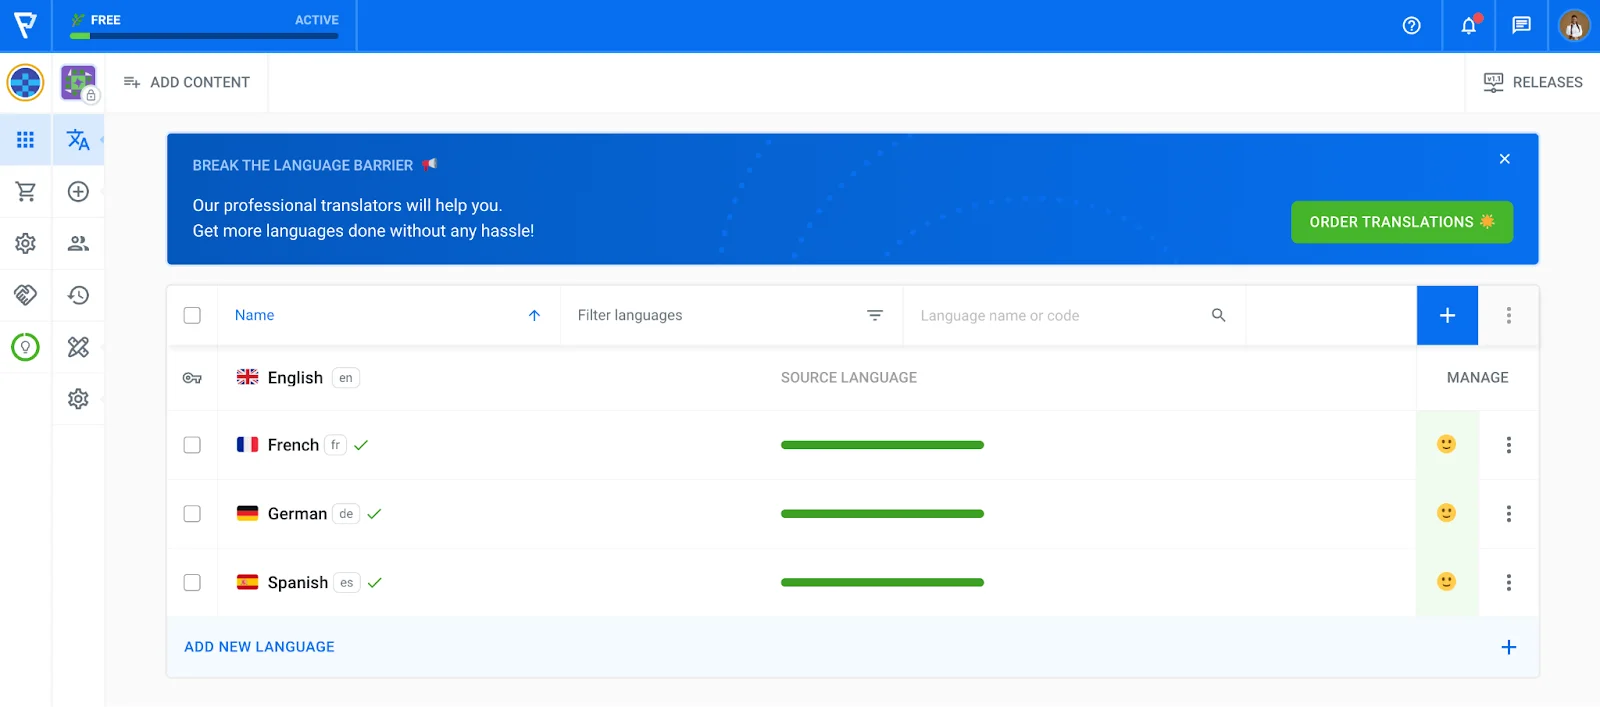
Navigate to the localazy project and view the uploaded strings by selecting the first row or clicking the Manage button. In our case, the source language is English:
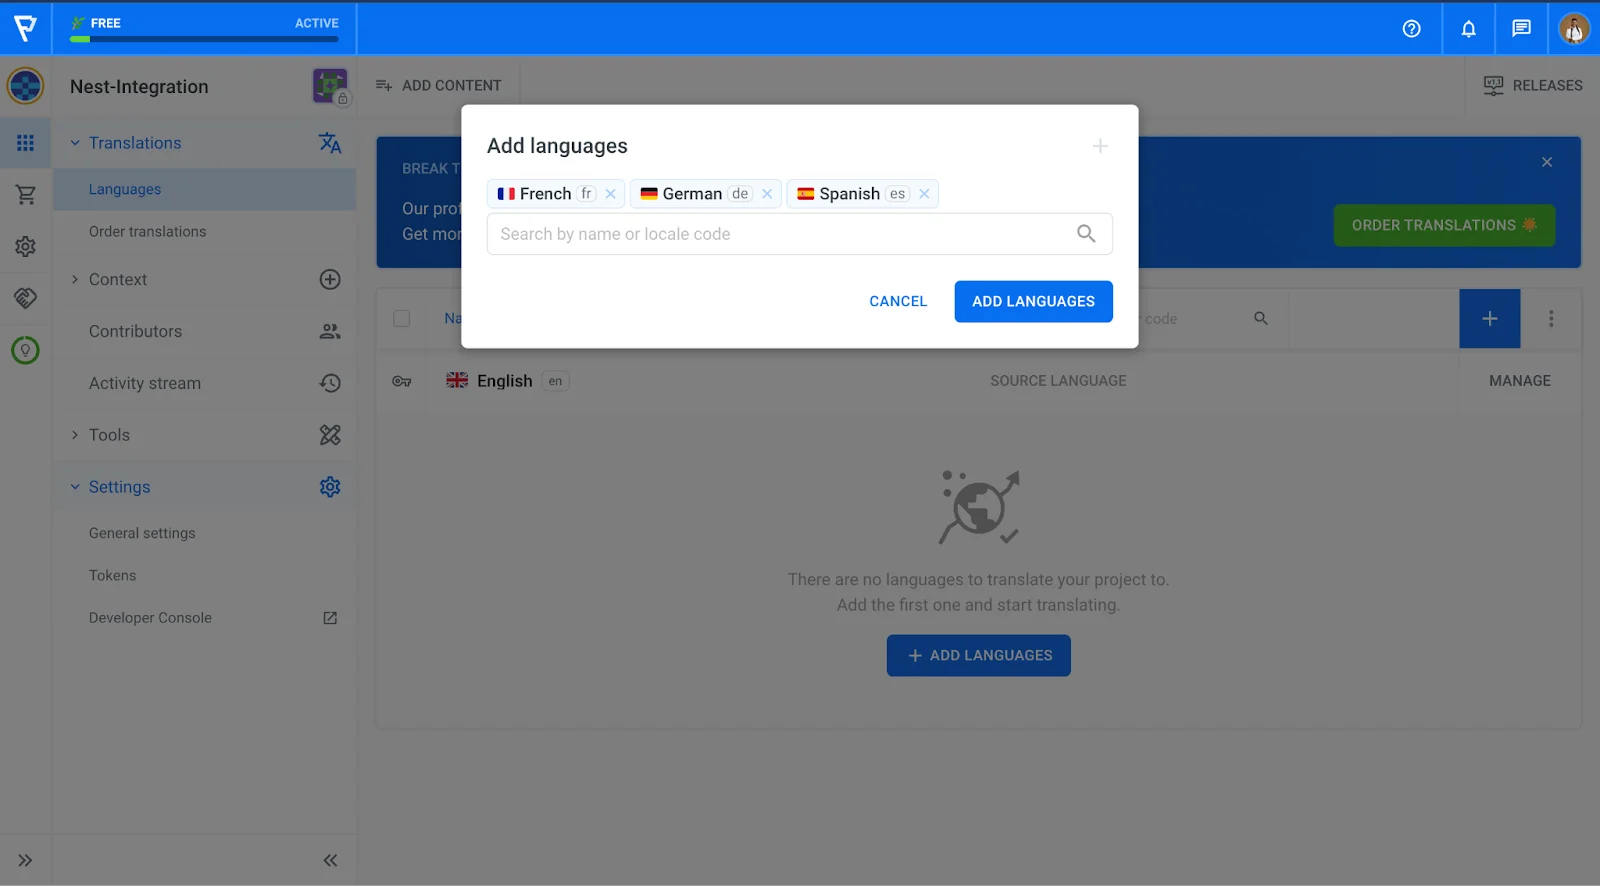
Add languages 🔗
Add the languages to be translated to by clicking the add languages button and selecting the languages. Let’s add French, German, and Spanish language.
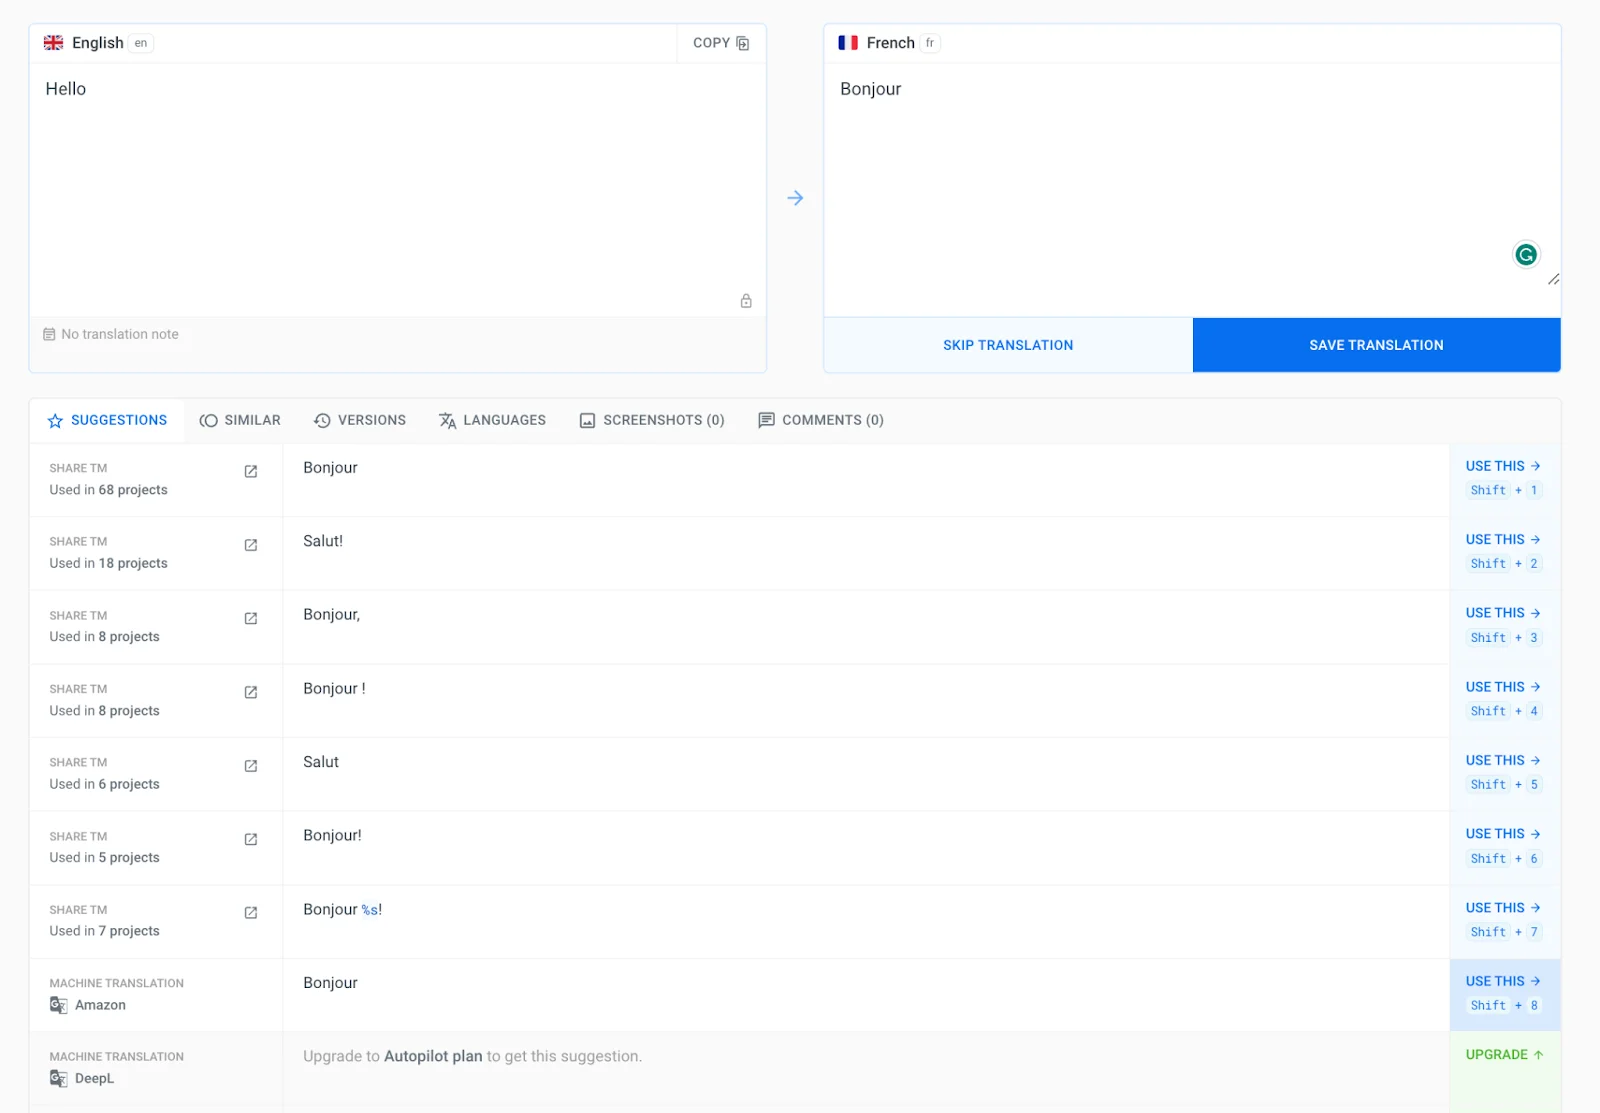
Translating on the Localazy dashboard 🔗
Localazy offers three general approaches to choose from and blend to translate your project:
- 💪🏻 Translate on your own or invite contributors - You can start translating on your own and use our built-in suggestion system.
- 🦾 Translate everything in bulk via machine translation - With the Localazy Autopilot plan, you can instantly translate all strings by running a machine translation over the content.
- 🚩 Fully automate the translation process with the Continuous Localization services - Once your Localazy integration is set up, you can order translations from our vetted translators and get your project translated by professionals automatically. The service is also proactive, so you don't have to micromanage translators, and you can visit Localazy only once in a while to check the progress.
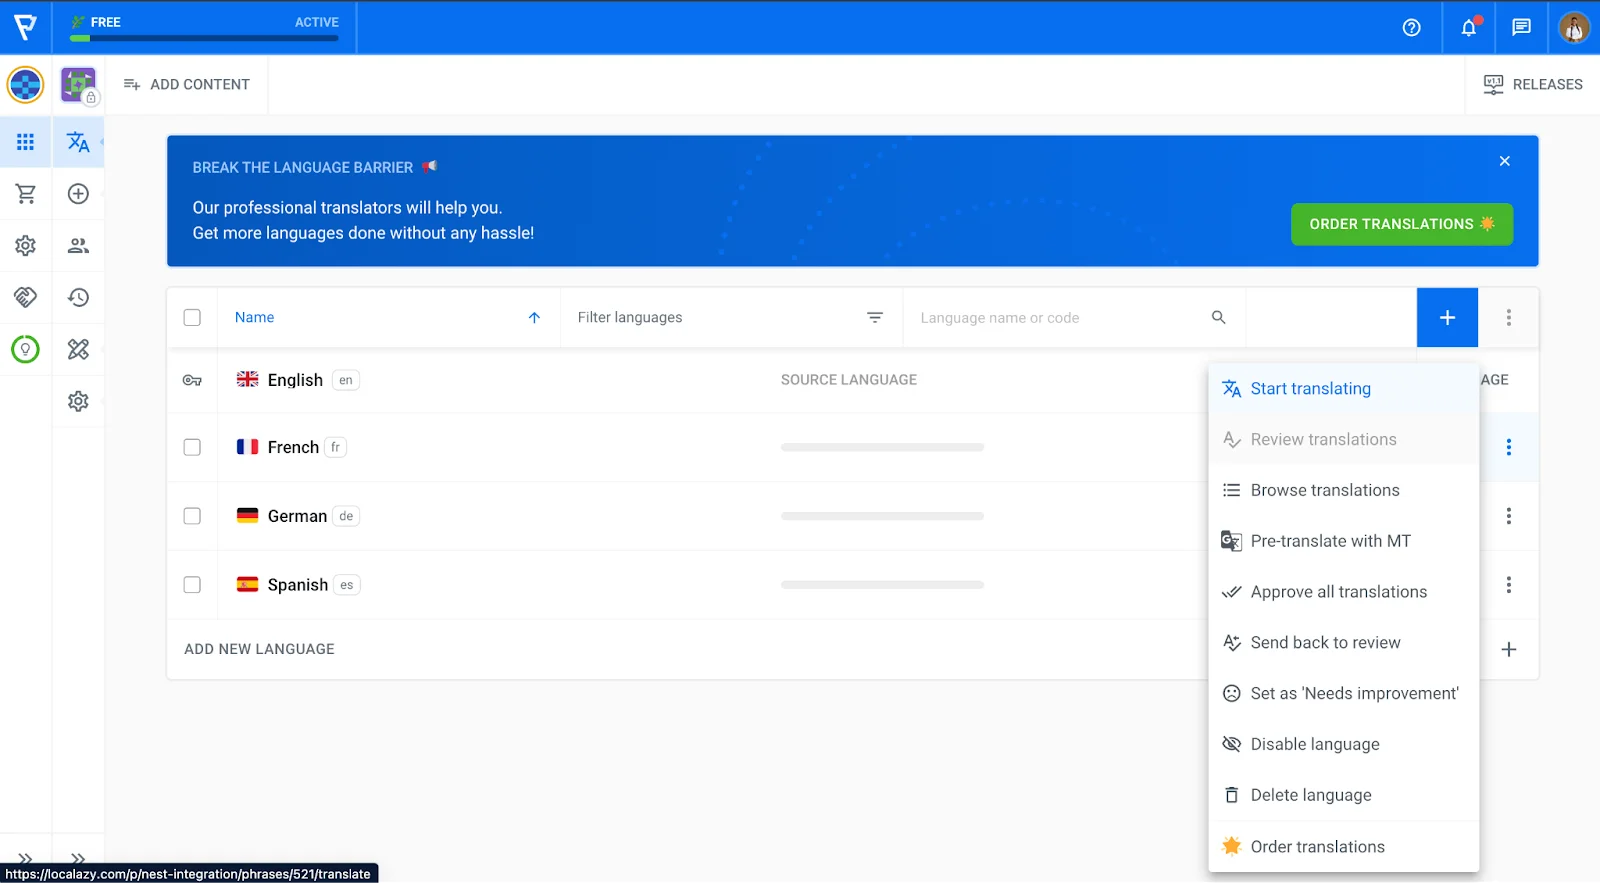
For now, we can translate on our own. To enter the translation session, go to the Translations page of your project, and click on the blue button in one of the language rows. You can also use the context menu to reveal more options:
If you are on a Free tier, you can use the Amazon machine translation suggestions or ShareTM translations to translate your texts. Do this for all the strings and all languages.
Confirm all translations have been done:
Localazy also offers continuous translations such as professional translations and proofreading, or more affordable human-assisted machine translations. Read up on these services here.
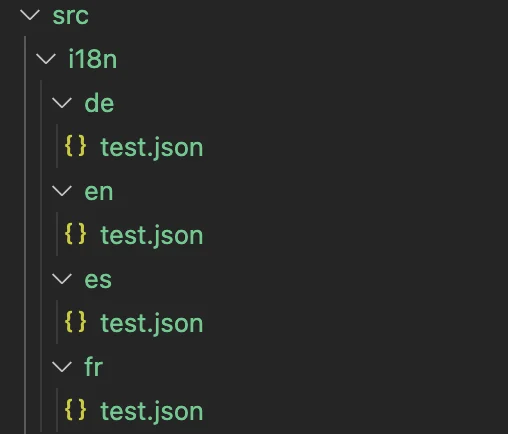
Download the translated files 🔗
Download files by running the command:
npm run downloadConfirm the successful download by viewing the files in the i18n folder:
🚩 The Translated Application 🔗
Start the application server with the command:
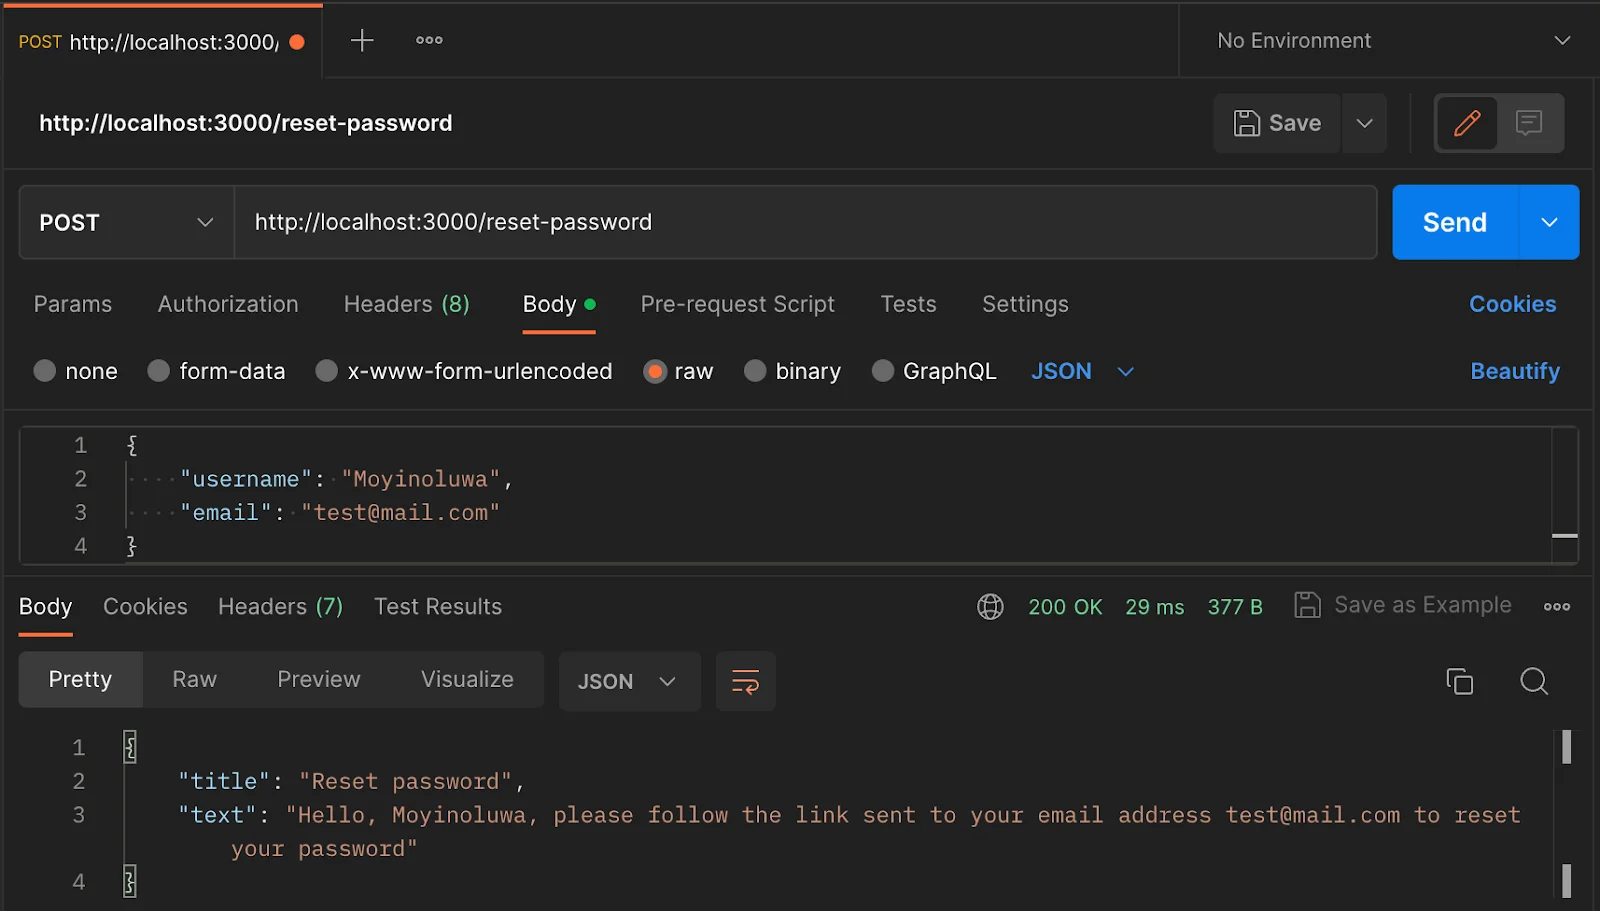
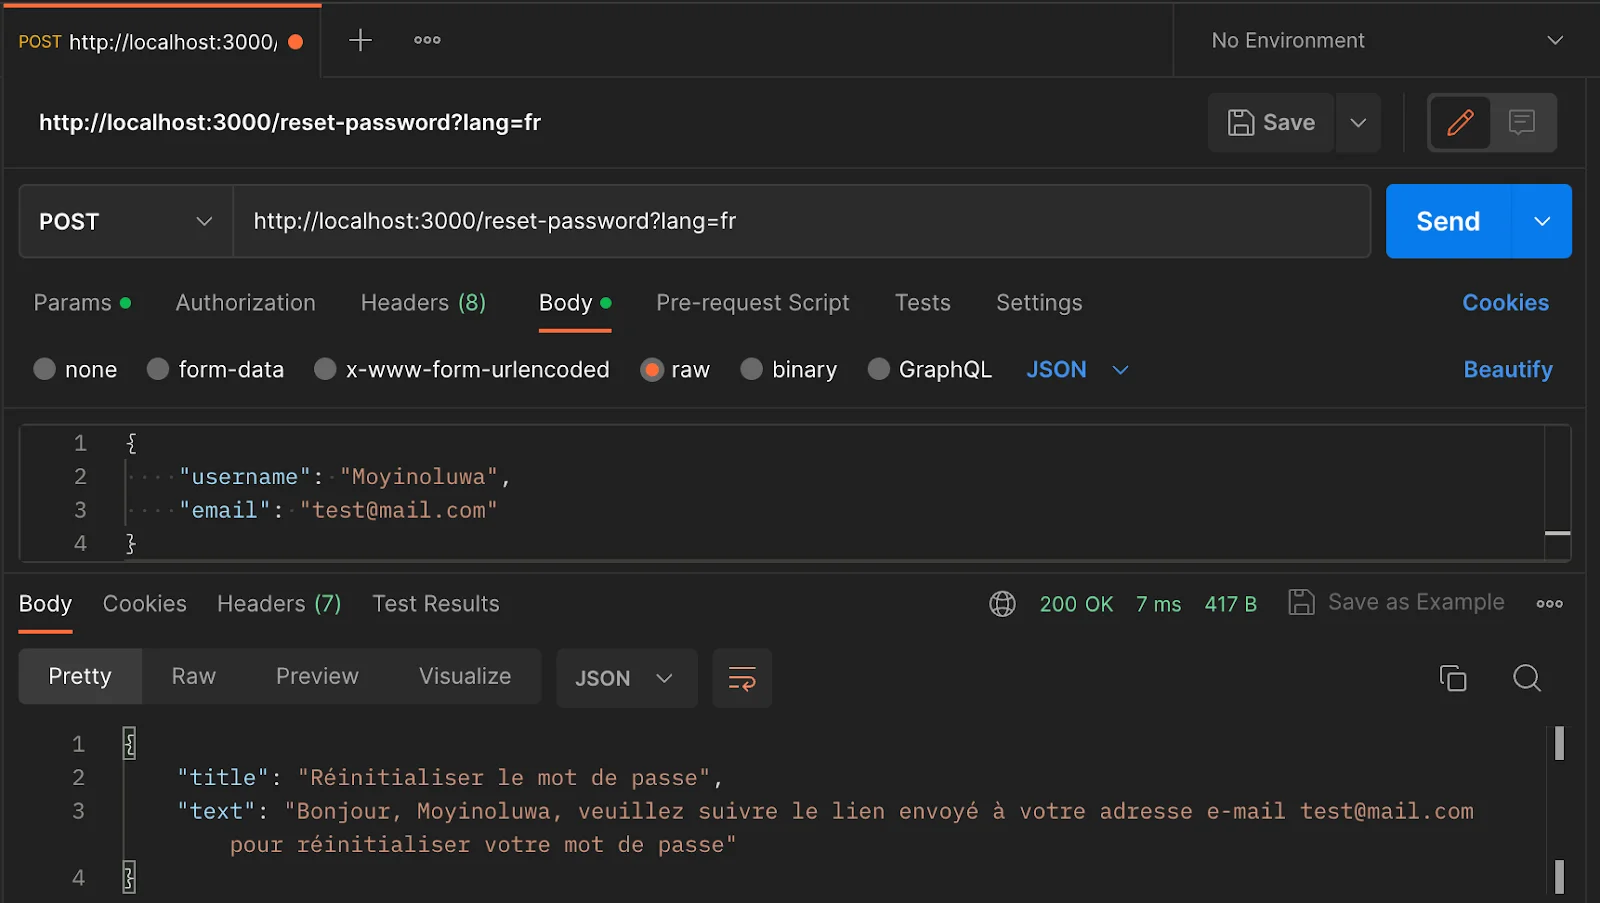
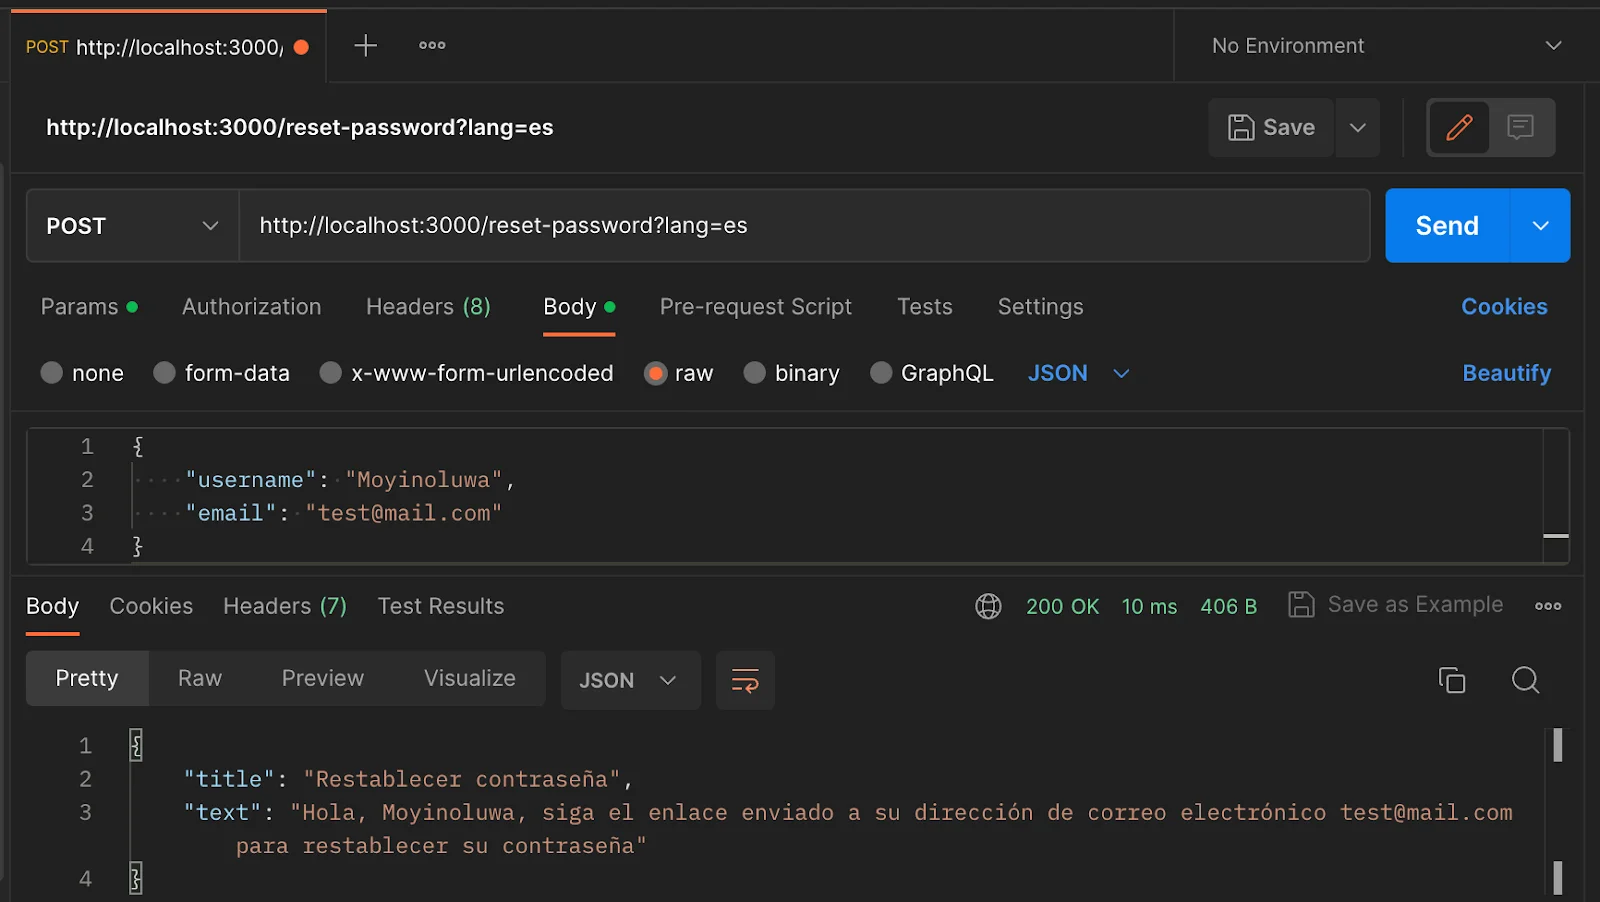
npm run start:devMake requests to the desired endpoint. We would use Postman to send requests.
Open the Postman application and send a new request to the endpoint http://localhost:3000/set-password?lang=es, passing the language as a query parameter called lang. View the response in the default language and other languages used by changing the query parameter to the language code.
✔️ Conclusion 🔗
Our application has now been localized using Localazy, and developers can focus on creating applications without worrying about translating applications to ensure it is accessible to a wide range of users.
Check out the code on GitHub here, and feel free to use it as a template for your NestJS applications by following the steps in the README.md file.